Contemplation – How to get this shot

Contemplation by Tukay Canuck
Contemplation, a photo by Tukay Canuck on Flickr.
Here’s how I got this shot.
I took an Elinchrom D-Lite 4 with a big beauty dish and gold reflector, put it on a boom arm on a C-stand, and had it camera right. It was quite a distance from the model, so I cranked it to full power (400w/s).
I put a Nikon SB900, put it on a light stand with Honl grid, and zoomed it to 200mm. It was quite close, so I powered it on manual to low power (1/64 or 1/128). The SB900 was set to SU-4 mode, so it would fire when it saw the Elinchrom fire.
The camera was set to ISO 100, 1/200sec, f11. I think the Elinchrom metered at f8, but if I had listened to my light meter I would have overexposed the background and the punchiness of the light I think is just right.
There was minimal editing of the photo, just a horizontal crop and a slight change to the white balance.

Commercial/Real-Estate Photography

For real estate, commercial, and architectural photography, you want to start with a high quality wide angle lens. You may also need a camera that is capable of doing high ISO, and you may need to supplement the environment with additional lighting.

Although you can certainly take and present decent straight-out-of-the-camera photographs for a client, but you will most likely get a better product by using professional post-processing techniques via Photoshop and various plug-in filters.

Here’s a recent photograph taken for a client. Here’s the “before” picture. Click on the image to see it close-up.

Before Processing


Although it’s a perfectly fine image, you’ll see after we touch up the lens flare, add some sharpness and detail to the image, and colour correct the photo, I think you’ll agree that the photograph stands out more. Click on the image to see it close-up.

After Processing


Here’s a summary of what was done in this example:

  • Cleaned up lens flare in Photoshop
  • Reduced noise in Lightroom
  • Added detail and sharpness in Photoshop
  • Corrected white balance in Lightroom
  • Removed television images (95% removal) in Photoshop

HDR Efex vs. Photomatix Revisited

In my previous comparison of HDR Efex versus Photomatix, I indicated that I preferred the HDR Efex as it has a simpler and more effective workflow.

One area where Photomatix is clearly better is when there is movement in the image, which could cause “ghosting” in the HDR image.

These sample images were taking using the same 5 bracketed exposures. The HDR Efex had the adaptive ghosting setting enabled, whereas the Photomatix had the semi-manual ghosting setting used.

As you can see, aside from different appearances based on settings used (which has no effect on the appearance of ghosting), the HDR efex version has some serious ghosting at the bottom of the verandah. (Not sure if that’s the technical term).

Although normally I prefer using HDR Efex for its simple workflow, there are situations such as when there is motion where Photomatix Pro excels.

About Light (and Shadow)


49/365 Unbearable

Originally uploaded by Tukay Canuck

It’s been a while since I blogged, and this entry will be short, but important.

The quality and direction of light has a huge impact on the final product.

These photographs of the same polar bear look quite different.

The first photograph was taken with diffused lighting (cloudy conditions) late morning.

Note the image looks quite two-dimensional, almost like a cardboard cutout.

The second photograph was taken in less cloudy conditions, at the end of the day with very directional light.

The light in the second photograph has a warmer colour to it, and the directional harsh nature of the light creates shadows that gives the second photograph a sense of dimension and shape.

We are three dimensional creatures – we experience the world around us in three dimensions, however photographs are two dimensional. Adding shadows to our subject allows the viewer to identify the dimension and texture of the subject.

Light and shadow isn’t always a good thing; harsh shadows aren’t always flattering for human subjects, and usually a cloudy day, such as in the first photograph, would be more aesthetically pleasing on a person.

We can’t control natural light, but we can be aware of weather conditions and the type of light we can expect at different periods of the day.

ISO Illustrated (or How I Learned To Not Fear The Noise)

Back in film days there were two things you could change on the fly to adjust your exposure, you could change the shutter speed, which determines how long you let light expose on the film, and the aperture size, which determines how much light is let in at one time and then hits the film.

Films had different sensitivities to light, also called “ISO” (or “ASA”). For argument sake, I’ll state that changing the ISO on film cameras was not something you could do “on the fly”.

Then along came digital cameras, and they also had the concept of ISO, which was a simulation of film sensitivity via how sensitive the sensor of the camera was to light.

As a photographer you may be used to changing the aperture and shutter speed to get the proper exposure. But what if you are shooting in a low light situation, you have your aperture wide open (say f2.8), and to get a proper exposure, you are shooting at 1/15 of a second. You’ll find that as things move, including the natural shake of your hand, the pictures come out blurry.

So instead of shooting at 1/15 of a second, you can bump your ISO from the default of 100 or 200, to a higher number, like 400, 800, or 1600, etc., and speed up your exposure to something more manageable, such as 1/60 of a second.

Every “doubling” of the ISO value doubles the brightness of the image, which is one “stop” brighter.

So for example if you are shooting at a fixed aperture of 2.8, and shooting at 1/60sec (a decent speed for hand holding your camera and not getting blur, most of the time), then increasing your ISO from 200 to 400 doubles the brightness of your image; and ISO 800 is twice as bright as ISO 400, etc., etc.

To summarize using an example, you are shooting indoors at a concert, and you can’t go any wider on your aperture (let’s say your lens goes to 2.8, and you are set to 2.8), and your shutter speed can’t go any slower without your hand shaking blurring the exposure, and your photos are coming out too dark, then your only option is to bump up the ISO.

The downside of bumping up the ISO is that you introduce noise. Noise is seen similar to grain in film cameras, but I would say it’s not as pleasant.

Fortunately today’s modern DSLRs are pretty good at keeping down the noise. The better the DSLR (usually meaning more $$), the better it is at handling noise.

I shoot with a Nikon D90 and a Nikon D40x. The Nikon D90 is fabulous at higher ISOs. I can shoot at ISO 800 reliably with little noise, and can shoot up to ISO 6400. ISO 1600 – 3200 has a fair bit of noise, but the pictures are still usable, particularly if you use a noise reduction software (such as Adobe Lightroom or Nik DeNoise), or convert to black and white. If you convert to black and white, the noise looks more like film grain.

Pro cameras such as the Nikon D700 and D3 handle noise even better. That’s why you pay the big bucks.

My D40x is an entry level DSLR, and the noise is pretty bad at ISOs higher than 400.

Here are some sample images of the D90 shooting in minimal lighting conditions. I shot by an LED light, shooting in manual mode at aperture f1.8 and shutter speed 1/250s. Each photograph represents one stop of ISO sensitivity. You’ll see that the photos start pretty dark, and as the ISO increases, the brightness of the photo increases, along with noise levels (look in the dark areas and within the solid colour areas for weird patterns of incorrect colour), and loss of detail. I think up to ISO 800 is very good, and ISO 1600 to maybe even 3200 is usable. Note I haven’t run any noise reduction software on these photos – when I say “usable” at 1600, I mean after cleaning up with noise reduction.

You’ll see that if I wanted a fast shutter speed to freeze action (1/250s), and I have my aperture at it’s widest (f1.8), that ISO 200 is just too dark. If I don’t have the option of slowing down my shutter, I can increase my ISO to a brighter image. ISO 200 is too dark, and I’d say ISO 6400 is getting too bright. ISO 800 and 1600 is about right, with acceptable levels of noise to work with.

Please let me know if you have any comments or questions. If you want to share links with the ISO experiments from your DSLR (read: Canon users), I would love to see the results. Just take a picture of the same object in manual mode in reasonably low light, with a fixed shutter speed and aperture, while increasing the ISO by doubling it each time.

Click on the image to zoom in to see the detail and noise. (Click on the image again to zoom in).

114
ISO 200
115
ISO 400
116
ISO 800
117
ISO 1600
118
ISO 3200
119
ISO 6400

Lightroom 3 and my workflow

I do most of my “darkroom” workflow with Adobe Lightroom (version 3). Adobe Lightroom is a very powerful and cost effective application that manages your photo library (think database), and also has very effective photo editing capabilities.

Let me break down the application into it’s five modules, and I will also quickly describe my workflow with Lightroom. The five modules are: Library, Develop, Slideshow, Web, Print.

My workflow always starts with Import to Library, Library workflow, Develop workflow, and optionally Web or Print functions.

Library

If you don’t use any software to manage your pictures, and you take as many pictures as I do, relying on your Operating System to find pictures is not an option. For example, let’s say I want to find all the pictures of my son, or all the pictures of people that I like enough to put into my portfolio. With thousands of pictures on your computer, browsing folder by folder would be daunting.

Lightroom manages your files both at the Operating System level (file system), and at a logical level via Collections.  Let me illustrate. After taking pictures, I put my SD memory card into my computer (via card reader). I then go to Lightroom’s Import Dialog. The dialog allows me to tell it where to put the files, auto naming it by date if I desire (I do), and allow me to quickly choose development presets and keywords.

Keywords are key to finding pictures again, as you can search by keyword (eg. “River”, “Model”, “Daughter”, “Sunset”), and you can even create smart collections based on keywords.

In the Library module, you can see a tree view of your computer’s folders and images; you also see the Collections, which are the logical folders you create. A photo can be a part of one or more collections, and collections can be “smart” – i.e. find photos based on criteria you provide it.

In my workflow, I have a Collection set called “Complete”, and a Collection set called “Work in progress”. These “sets” contain my collections. (Collections can be hierarchical, like folders in your computer file system).

When I add a large quantity of photos, I will create a collection under the “Work In Progress” set. Within that collection, I will make a sub collection called “picks”, which will contain all of the pictures I have flagged to indicate that I like them.

I then go through the pictures I like, and choose my favourites amongst the ones that are similar (or near identical). These go into my “selects” sub collection.

I then start developing the “selects”.

The keys to the Library module are the different representation of your photo storage: physical (file system) versus logical (collecti0ns, collection sets and smart collections).

The Library module manages your metadata (keywords and camera settings). It also allows you to tag images by colour flag, by rating (1 to 5), or by “pick” or “reject”. I mostly use “pick” or “reject” to sort through my images, and I use the colour flags to indicate “processed” and “exported” (e.g. to web).

Develop

The develop module allows you to do common photo development and correction, such as converting to black and white, fixing colours and exposure, minor blemish touch up, etc. This description definitely understates how powerful the develop module is; however for advanced editing, such as the need of a “clone brush” for certain photos, or if layers are required, another photo editor, such as Photoshop, is required. Lightroom integrates with Photoshop naturally.

In my workflow, for serious editing, I export photos to Photoshop Elements. Once I am finished editing in Elements, I will re-import the adjusted image back into Lightroom.

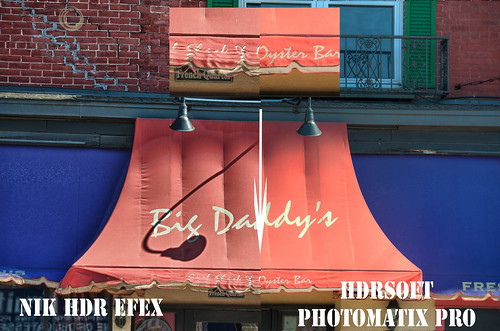
Other external editors that I export to from Lightroom include Photomatix, for HDR images (merging 3 images of different exposures), and Topaz plug-ins. I’ve discussed Photomatix in a previous post. Topaz plug-ins are very powerful plugins that provide “filter” effects, such as detail enhancement, colour modifications, and noise reduction. Oh did I mention that Lightroom 3 has superb noise reduction capability too?

Lightroom allows you to specify external editors, and being able to open a photo for editing in other editors right from the Lightroom interface is invaluable to my workflow.

Slideshow

The slideshow module allows you to create slideshows of your pictures. I don’t use this much, but it’s a cool feature should I ever want a slideshow. 😀

Web

This module allows you to publish photos to your website for your portfolio or for customers. This is so easy and powerful, you have to see it to believe it. There are a few templates you can choose from, and Lightroom will automatically create the webpage and upload it to your website (provided you give it the right login information).

There are other great web templates you can download for free and for purchase. I personally like the templates from the Turning Gate (http://theturninggate.net/)

Print

The print module is a powerful print engine that allows you to layout and print (with many options) your photos. Since I mostly outsource my printing, this module is rarely used in my workflow.

Exporting

While this isn’t a module per se, exporting is a huge part of my workflow. With many available plugins available for Lightroom, I can easily export photos to Flickr (a photo sharing site) or Facebook, with my favourite settings remembered. You can see many of the images I have exported from Lightroom in my Flickr stream: http://www.flickr.com/photos/focusonottawa/.

Need your help!

Focus on Ottawa needs your help! It will not cost you a dime though, and it will not take much of your time.

Focus on Ottawa is looking for a new logo. We have started a contest for graphic artists to submit logos for consideration. Now we need your help to decide which one to choose.

Take a look at the submissions at the following website:

http://www.crowdspring.com/project/2287769_photography-company-simple-logo/

Please vote on your favourite by indicating the artist name and a brief description – unfortunately the submissions are not indexed in any way.

You can let me know via comment here, via tweet at @tukaycanuck, or email at information@focusonottawa.com, or our Facebook page.

The deadline is in a couple of days. Thanks for your assistance!

The best camera…


Humid

Originally uploaded by Tukay Canuck

World renowned photographer Chase Jarvis says “The best camera is the one you have with you.”

My camera was in the shop for repairs, and I saw this flower. I could have kept walking past it, resigning to the fact that I didn’t have my good SLR camera with me. But instead I took this picture with my phone (iphone). And I think it turned out pretty good.

Most people have cameras on their phones, which means most people always have a camera with them. So if you see something interesting and you don’t happen to have your SLR with you, don’t give up. You could have a top end super camera, but if you come across something rare and extraordinary, the best camera isn’t your top end camera, it’s the one you have with you.

Lens compression (Perspective Distortion)

Lens compression is a peculiar effect that occurs when you change the focal length of the lens.

There are two effects of changing your focal length (either by zooming in and out with your telephoto, and/or changing to a different lens size on your SLR camera).

The first effect is the potential distortion of your subject at a small focal length, such as at 16mm, or a flattering perspective at a larger focal length (such as at 200mm).

The second effect is the relative size of background objects in relation to your subject.

Let’s take a look at these two effects in an example.

When you look at these images, if you haven’t seen this effect before, it can be quite astonishing. There’s no trickery here – we didn’t move the trees or the model or the vehicles in the background. This is all done by changing the focal length of the lens and repositioning the camera either further or closer to the subject (the model).

Focal length of 86mm

In the first image, note how flattering the capture of the model is. There is no distortion of the appearance of her body.

Also note how close the black truck and the background tree appear to be in relation to the foreground tree and model.

Continue reading “Lens compression (Perspective Distortion)”

Posing help

Posing
Posing

If you are an aspiring model, you should check out this link. It has great tips on posing, and other things you should concern yourself with when modeling.

This is also a great resource if you are a photographer learning to pose models.