Depth of field

You’ve probably heard the term “depth of field” before, but like many photographers, it may be a concept hard to visualize. I find the best way to understand things is by example, so here it goes.

Before we get to the example, let’s talk theory. Some of this I’ve already discussed, so please forgive the repetition. When the aperture (that’s the opening) of your lens is very wide, it lets in a lot of light. A wide aperture confusingly is given a small “f-stop” number, such as f1.4 or f2.8. When the aperture is very narrow, it lets in less light. This is given a larger f-stop number, such as f22 or f30. And there’s a whole slew of f-stop ranges in between ranging from wide open to almost completely closed.

A wider open aperture lets in more light, and therefore the shutter doesn’t need to be open as long as when you have a narrow aperture. This means to take the same exposure of the same photo, you will need to have a very slow shutter speed for a narrower aperture. Faster is better because you can hand hold the camera to take photos, and capture high speed action, right? Well that’s technically true, but there’s another factor in play here : depth of field.

A wider open aperture (e.g. f1.4) has a narrower depth of field. A narrow depth of field means things that you aren’t focusing on are blurry.

A narrower aperture (e.g. f22) has a much wider depth of field, meaning more of your composition will be in focus.

These facts are neither good nor bad – they just are.

Sometimes you want a wide depth of field, such as when you are doing landscape photography and you want the foreground and the background all in focus. Since you want a very narrow aperture, exposure time will be longer, so you’ll probably be using a tripod.

Why wouldn’t you always want as much as you can in focus, and use this wide depth of field? Many point and shoots try to give you as much depth of field as possible. In my opinion, this is not usually desirable.

When taking portraiture, a narrow depth of field helps isolate the subject, the person, from the background. If the background is tack sharp, that could distract from the subject that you are trying to focus on. Many beginner photographers try to get as much information in the scene, but this in the end makes for a boring scene. Simplicity and focus on the subject usually wins out. If you don’t believe me, take a look at the best photojournalism photos (e.g. http://www.boston.com/bigpicture/)

More expensive lenses are expensive because they are faster, which is another way of saying they have a wider aperture (or smaller f-stop number – this is confusing at first, I know).

One more thing – depth of field is not only controlled by the size of your aperture, but by your distance from the subject. The closer you are, the narrow the depth of field.
You can even use your eyes to prove this one out. Focus on something very close to you, and everything else (including things relatively close) is blurry. Focus on something farther away, and more objects are in focus.

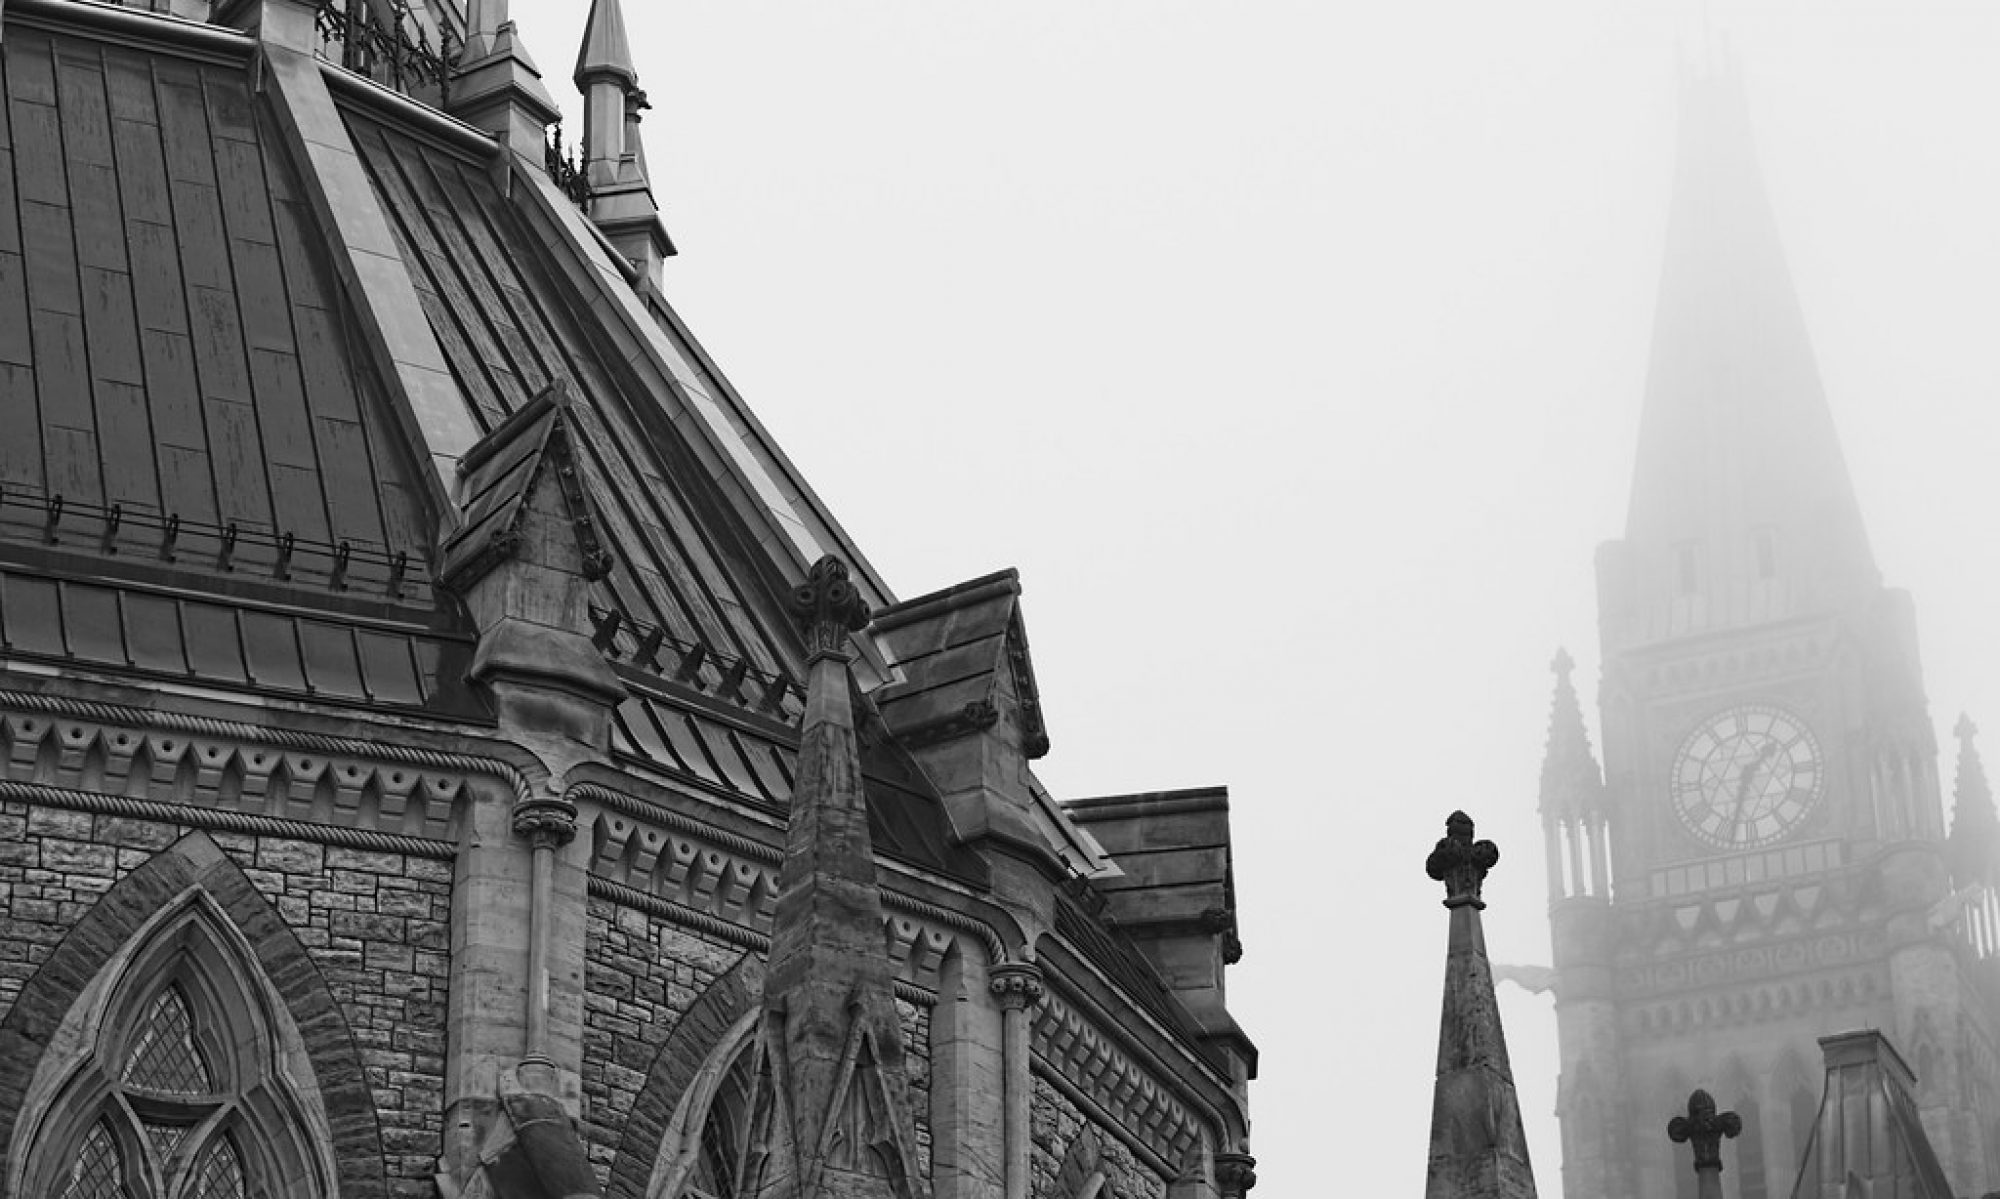
Okay – as promised, here are some examples to illustrate how the aperture controls the depth of field. I’m focusing on something fairly close to the lens, and note how the narrower the aperture, the more in focus the background building becomes. You can hopefully see how this can be used for creative control – neither the in focus nor the out of focus photos are better or worse than each other, they just produce a different outcome.

f22 - narrow aperture, wide depth of field
f2.8 - wide aperture, narrow depth of field

Depth of Field Link

I am eventually going to post some pictures to depict what depth of field means and how to use it creatively, but I stumbled upon this great link that illustrates the point as well as I can explain it. Enjoy!


Commercial/Real-Estate Photography

For real estate, commercial, and architectural photography, you want to start with a high quality wide angle lens. You may also need a camera that is capable of doing high ISO, and you may need to supplement the environment with additional lighting.

Although you can certainly take and present decent straight-out-of-the-camera photographs for a client, but you will most likely get a better product by using professional post-processing techniques via Photoshop and various plug-in filters.

Here’s a recent photograph taken for a client. Here’s the “before” picture. Click on the image to see it close-up.

Before Processing


Although it’s a perfectly fine image, you’ll see after we touch up the lens flare, add some sharpness and detail to the image, and colour correct the photo, I think you’ll agree that the photograph stands out more. Click on the image to see it close-up.

After Processing


Here’s a summary of what was done in this example:

  • Cleaned up lens flare in Photoshop
  • Reduced noise in Lightroom
  • Added detail and sharpness in Photoshop
  • Corrected white balance in Lightroom
  • Removed television images (95% removal) in Photoshop

ISO Illustrated (or How I Learned To Not Fear The Noise)

Back in film days there were two things you could change on the fly to adjust your exposure, you could change the shutter speed, which determines how long you let light expose on the film, and the aperture size, which determines how much light is let in at one time and then hits the film.

Films had different sensitivities to light, also called “ISO” (or “ASA”). For argument sake, I’ll state that changing the ISO on film cameras was not something you could do “on the fly”.

Then along came digital cameras, and they also had the concept of ISO, which was a simulation of film sensitivity via how sensitive the sensor of the camera was to light.

As a photographer you may be used to changing the aperture and shutter speed to get the proper exposure. But what if you are shooting in a low light situation, you have your aperture wide open (say f2.8), and to get a proper exposure, you are shooting at 1/15 of a second. You’ll find that as things move, including the natural shake of your hand, the pictures come out blurry.

So instead of shooting at 1/15 of a second, you can bump your ISO from the default of 100 or 200, to a higher number, like 400, 800, or 1600, etc., and speed up your exposure to something more manageable, such as 1/60 of a second.

Every “doubling” of the ISO value doubles the brightness of the image, which is one “stop” brighter.

So for example if you are shooting at a fixed aperture of 2.8, and shooting at 1/60sec (a decent speed for hand holding your camera and not getting blur, most of the time), then increasing your ISO from 200 to 400 doubles the brightness of your image; and ISO 800 is twice as bright as ISO 400, etc., etc.

To summarize using an example, you are shooting indoors at a concert, and you can’t go any wider on your aperture (let’s say your lens goes to 2.8, and you are set to 2.8), and your shutter speed can’t go any slower without your hand shaking blurring the exposure, and your photos are coming out too dark, then your only option is to bump up the ISO.

The downside of bumping up the ISO is that you introduce noise. Noise is seen similar to grain in film cameras, but I would say it’s not as pleasant.

Fortunately today’s modern DSLRs are pretty good at keeping down the noise. The better the DSLR (usually meaning more $$), the better it is at handling noise.

I shoot with a Nikon D90 and a Nikon D40x. The Nikon D90 is fabulous at higher ISOs. I can shoot at ISO 800 reliably with little noise, and can shoot up to ISO 6400. ISO 1600 – 3200 has a fair bit of noise, but the pictures are still usable, particularly if you use a noise reduction software (such as Adobe Lightroom or Nik DeNoise), or convert to black and white. If you convert to black and white, the noise looks more like film grain.

Pro cameras such as the Nikon D700 and D3 handle noise even better. That’s why you pay the big bucks.

My D40x is an entry level DSLR, and the noise is pretty bad at ISOs higher than 400.

Here are some sample images of the D90 shooting in minimal lighting conditions. I shot by an LED light, shooting in manual mode at aperture f1.8 and shutter speed 1/250s. Each photograph represents one stop of ISO sensitivity. You’ll see that the photos start pretty dark, and as the ISO increases, the brightness of the photo increases, along with noise levels (look in the dark areas and within the solid colour areas for weird patterns of incorrect colour), and loss of detail. I think up to ISO 800 is very good, and ISO 1600 to maybe even 3200 is usable. Note I haven’t run any noise reduction software on these photos – when I say “usable” at 1600, I mean after cleaning up with noise reduction.

You’ll see that if I wanted a fast shutter speed to freeze action (1/250s), and I have my aperture at it’s widest (f1.8), that ISO 200 is just too dark. If I don’t have the option of slowing down my shutter, I can increase my ISO to a brighter image. ISO 200 is too dark, and I’d say ISO 6400 is getting too bright. ISO 800 and 1600 is about right, with acceptable levels of noise to work with.

Please let me know if you have any comments or questions. If you want to share links with the ISO experiments from your DSLR (read: Canon users), I would love to see the results. Just take a picture of the same object in manual mode in reasonably low light, with a fixed shutter speed and aperture, while increasing the ISO by doubling it each time.

Click on the image to zoom in to see the detail and noise. (Click on the image again to zoom in).

114
ISO 200
115
ISO 400
116
ISO 800
117
ISO 1600
118
ISO 3200
119
ISO 6400

“What a nice, sunny day for taking pictures”

One of the biggest misconceptions I hear from people is that a nice sunny day is a good time to take pictures. Wrong.

The sun is a harsh light source. It creates harsh shadows that are not flattering on even the most beautiful of us.

One of the best times to take photos is when it’s cloudy out. Clouds act as a giant diffuser, casting soft light on your subject and removing the harsh contrast of shadows.

Direct sunlight can lead to harsh unflattering shadows

So let’s say you know that the sun is bad, so let’s move the subject under the shadow of trees. Wrong! Unless the trees cast an absolute shadow on your subject, any light shining through the leaves creates nasty distracting contrast.

Shadow from trees looks better than direct light, but light shining through the trees is distracting

If there isn’t a cloud in the sky, you have more options.

1) Shoot with the sun at the subject’s back, and add a bit of flash or reflector to light up their face. The sun will act as a hairlight, and the reflector or flash should add a hint of light to fill in the shadows and bring out the subject’s features. You can place the subject between the camera and the sun, so you don’t get flare from the sun, and the sun casts a nice halo behind your subject.

2) Shoot the subject in perfect shade. Even if it seems dark relative to in direct sunlight, it’s probably bright enough for your camera. If not, add a bit of flash.

3) Add a diffusion panel between the sun and your subject. This is a semi-transparent material (even a bed sheet will work). This is a bit harder because you will need 1-2 assistants to hold the panel, and if it’s windy, good luck. But the results are like shooting in a cloudy day or having a giant softbox.

Shooting with the sun behind the subject looks best, with flash or reflector to fill in the shadows

I also prefer to shoot in the morning or evening, when the sun isn’t directly overhead. Overhead sun is the harshest, and can leave shadows in the subject’s eye sockets. A reflector or flash fill will help, but getting good results at noon is a tricky proposition. Evening sun at sunset casts a warmer light, and looks better.

Lens compression (Perspective Distortion)

Lens compression is a peculiar effect that occurs when you change the focal length of the lens.

There are two effects of changing your focal length (either by zooming in and out with your telephoto, and/or changing to a different lens size on your SLR camera).

The first effect is the potential distortion of your subject at a small focal length, such as at 16mm, or a flattering perspective at a larger focal length (such as at 200mm).

The second effect is the relative size of background objects in relation to your subject.

Let’s take a look at these two effects in an example.

When you look at these images, if you haven’t seen this effect before, it can be quite astonishing. There’s no trickery here – we didn’t move the trees or the model or the vehicles in the background. This is all done by changing the focal length of the lens and repositioning the camera either further or closer to the subject (the model).

Focal length of 86mm

In the first image, note how flattering the capture of the model is. There is no distortion of the appearance of her body.

Also note how close the black truck and the background tree appear to be in relation to the foreground tree and model.

Continue reading “Lens compression (Perspective Distortion)”

Product Photography


34/365

Originally uploaded by Tukay Canuck

How to get this type of shot.

This was shot on a glass coffee table.

First, clean the coffee table thoroughly with glass cleaner.

Next, tape black construction paper to the bottom of the glass, near the rear of the table.

Thirdly, prop a black background in behind. I used the black side of a circular reflector (the “gobo” side).

For the lighting, I used a ring flash, which is a circular flash that wraps around the lens. This is good for macro and product photography.

I also used a remote flash off to the left side.
I held a white reflector on the right side to fill in the shadows a bit (I actually used some paper towels, as they were handy).

Because I was holding the paper towels, I had the camera on a tripod and I set it to timer mode, so I had time to press the button, then hold up the white reflector.

For the beer can, I sprayed it with a water bottle to give it more beads of water.

Et voila.

After the “money shot” was verified, I enjoyed the beer.

…To not snoot


Self Portrait 2

Originally uploaded by Tukay Canuck

Here is the same setup, but by bouncing the light from the flash off the ceiling, and using the Honl snoot as a bounce card instead. (The bounce card catches some of the light from the flash and sends it into my eyes, where the rest of the light is soft and diffused as it is spread out from the ceiling).

You’ll observe that this picture is a lot softer, less harsh, and arguably less dramatic.

Extra details: The SB900 flash, is off camera, left of the camera. It is angled 45 degrees towards the ceiling, and a bounce card is used to bounce some of the light straight at me instead of towards the ceiling.

To snoot or not to snoot?


Self Portrait 1

Originally uploaded by Tukay Canuck

A snoot is a device that narrows the light from a strobe to make a harsher, narrower field of light. This is a self portrait using an SB900 flash, with a Honl 5″ snoot, camera left. (i.e. the flash is NOT attached to the camera, but triggered remotely).

The next post will show you what it looks like without the snoot.

Panorama How To


Champlain Lookout Pano

Originally uploaded by Tukay Canuck

A panorama can be a cool effect for landscape portraits. Panoramas are much easier to do these days with digital cameras.
You don’t have to buy a special panorama camera, or do anything too complicated. There are some basic steps to get a good panorama though.
Here are some tips on how to get a panorama.

1) Use a tripod. This is more of a rule than a tip – don’t even try to build a panorama by hand holding the camera.
Put the camera on a tripod. If your tripod has levels (like the ones used for carpentry), you should use them to make sure your tripod (camera) is level.

2) Put your camera in portrait orientation. This means sideways (normal orientation is called “landscape”). Your tripod should allow this. If not, you should probably invest in a better tripod.

3) Take an exposure reading. You can do this by putting your camera in (A)perture priority, setting it to a high F-stop number (like F22), and pressing the shutter release button down halfway, if you’re using an SLR (or most point and shoot models). The camera will give you an aperture reading and a shutter speed reading.

4) Put your camera in (M)anual mode, and dial in the settings from the previous step. The reason you are doing this is because you will be taking multiple shots, and your camera might have different readings depending
on how bright the sky is or ground is in different places. You don’t want to have different exposures if you are stitching them together – it will look weird. Otherwise, you will be spending a lot of time in post processing
matching the brightness of each picture. You also want to ensure you use the same aperture across all pictures, otherwise things could be blurry in some pictures, but in focus in the next. This will
also make the stitching look weird.

5) Take a picture of your hand or something, indicating the start of your series.

6) Now start shooting. Take a picture, rotate the tripod a bit, take another. You should use a remote, or the timer on the camera, to ensure no camera shake. This will also let you use a longer exposure if it’s getting dark out.
(You probably want to shoot in a higher f-stop number, like f11 -> f22. This will put more of the foreground/background in focus. Since you are shooting on a tripod with a remote or a timer, you don’t need to worry about camera shake)
The more pictures you take, the smoother the stitching will be. (i.e. smaller rotational increments). e.g. 8-15 pictures for a 180 degree view.

7) Mark your last picture with your hand or something, to indicate the end of the series. This will make it easier when you are reviewing your pictures on the computer to see which photos are a part of your pano.

8 ) Use stitching software, like Hugin: http://hugin.sourceforge.net/download/

9) You’re done! Post the picture so others can enjoy.