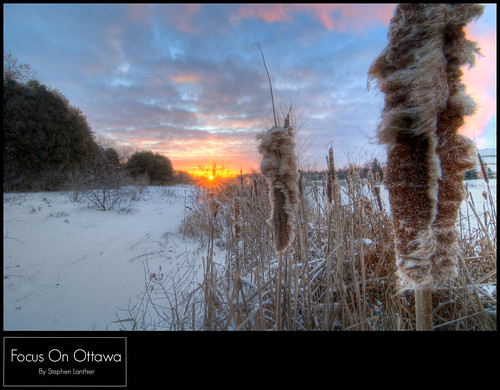
Yes it’s cold out, but that’s no excuse to stay indoors. Get out there and shoot; winter in Canada is gorgeous.
If you are shooting with an SLR, there are some precautions you should take.
1) Keep your batteries warm. You should have at least a couple of batteries for your SLR. Keep one battery close to your body (inside your jacket, in your underwear, etc). Switch batteries every once in a while to keep them both warm. Even if you have a battery grip on your camera that holds two batteries like I do, only keep one battery in the camera. Of course this is true for batteries in your flash, if you are shooting with off-camera flash.
2) Dress warm. Duh!
3) Protect your camera. If it’s snowing, or there’s a risk of dropping your camera, get one of those camera raincoats. eBay is a good place to get these – retail stores charge way too much for them.
5) Wear rubber gloves. I buy disposable latex gloves in bulk. I wear the gloves under my winter gloves mitts. Sometimes you need a level of dexterity that requires you to remove your winter gloves. Having rubber gloves on protects you a little bit from the cold, but more importantly, from the wind. As an oddball bonus, you won’t accidentally leave any finger prints on your lens.
6) When you bring your camera indoors, the quick temperature change might create condensation in the lens, and that’s a bad thing. Put the lens(es) in large ziplock bags – the bag will attract the condensation, thus reducing the risk of condensation within the lens assembly.
Here are some tips for good winter photography:
1) Use a tripod. This is true in any season, but it’s a good tip.
2) Overexpose. Unless you are shooting (M)anual, your camera will want to make the snow 18% gray. That’s how cameras meter. You must convince your camera that snow is supposed to be white. Set your exposure compensation (the button with the +/-) to +1. Take a test shot, and adjust if necessary. It’s okay if your snow is blown out (too bright), if your subject is something other than the snow.
When doing studio shooting, there is practically an infinite combination of lighting setups that you can use in your arsenal. Before going wild with lighting setups, it is helpful to understand the basics of studio lighting and lighting ratios.
Let’s talk about the basics of lighting components before talking about lighting ratios.
One common setup is with the use of three lights. There is the key light, the fill light, and the back light.
The key light is the main light, and is used to add light to the subject, representing the sun.
The fill light adds light to the shadows of the subject. The fill light is at most as bright as the key light, but is typically darker (hence “fill”).
The back light (highlight, kicker, hair light) adds light from behind of the subject, to help separate the subject from the background. For example, if photographing a model wearing black clothing in front of a black background, you wouldn’t be able to see their outline without some light source. The back light is at least as bright as the key light, but often brighter.
Now to describe the lighting setup, we use light ratios. Light ratios measure the ratios between the f-stop numbers of the light source.
Let’s have a quick crash course on f-stop numbers. An f-stop number represents the ratio of the focal length of the lens, divided by the diameter of the aperture. Every f-stop increment (larger f-stop number) corresponds to half the light entering the camera; i.e. f11 will let in half the light of f8.
The standard f-stop scale is represented by a factor of √2, or about 1.4 per stop:
For a more detailed discussion on f-stops (f-numbers), please consult Wikipedia.
When speaking of lighting, if you measure the light using a light meter (or the built in light meter in your camera), by keeping the shutter speed and ISO setting consistent and adjusting the light output of each light, you will get a reading of the f-stop number required to properly expose the image. (Lighting is measured by turning off the other lights, and only testing one light at a time).
So lighting at f8 is half as bright as lighting at f11, meaning you need a smaller aperture so as to not over-expose the image.
The lighting ratio can be described as the key to shadow ratio, which is the ratio of the key light to the fill light. The key light is always represented by a factor of 1, and the shadow ratio is a factor of fill light with respect to the key light. A 1:1 ratio means the fill light is the same as the key light. A 1:2 ratio means the fill light is half as bright as the key light. This would be one f-stop of lighting difference – for example f8 of key light and f11 of fill light. A 1:4 ratio is two f-stops of difference (since every f-stop is a doubling of brightness). A 1:8 ratio is three f-stops.
If you are looking at two f-stops of lighting difference, e.g. f8 of key light and f16 of fill light, you would represent this as 1:4 lighting ratio. Remember that each f-stop represents a factor of 2, so the lighting ratio doubles every f-stop.
You can use lighting ratios to represent the lighting ratio between the key light and the back light (highlight or hair light). This number is represented with the key light as the second number, and always with a value of 1. So a 1:1 lighting ratio means the highlight is as bright as the key light. A 2:1 lighting ratio means the highlight is twice as bright as the key light, for example f5.6 of highlight with f8 of key light.
Finally, you can represent both lighting ratios as x:y:z, where x is the highlights, y is the key light, and z is the fill light (shadow). So a 1:1:1 lighting ratio means the entire scene is lit evenly. This is fine for glamour images, but lacks contrast and drama if that is what you are aiming for. Drop the key light down a stop or two, and you add drama and interest through contrast. Add more highlight, and you add more separation from the background, and more interest.
Here are some examples of lighting ratios, and how changing the light affects the feel of the image.
Lighting ratio of 1:1:1
The above photo of a model was taken with a lighting ratio of 1:1:1, using light of f11:f11:f11. The key light was a softbox camera right. The fill light was a softbox camera left. The highlight, or hair light, was a Vivitar strobe, camera left, behind and above the model. Since the lighting ratios are even and there is no contrast, this type of lighting is called flat lighting.
Lighting ratio of 1:1:2
The above photo was taken with the same settings as the previous image, except the fill light was f8 (half the light of the key light). You’ll notice the subtle shadow on the camera-side of the model’s face. Since the majority of the model’s face as seen by the camera is on the shadow-side of her face, this lighting is called narrow lighting.
4:1:4 lighting ratio
By increasing the lighting of the hair light to f22 (three stops) and dropping the shadow two f-stops down to f5.6, we now have a 4:1:4 light ratio. This is a bit extreme, but demonstrates the effect of adding more highlight to separate the model from the background.
A 2:1:4 lighting ratio
The above lighting ratio has a one-stop of highlight brighter than the key light, and a two-stop lighting darker in the fill light. The photo has good separation of the subject from the backdrop, and the contrast between the lighting and the shadow adds drama and interest.
Having one key light source represents the sun, and is appealing because it is what our brain is expecting due to familiarity to living on our planet over millions of years of evolution. Add some light to the shadow side of the model so you can make out the model’s features.
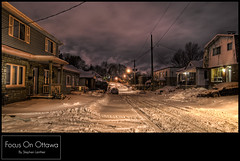
In our previous post we talked about panoramas. I said it was essential to use a tripod to build a panorama. This photo was taken by a handheld camera (an iPhone actually), and stitched together. Although it’s not nearly as good as a panorama taken with an SLR on a tripod, it’s still interesting to look at, no? The best camera is the camera that’s on you, and it’s better to take a picture than no picture at all.
A panorama can be a cool effect for landscape portraits. Panoramas are much easier to do these days with digital cameras.
You don’t have to buy a special panorama camera, or do anything too complicated. There are some basic steps to get a good panorama though.
Here are some tips on how to get a panorama.
1) Use a tripod. This is more of a rule than a tip – don’t even try to build a panorama by hand holding the camera.
Put the camera on a tripod. If your tripod has levels (like the ones used for carpentry), you should use them to make sure your tripod (camera) is level.
2) Put your camera in portrait orientation. This means sideways (normal orientation is called “landscape”). Your tripod should allow this. If not, you should probably invest in a better tripod.
3) Take an exposure reading. You can do this by putting your camera in (A)perture priority, setting it to a high F-stop number (like F22), and pressing the shutter release button down halfway, if you’re using an SLR (or most point and shoot models). The camera will give you an aperture reading and a shutter speed reading.
4) Put your camera in (M)anual mode, and dial in the settings from the previous step. The reason you are doing this is because you will be taking multiple shots, and your camera might have different readings depending
on how bright the sky is or ground is in different places. You don’t want to have different exposures if you are stitching them together – it will look weird. Otherwise, you will be spending a lot of time in post processing
matching the brightness of each picture. You also want to ensure you use the same aperture across all pictures, otherwise things could be blurry in some pictures, but in focus in the next. This will
also make the stitching look weird.
5) Take a picture of your hand or something, indicating the start of your series.
6) Now start shooting. Take a picture, rotate the tripod a bit, take another. You should use a remote, or the timer on the camera, to ensure no camera shake. This will also let you use a longer exposure if it’s getting dark out.
(You probably want to shoot in a higher f-stop number, like f11 -> f22. This will put more of the foreground/background in focus. Since you are shooting on a tripod with a remote or a timer, you don’t need to worry about camera shake)
The more pictures you take, the smoother the stitching will be. (i.e. smaller rotational increments). e.g. 8-15 pictures for a 180 degree view.
7) Mark your last picture with your hand or something, to indicate the end of the series. This will make it easier when you are reviewing your pictures on the computer to see which photos are a part of your pano.
8 ) Use stitching software, like Hugin: http://hugin.sourceforge.net/download/
9) You’re done! Post the picture so others can enjoy.