Studio Lighting Basics Part 1: Lighting Ratios

Lighting

When doing studio shooting, there is practically an infinite combination of lighting setups that you can use in your arsenal. Before going wild with lighting setups, it is helpful to understand the basics of studio lighting and lighting ratios.

Let’s talk about the basics of lighting components before talking about lighting ratios.

One common setup is with the use of three lights. There is the key light, the fill light, and the back light.

The key light is the main light, and is used to add light to the subject, representing the sun.

The fill light adds light to the shadows of the subject. The fill light is at most as bright as the key light, but is typically darker (hence “fill”).

The back light (highlight, kicker, hair light) adds light from behind of the subject, to help separate the subject from the background. For example, if photographing a model wearing black clothing in front of a black background, you wouldn’t be able to see their outline without some light source. The back light is at least as bright as the key light, but often brighter.

Now to describe the lighting setup, we use light ratios. Light ratios measure the ratios between the f-stop numbers of the light source.

Let’s have a quick crash course on f-stop numbers. An f-stop number represents the ratio of the focal length of the lens, divided by the diameter of the aperture. Every f-stop increment (larger f-stop number) corresponds to half the light entering the camera; i.e. f11 will let in half the light of f8.

The standard f-stop scale is represented by a factor of √2, or about 1.4 per stop:

f/1, f/1.4, f/2, f/2.8, f/4, f/5.6, f/8, f/11, f/16, f/22, f/32, f/45, f/64, f/90, f/128

For a more detailed discussion on f-stops (f-numbers), please consult Wikipedia.

When speaking of lighting, if you measure the light using a light meter (or the built in light meter in your camera), by keeping the shutter speed and ISO setting consistent and adjusting the light output of each light, you will get a reading of the f-stop number required to properly expose the image. (Lighting is measured by turning off the other lights, and only testing one light at a time).

So lighting at f8 is half as bright as lighting at f11, meaning you need a smaller aperture so as to not over-expose the image.

The lighting ratio can be described as the key to shadow ratio, which is the ratio of the key light to the fill light. The key light is always represented by a factor of 1, and the shadow ratio is a factor of fill light with respect to the key light. A 1:1 ratio means the fill light is the same as the key light. A 1:2 ratio means the fill light is half as bright as the key light. This would be one f-stop of lighting difference – for example f8 of key light and f11 of fill light. A 1:4 ratio is two f-stops of difference (since every f-stop is a doubling of brightness). A 1:8 ratio is three f-stops.

If you are looking at two f-stops of lighting difference, e.g. f8 of key light and f16 of fill light, you would represent this as 1:4 lighting ratio. Remember that each f-stop represents a factor of 2, so the lighting ratio doubles every f-stop.

You can use lighting ratios to represent the lighting ratio between the key light and the back light (highlight or hair light). This number is represented with the key light as the second number, and always with a value of 1. So a 1:1 lighting ratio means the highlight is as bright as the key light. A 2:1 lighting ratio means the highlight is twice as bright as the key light, for example f5.6 of highlight with f8 of key light.

Finally, you can represent both lighting ratios as x:y:z, where x is the highlights, y is the key light, and z is the fill light (shadow). So a 1:1:1 lighting ratio means the entire scene is lit evenly. This is fine for glamour images, but lacks  contrast and drama if that is what you are aiming for. Drop the key light down a stop or two, and you add drama and interest through contrast. Add more highlight, and you add more separation from the background, and more interest.

Here are some examples of lighting ratios, and how changing the light affects the feel of the image.

Lighting ratio of 1:1:1

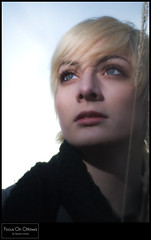
The above photo of a model was taken with a lighting ratio of 1:1:1, using light of f11:f11:f11. The key light was a softbox camera right. The fill light was a softbox camera left. The highlight, or hair light, was a Vivitar strobe, camera left, behind and above the model. Since the lighting ratios are even and there is no contrast, this type of lighting is called flat lighting.

Lighting ratio of 1:1:2

The above photo was taken with the same settings as the previous image, except the fill light was f8 (half the light of the key light). You’ll notice the subtle shadow on the camera-side of the model’s face. Since the majority of the model’s face as seen by the camera is on the shadow-side of her face, this lighting is called narrow lighting.

2:1:2 lighting ratios
4:1:4 lighting ratio

By increasing the lighting of the hair light to f22 (three stops) and dropping the shadow two f-stops down to f5.6, we now have a 4:1:4 light ratio. This is a bit extreme, but demonstrates the effect of adding more highlight to separate the model from the background.

A 2:1:2 lighting ratio
A 2:1:4 lighting ratio

The above lighting ratio has a one-stop of highlight brighter than the key light, and a two-stop lighting darker in the fill light. The photo has good separation of the subject from the backdrop, and the contrast between the lighting and the shadow adds drama and interest.

Having one key light source represents the sun, and is appealing because it is what our brain is expecting due to familiarity to living on our planet over millions of years of evolution. Add some light to the shadow side of the model so you can make out the model’s features.

Exceptions to every rule – Panorama


Waiting for the bus

Originally uploaded by Tukay Canuck

In our previous post we talked about panoramas. I said it was essential to use a tripod to build a panorama. This photo was taken by a handheld camera (an iPhone actually), and stitched together. Although it’s not nearly as good as a panorama taken with an SLR on a tripod, it’s still interesting to look at, no? The best camera is the camera that’s on you, and it’s better to take a picture than no picture at all.

Lost and found


grace_19395_6_7

Originally uploaded by Tukay Canuck

I really should spend more time looking at my old, unprocessed files. I was thinking of going on a photowalk today, but I have too many unprocessed pictures to get through. There are some gems in there that I never had time to process, like this one. I’m glad I stayed home today.

This is an HDR of the Union Street steel bridge, near the old Ottawa City Hall.

Latest Model Shoot


Kimberlin_20507

Originally uploaded by Tukay Canuck

Here’s a sample from my latest model shoot. These photos were taken around Gatineau Park and in the Bytown Market in downtown Ottawa.
Kimberlin was a great model to work with, who clearly knows how to model and is quite photogenic. Take a look at the rest of the photos from this shoot on my Flickr photostream.

Lens Filters

There are many types of filters that you can get for your lenses. Here’s a brief rundown of some of the filters I use.

UV, Clear and Haze:

wpid296-misc_17011-27.jpg
UV Filters

A UV filter removes some invisible UV light that may lead to haze in photos. Clear, or “digital clear”  is only used to protect your lens. Even though the UV filter has some marketable value in the end result of your photography, the most common reason for using the UV filter is the same as the clear filter: to protect your lens.  A haze filter is a type of UV filter, but it is more liberal in removing the ultraviolet light (and some visible light).

There are conflicting opinions on whether or not to use a UV or clear filter to protect your lens. One party feels that these filters have negative impact on the final output of the photograph. By adding “cheap” glass in front of your expensive lens, you are doing yourself a dis-service. If you want to protect your lens, use a lens hood.

The other argument is that a UV filter protects your front element, so if you drop your lens or rub against something, you are only damaging the cheap filter, and not your expensive lens.

Personally I fall into the latter category. Here are my personal reasons:

  1. By using a filter on my lens, I tend to use lens caps less. This allows me to be more ready to take a picture in a hurry. I don’t want to worry about messing with lens caps when there is an opportunity that is fleeting.
  2. I feel better about cleaning the lens filter when it gets dirty than cleaning the front of the lens element. I’m not too worried about scratching my UV filter or smudging it – I can always replace the lens filter.
  3. If there is a “money shot”, I will take off the UV filter briefly, knowing full well that my lens is clean and dust-free. The UV filter has kept the dust out during my 3 hour walk in the wilderness.
  4. Based on my personal tests of photographs between shooting with and without a UV filter, the difference is negligible and usually not discernable.


Polarizer

wpid291-misc_17010-27.jpg
Polarizer

A polarizing filter acts just like your polarizing sunglasses, it polarizes the incoming light. What this effectively does is reduce reflections in water and other reflective surfaces. It also improves photography in hazy conditions, because a large part of haze is reflection of water particles. To get more information on how polarization works, consult Brewster’s angle in Wikipedia. Polarizing filters also increase the contrast between clouds and sky, so they are definitely a good item to keep in your camera bag.

There are two types of polarizers: linear and circular. Most dSLR lenses have issues with polarized (linear) light and auto-focus. Circular polarizers take the polarized light and convert it back to circular light. Thus circular polarizers are better suited for modern digital SLRs, but they come at a price – they are more expensive than linear polarizers.

Star Filters

Star filters have prisms embedded in the filter, which cause lights (e.g. street lights, headlights) passing through the filter to have a classic star appearance. There are different configurations of these filters, creating typically either 4, 6, or 8 point stars. Unlike the previous filters mentioned, the star filters are not corrective in nature, but more of a “special effect” filter.

Neutral Density Graduated Filter

wpid293-misc_17013-27.jpg
Neutral Density Graduated Filter

A neutral density graduated filter goes from totally clear to slightly dark. The “neutral density” part means that there are no changes to the colour. Basically what these are good for are landscape pictures, so that your sky is slightly darker and the ground is slightly brighter. There are different degrees of graduation (how fast it goes from light to dark), and there are different degrees of how dark the darkest part of the filter goes (e.g. 0.3 stops, 0.6 stops, etc).

An alternative to using a neutral density graduated filter is shooting in HDR.

Colour filters

There are different types of colour filters. There are colour corrective filters (that effectively fix the white balance of your photographs), and colour subtractive filters, which remove a colour hue such as red or green, to a certain extent. There are also gradient colour filters.

Colour filters were necesary with film cameras, but with digital cameras, all colour corrections, such as white balance correction or colour subtraction can be done either in the camera, or in post-processing, with ease. I do not use colour based filters, and they are used less in general with digital photography.

Backups

Everyone knows how important backups are, especially with your pictures. But most people still don’t do it.

Hard drives fail people. Even enterprise rated hard drives have almost a 1% chance of failing per year. How many years have you had your hard drive?

There are several things you should do to back up. Here’s my workflow as an example.

When I upload my pictures from my memory card, the software I use to upload the files (Nikon Capture) automatically backs-up the files. I have it configured to backup to a separate hard drive in my workstation, so if the first hard drive fails, I have a backup on the other drive. I shoot in RAW format, meaning the files are pretty big! Do not backup to the same hard drive, that’s (almost) useless.

When I take pictures of a special event or assignment (particularly if there’s money involved), I back up the original images to a DVD disk. That way if my entire computer blows up, I still have the pictures on a separate media.

After processing the files, I often backup the processed files (Jpeg format) to a CD-rom.

From time to time I backup my files to a network hard drive. Personally, I use a network attached hard drive, a Linksys Nas 200. *If you want my review on this device, contact me.

I also backup files to removable hard drives. I use normal “internal” SATA hard drives, but I place them in a dock. This allows me to swap out the hard drives and get them offsite.

I’ll reiterate this point because this is vital – get your pictures OFFSITE. If God forbid you should have a fire, theft, or some sort of tragedy, losing your pictures would be horrible. That’s because you can always replace “things”, but you can’t replace pictures. Give the hard drive to a friend or family member to store for you. When you have a new hard drive (with more recent backup), swap hard drives with them.

You can also use an internet based backup system, such as Window’s Skydrive or Mesh, or a paid service such as Carbonite.

I also upload quite a few pictures to my website and to Flickr, which a form of backup. It doesn’t account for my RAW files, but at least the Jpegs are backed up and Flickr stores the original size (if you want them to).

I may have said a lot, but the effort I exert to backup is minimal, and I’ve covered my a$$. If you get into the habit of doing it, it’s like brushing your teeth. Don’t get into the mindset of “I’ll do it someday”.

Here’s a summary of what you should do at a minimum:

1) Backup to another drive, whether it’s in the same PC, or an external USB or network drive

2) Backup to optical media, such as CD or DVD, when the pictures are important to you or someone else

3) Backup offsite

Street Photography

Street photography forces you, the photographer, to leave your comfort zone and overcome shyness. It’s a great exercise to force you out of your “shell”. Check out this great video from Wired on Street photography.

You can visit our take on street photography on Flickr. Pictures will be added constantly.

Scott Kelby Photowalk

wpid221-kelby_12077.jpg

I was privileged to join this year’s Scott Kelby worldwide photowalk. This is a photo expedition that takes place simultaneously in over 900 cities across the world, with 32,000 participants. I represented Ottawa along with 49 other local photographers.

The official website for the photowalk is here.

Scott Kelby is a professional photographer, president of the National Association of Photoshop Professionals (NAPP), head of Kelby training, author of top selling books, and more.

You can check out some more of my fun pictures here.

wpid225-kelby_12203_4_5.jpgwpid227-kelby_12269.jpg

Fast Lenses

You may have heard the term “Fast Lens” when referring to a good quality lens. I find the term “Fast” a bit misleading, although technically accurate.

A fast lens is a lens with a large aperture. So a 50mm lens with the largest aperture of f5 may not be considered a fast lens, a 50mm lens with the largest aperture of 1.4 is very fast. Remember the aperture size is the size of the opening or diaphragm of the lens. A smaller number means a bigger opening.

The reason it is a “fast” lens is that, if you recall from my previous post on aperture, a larger aperture lets in more light, and thus the lens aperture does not need to be left open for as long as a lens with a smaller aperture.

This is significant! Imagine shooting an indoor wedding with low light. Let’s say the church doesn’t allow flash, and doesn’t allow you to use your tripod. If you shoot with a slow lens, you will need to use a slower shutter speed to get a well lit shot of the bride and groom. Since we humans tend to shake, a longer exposure will reveal that shaking, and will be exhibited as blur. A faster, better lens will be able to take the same shot in a much shorter exposure, thus leading to less camera shake and resulting in a sharper image.