ISO Illustrated (or How I Learned To Not Fear The Noise)

Back in film days there were two things you could change on the fly to adjust your exposure, you could change the shutter speed, which determines how long you let light expose on the film, and the aperture size, which determines how much light is let in at one time and then hits the film.

Films had different sensitivities to light, also called “ISO” (or “ASA”). For argument sake, I’ll state that changing the ISO on film cameras was not something you could do “on the fly”.

Then along came digital cameras, and they also had the concept of ISO, which was a simulation of film sensitivity via how sensitive the sensor of the camera was to light.

As a photographer you may be used to changing the aperture and shutter speed to get the proper exposure. But what if you are shooting in a low light situation, you have your aperture wide open (say f2.8), and to get a proper exposure, you are shooting at 1/15 of a second. You’ll find that as things move, including the natural shake of your hand, the pictures come out blurry.

So instead of shooting at 1/15 of a second, you can bump your ISO from the default of 100 or 200, to a higher number, like 400, 800, or 1600, etc., and speed up your exposure to something more manageable, such as 1/60 of a second.

Every “doubling” of the ISO value doubles the brightness of the image, which is one “stop” brighter.

So for example if you are shooting at a fixed aperture of 2.8, and shooting at 1/60sec (a decent speed for hand holding your camera and not getting blur, most of the time), then increasing your ISO from 200 to 400 doubles the brightness of your image; and ISO 800 is twice as bright as ISO 400, etc., etc.

To summarize using an example, you are shooting indoors at a concert, and you can’t go any wider on your aperture (let’s say your lens goes to 2.8, and you are set to 2.8), and your shutter speed can’t go any slower without your hand shaking blurring the exposure, and your photos are coming out too dark, then your only option is to bump up the ISO.

The downside of bumping up the ISO is that you introduce noise. Noise is seen similar to grain in film cameras, but I would say it’s not as pleasant.

Fortunately today’s modern DSLRs are pretty good at keeping down the noise. The better the DSLR (usually meaning more $$), the better it is at handling noise.

I shoot with a Nikon D90 and a Nikon D40x. The Nikon D90 is fabulous at higher ISOs. I can shoot at ISO 800 reliably with little noise, and can shoot up to ISO 6400. ISO 1600 – 3200 has a fair bit of noise, but the pictures are still usable, particularly if you use a noise reduction software (such as Adobe Lightroom or Nik DeNoise), or convert to black and white. If you convert to black and white, the noise looks more like film grain.

Pro cameras such as the Nikon D700 and D3 handle noise even better. That’s why you pay the big bucks.

My D40x is an entry level DSLR, and the noise is pretty bad at ISOs higher than 400.

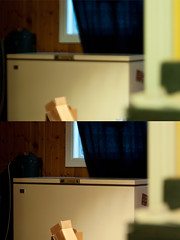
Here are some sample images of the D90 shooting in minimal lighting conditions. I shot by an LED light, shooting in manual mode at aperture f1.8 and shutter speed 1/250s. Each photograph represents one stop of ISO sensitivity. You’ll see that the photos start pretty dark, and as the ISO increases, the brightness of the photo increases, along with noise levels (look in the dark areas and within the solid colour areas for weird patterns of incorrect colour), and loss of detail. I think up to ISO 800 is very good, and ISO 1600 to maybe even 3200 is usable. Note I haven’t run any noise reduction software on these photos – when I say “usable” at 1600, I mean after cleaning up with noise reduction.

You’ll see that if I wanted a fast shutter speed to freeze action (1/250s), and I have my aperture at it’s widest (f1.8), that ISO 200 is just too dark. If I don’t have the option of slowing down my shutter, I can increase my ISO to a brighter image. ISO 200 is too dark, and I’d say ISO 6400 is getting too bright. ISO 800 and 1600 is about right, with acceptable levels of noise to work with.

Please let me know if you have any comments or questions. If you want to share links with the ISO experiments from your DSLR (read: Canon users), I would love to see the results. Just take a picture of the same object in manual mode in reasonably low light, with a fixed shutter speed and aperture, while increasing the ISO by doubling it each time.

Click on the image to zoom in to see the detail and noise. (Click on the image again to zoom in).

114
ISO 200
115
ISO 400
116
ISO 800
117
ISO 1600
118
ISO 3200
119
ISO 6400

Vibration Reduction / Image Stabilization


No VR versus VR

Originally uploaded by Tukay Canuck

If you’re shopping for a lens, you may want to consider vibration reduction (on Nikons) or image stabilization (on Canons). These are marketed as “VR” and “IS” on the lens model name. Other brands have this technology too, and may have different marketing terms.

Image stabilization is a technology that stabilizes the lens even if your hand is shaking (your hand shakes – trust me). This allows you to shoot at slower shutter speeds and still get sharper images.

As a rule of thumb, you should shoot at 1/ (without using image stabilization). So if you are shooting with a 50mm lens, you shouldn’t shoot any slower than 1/50 of a second. If you are shooting with a 200mm lens, you shouldn’t shoot any slower than 1/200 of a second.

This is a rule of thumb, but you may be able to hold your camera more sturdier than the average person, and may be able to operate at slower shutter speeds.

Without image stabilization, if you are shooting at slower speeds than you can hold and keep the camera stable, then you will need to lower your f-stop (increase the aperture size), or boost your ISO.

Lowering the f-stop is a good option, as this will allow you to use a faster shutter speed. But if you are at your widest aperture (in this example, I’m at f2.8, which is as wide as this lens goes), then you are stuck.

Boosting the ISO is an option; this will also allow you to use a faster shutter speed while keeping the same f-stop. Boosting the ISO however introduces noise into the picture, and this may be undesirable. The more you have to boost your ISO to get the optimal shutter speed, the more noise you get. If it’s very low light, you may get a lot of noise due to a high ISO.

Vibration reduction/image stabilization introduces a new option – you can shoot at a slower shutter speed while keeping your f-stop the same and without having to increase your ISO as much (or not have to increase it at all).

In the example provided, I shot the freezer at f2.8, 70mm at 1/3 of a second, at ISO 200. Using my rule of thumb, I would need to quicken my shutter to 1/70s to get a sharp picture. Since I’m at the lowest f-stop number (2.8) that my lens will allow, I would have to increase my ISO to get 1/70, and the picture would get noisier (if I didn’t have VR).

In the second image, I have VR enabled. Note that even though I am shooting much slower than I should be able to steadily hold, the picture still looks reasonably sharp.

This is the great value from VR.

(Note: anther option in addition to boosting the ISO or lowering the f-stop is to mount your camera on a tripod. This is sometimes a good option, but a tripod is not always convenient, and sometimes not allowed.)

Studio Lighting Basics Part 1: Lighting Ratios

Lighting

When doing studio shooting, there is practically an infinite combination of lighting setups that you can use in your arsenal. Before going wild with lighting setups, it is helpful to understand the basics of studio lighting and lighting ratios.

Let’s talk about the basics of lighting components before talking about lighting ratios.

One common setup is with the use of three lights. There is the key light, the fill light, and the back light.

The key light is the main light, and is used to add light to the subject, representing the sun.

The fill light adds light to the shadows of the subject. The fill light is at most as bright as the key light, but is typically darker (hence “fill”).

The back light (highlight, kicker, hair light) adds light from behind of the subject, to help separate the subject from the background. For example, if photographing a model wearing black clothing in front of a black background, you wouldn’t be able to see their outline without some light source. The back light is at least as bright as the key light, but often brighter.

Now to describe the lighting setup, we use light ratios. Light ratios measure the ratios between the f-stop numbers of the light source.

Let’s have a quick crash course on f-stop numbers. An f-stop number represents the ratio of the focal length of the lens, divided by the diameter of the aperture. Every f-stop increment (larger f-stop number) corresponds to half the light entering the camera; i.e. f11 will let in half the light of f8.

The standard f-stop scale is represented by a factor of √2, or about 1.4 per stop:

f/1, f/1.4, f/2, f/2.8, f/4, f/5.6, f/8, f/11, f/16, f/22, f/32, f/45, f/64, f/90, f/128

For a more detailed discussion on f-stops (f-numbers), please consult Wikipedia.

When speaking of lighting, if you measure the light using a light meter (or the built in light meter in your camera), by keeping the shutter speed and ISO setting consistent and adjusting the light output of each light, you will get a reading of the f-stop number required to properly expose the image. (Lighting is measured by turning off the other lights, and only testing one light at a time).

So lighting at f8 is half as bright as lighting at f11, meaning you need a smaller aperture so as to not over-expose the image.

The lighting ratio can be described as the key to shadow ratio, which is the ratio of the key light to the fill light. The key light is always represented by a factor of 1, and the shadow ratio is a factor of fill light with respect to the key light. A 1:1 ratio means the fill light is the same as the key light. A 1:2 ratio means the fill light is half as bright as the key light. This would be one f-stop of lighting difference – for example f8 of key light and f11 of fill light. A 1:4 ratio is two f-stops of difference (since every f-stop is a doubling of brightness). A 1:8 ratio is three f-stops.

If you are looking at two f-stops of lighting difference, e.g. f8 of key light and f16 of fill light, you would represent this as 1:4 lighting ratio. Remember that each f-stop represents a factor of 2, so the lighting ratio doubles every f-stop.

You can use lighting ratios to represent the lighting ratio between the key light and the back light (highlight or hair light). This number is represented with the key light as the second number, and always with a value of 1. So a 1:1 lighting ratio means the highlight is as bright as the key light. A 2:1 lighting ratio means the highlight is twice as bright as the key light, for example f5.6 of highlight with f8 of key light.

Finally, you can represent both lighting ratios as x:y:z, where x is the highlights, y is the key light, and z is the fill light (shadow). So a 1:1:1 lighting ratio means the entire scene is lit evenly. This is fine for glamour images, but lacks  contrast and drama if that is what you are aiming for. Drop the key light down a stop or two, and you add drama and interest through contrast. Add more highlight, and you add more separation from the background, and more interest.

Here are some examples of lighting ratios, and how changing the light affects the feel of the image.

Lighting ratio of 1:1:1

The above photo of a model was taken with a lighting ratio of 1:1:1, using light of f11:f11:f11. The key light was a softbox camera right. The fill light was a softbox camera left. The highlight, or hair light, was a Vivitar strobe, camera left, behind and above the model. Since the lighting ratios are even and there is no contrast, this type of lighting is called flat lighting.

Lighting ratio of 1:1:2

The above photo was taken with the same settings as the previous image, except the fill light was f8 (half the light of the key light). You’ll notice the subtle shadow on the camera-side of the model’s face. Since the majority of the model’s face as seen by the camera is on the shadow-side of her face, this lighting is called narrow lighting.

2:1:2 lighting ratios
4:1:4 lighting ratio

By increasing the lighting of the hair light to f22 (three stops) and dropping the shadow two f-stops down to f5.6, we now have a 4:1:4 light ratio. This is a bit extreme, but demonstrates the effect of adding more highlight to separate the model from the background.

A 2:1:2 lighting ratio
A 2:1:4 lighting ratio

The above lighting ratio has a one-stop of highlight brighter than the key light, and a two-stop lighting darker in the fill light. The photo has good separation of the subject from the backdrop, and the contrast between the lighting and the shadow adds drama and interest.

Having one key light source represents the sun, and is appealing because it is what our brain is expecting due to familiarity to living on our planet over millions of years of evolution. Add some light to the shadow side of the model so you can make out the model’s features.

Light Meters

Today’s DSLR cameras have magnificent light metering technology. There are still situations where you will want to use a separate light meter. The main situation is where you are using studio flash lighting. If you set your camera to anything other than Manual mode, the camera will meter the lighting before the flashes fire, and that will result in an overexposed image.

When I first got my light meter, I didn’t understand why my light meter let you dial in the shutter speed I was going to use (which would then give you the aperture f-stop number after taking a light reading), but it wouldn’t let you input the f-stop and give you a shutter speed setting. After buying my studio lighting I then understood: when measuring studio lighting, you always know what shutter speed you are using based on the speed of your flashes. If your flashes fire at 1/200 of a second, you are going to set your camera to 1/200 of a second, and thus you need the light meter to tell you what f-stop to use. If you set your camera to a faster shutter speed, you may be too fast for the flash sync to occur. If you set it to a longer exposure, well, your studio flash (for example) is only firing at 1/200 of a second, so any longer won’t contribute to your exposure.

Having said all that, a light meter will give you a suggestion of f-stop based on what shutter speed (and ISO) you tell it you are going to use. It will give you that reading to provide you with an average (like the 18% gray) image. If you don’t want 18% gray, then you are going to tweak the numbers.

I find that trial and error with the camera is often faster than taking a light reading, and then tweaking (trial and error) to get the right lighting for the shot. Modern DSLRs have histograms, allowing you quickly see how much light is in your shot, and allowing you to quickly adjust if it’s too much or too little.

Since light meters can cost as much as an entry-level DSLR, my advice is not to bother with a light meter, or try to find a used one to see if you like it. You may find that the trial and error method is just as effective, and much cheaper!

(If you didn’t understand this post, don’t worry. Go back and read my post on Aperture and Shutter Speed. Then come back and re-read this).

Auto-ISO and Studio Lighting

You have your studio set up. You shoot your grey card. You take a reading with your light meter. “F5.6 at 125 shutter speed at ISO 200”.

Great. You take a second and third reading to make sure. You set your camera to (M)anual mode, you dial in F5.6 and 1/125 second shutter speed. Your ISO is already showing 200. You take a photo, and the picture is overexposed without hope. What went wrong?

If you do a lot of outdoor shooting, you probably have set your ISO to auto, meaning your camera will bump up the ISO if it thinks you will be underexposed at your current settings. Since the camera took its light metering without your studio strobes firing, it thinks it’s too dark, and it has just bumped the ISO to something like 3200, which is not what you want.

When shooting in a studio, make sure to turn off the auto ISO feature, or you will be sorry.

Aperture, Shutter Speed and ISO

The aperture is the size of the opening in your lens to allow light onto your sensor or film.The wider the aperature, the more light that comes in at any instant. Aperture is measured in f-stops. A higher number means a smaller opening, which means less light.

The shutter speed is how fast the shutter is open to allow light in. The longer the shutter is open, the more light that comes in over a period of time.

To get the same exposure with a higher f-stop (smaller hole), you need to leave the shutter open longer, thus you will need a slower shutter speed. You want to make sure the shutter speed isn’t too slow, because vibrations in your hand will affect the image. If you need to use a long shutter speed, you will want to use a tripod to stabilize the camera.

ISO is a measurement of film. A higher ISO number means it is more sensitive to light, and you can speed up your shutter speed if you use a higher ISO film. In digital cameras you obviously can’t change the ISO of the film, but digital cameras let you emulate ISO values. A word of warning: higher ISOs increase noise in pictures (or “grain” in film cameras).

Here is a neat utility that let’s you see first hand how aperature, shutter speed and ISO affect the quality of an image.