Welcome to this quick tutorial on laser triggering with Pluto trigger.
Today I was playing around with freeze motion photography, and thought it would be cool to share with you what I tried to get this type of shot.
It’s my first time doing this shot this way, and I certainly would improve the process next time.
I shot this using a Pluto trigger (link in description), but you could do it with an assistant, but it would be a bit more unpredictable.
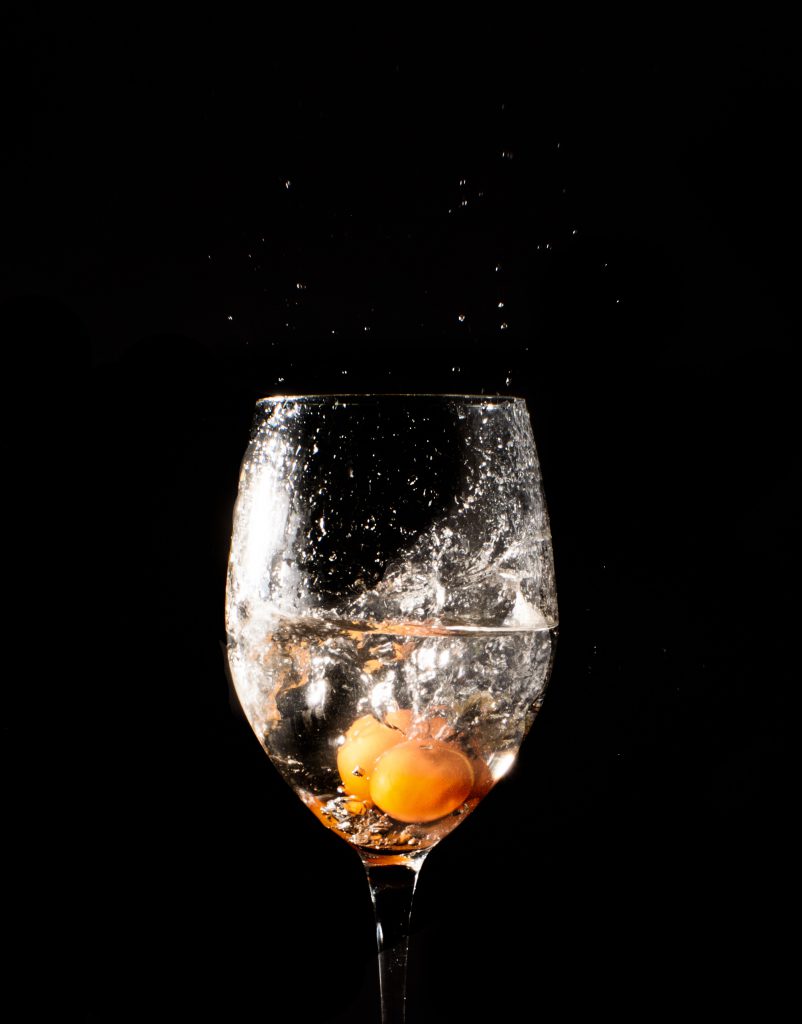
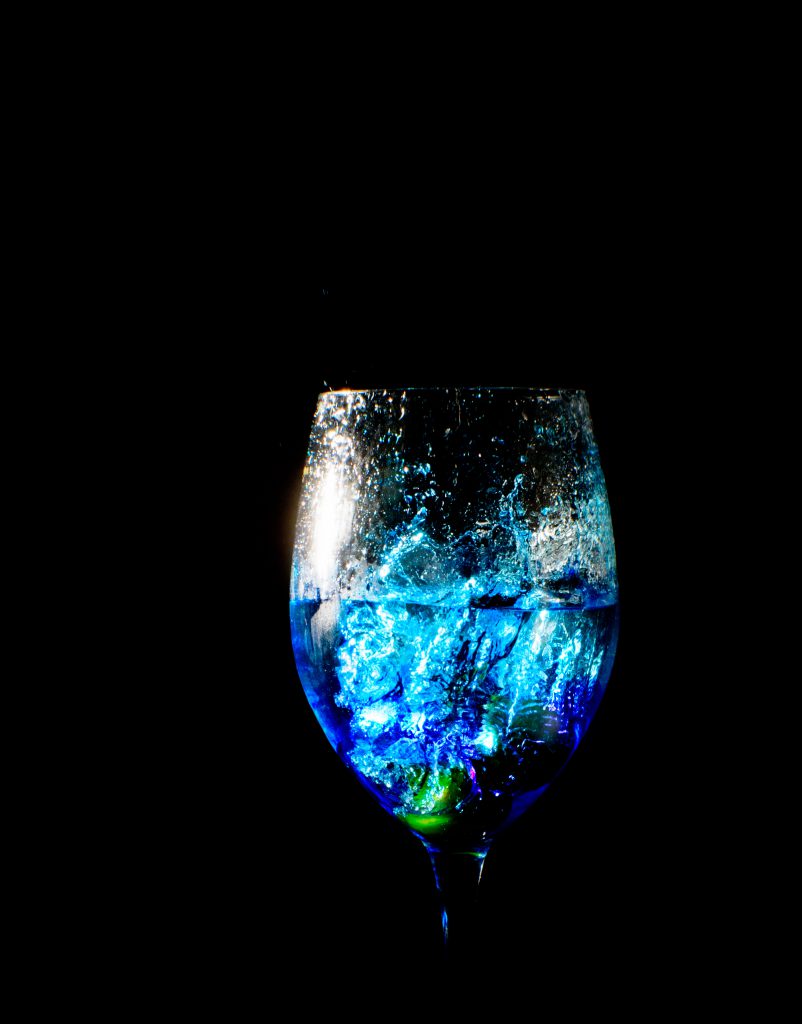
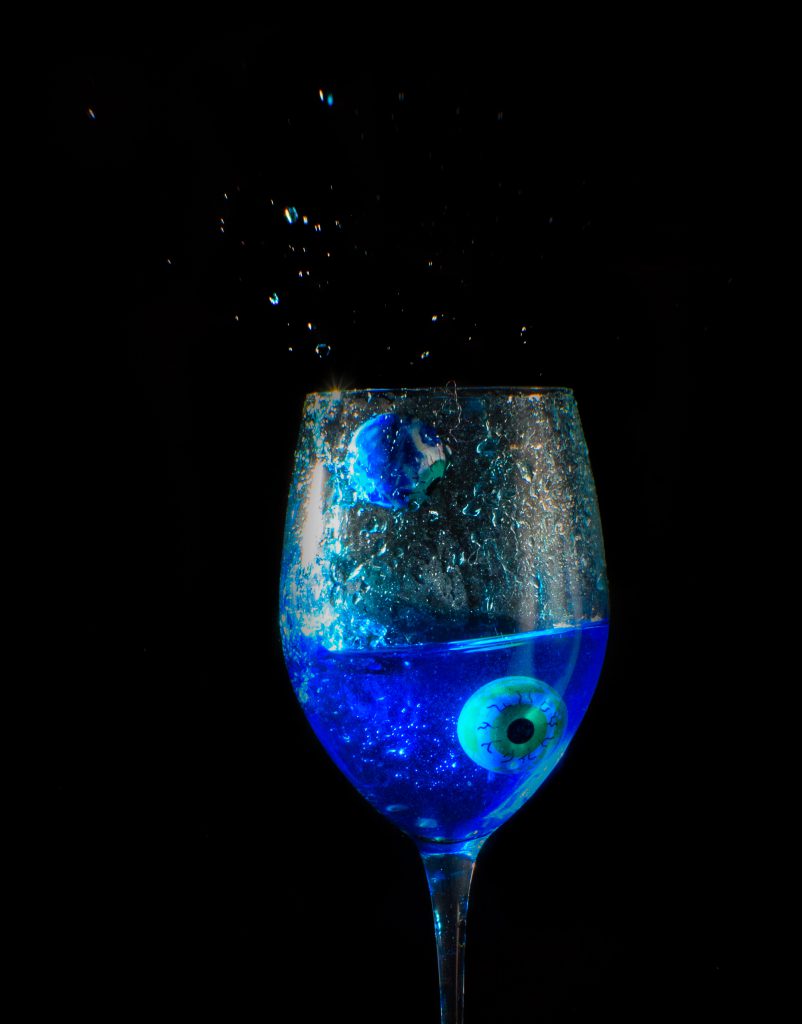
I was shooting things like cherry tomatoes and rubber balls dropped into a wine glass, with regular water or with food colouring in water.
Let’s walk through the setup.
With the Pluto trigger there is a laser. I had this set up on a light stand pointing at the pluto trigger, which acts as a receiver.
The Pluto trigger is connected to my camera to trigger the shutter when the laser beam is disturbed.
My camera has a Godox X1T Nikon trigger. It is triggering an AD 200 flash. You don’t need this set up – I did it because I have one and it is able to do high speed images. Many external flashes and strobes are limited to slow speeds (e.g. 1/125 sec) due to the nature of the SLR’s shutter. I won’t go into this, but if you want to understand this, check out this article on high speed sync…
On the flash is a Magmod grid, to make the light shine only on the glass, and limit light spill on the background and camera.
Between the two lasers is a string using dental floss, so i can properly aim through the laser. It’s a lot harder to aim than it looks, so this helps.
So I would drop the tomato cherry, it would break the laser, triggering my camera and the light all at once.
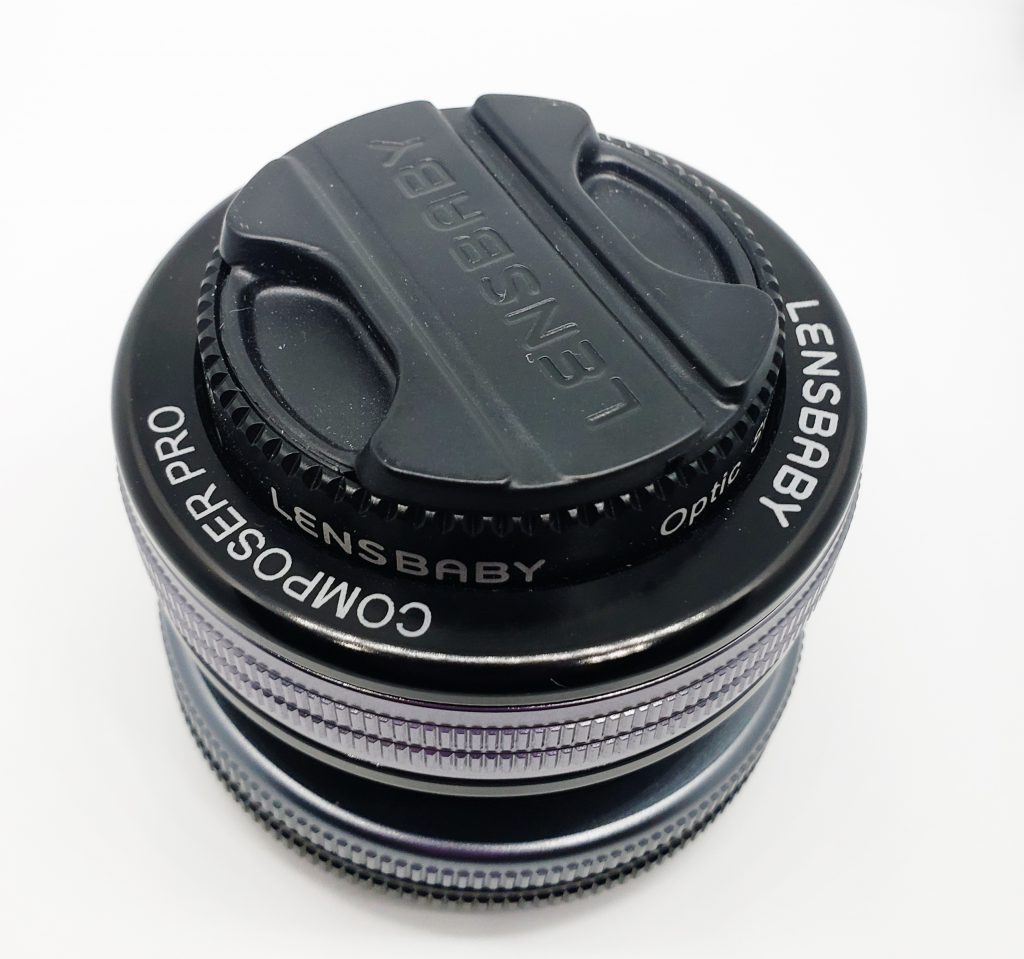
I used the LensBaby Composer Pro II with Sweet 35 lens, because it was a good focal length for the distance I was shooting, and added a bit of creativity, even if I was shooting mostly at the smallest aperture (which gives the least amount of blur effect).
Not shown is my phone, which is required to control the Pluto trigger.
In the end, I processed the photos in Lightroom (initial RAW develop) + Photoshop (layers and masking) + Luminar 2018 (detail enhancement).
Results:
Here are some samples of the results:
Some things worth noting:
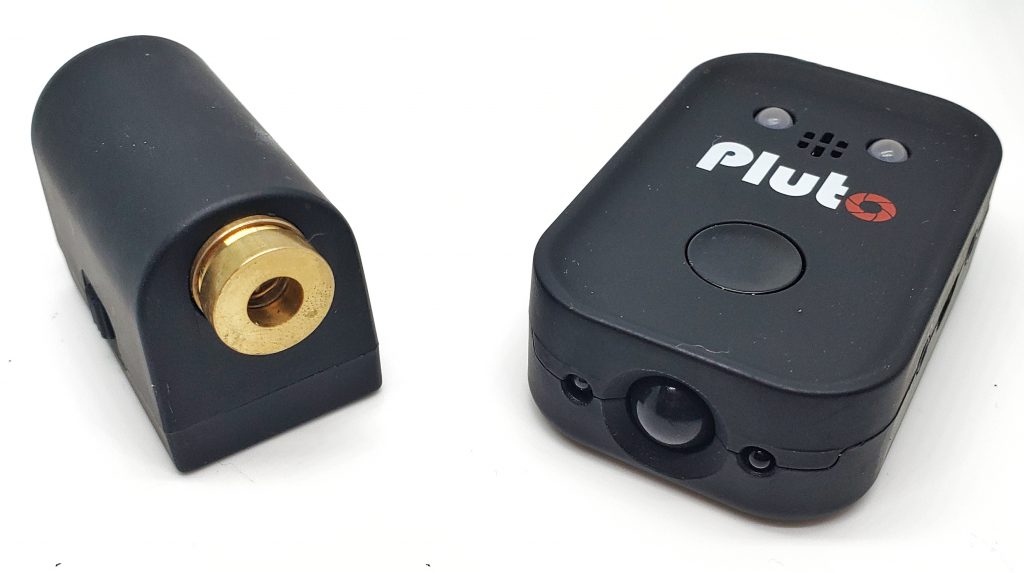
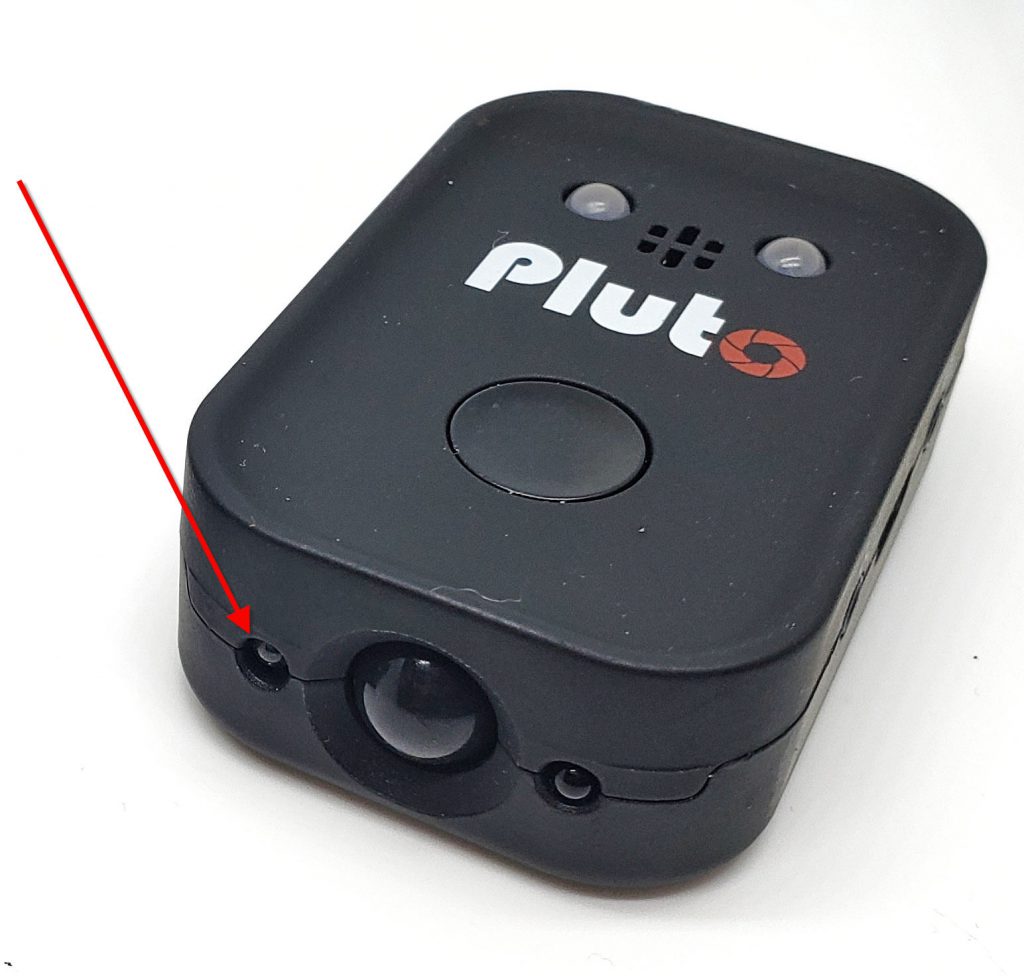
It took me a while to realize the laser of the Pluto had to be pointed to the small sensor to the left of the big sensor. See the following image:
The laser sensor is the left sensor on the Pluto
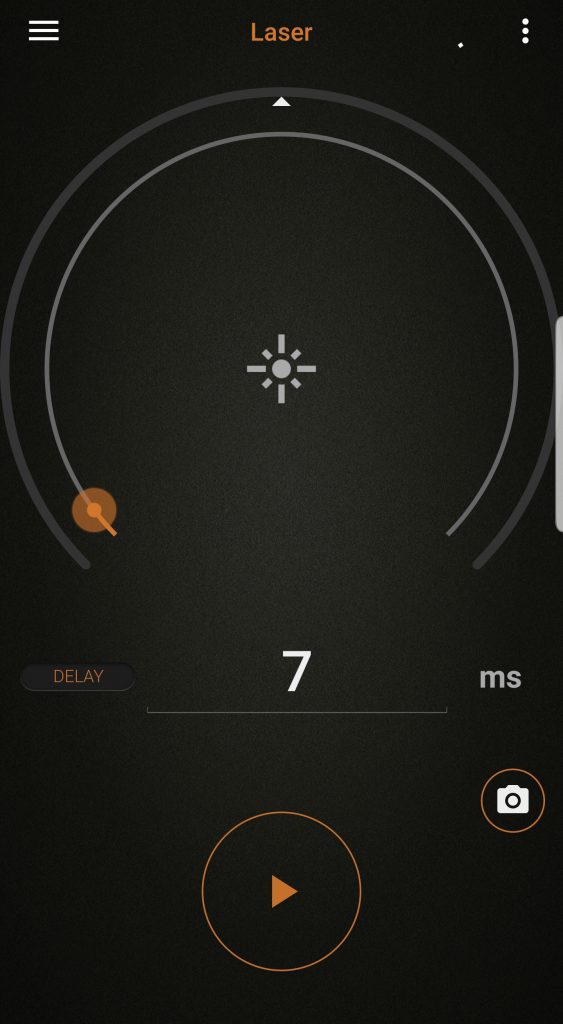
You need to tune the laser sensitivity so it’s just on the sweet spot between being triggered. You don’t want the setting too high or too low, or it will not trigger or trigger too often.
You may want to go into Pluto settings and give it a trigger reset value (see image below), so you aren’t inadvertently triggering the flash when you are recovering the dropped objects. E.g. I set the retry to 2 seconds, but you may want even as high as 10 seconds if you aren’t dropping things more rapidly than that.
I added a delay of 7ms since the objects were hitting the dental floss on the way down, and slowing down a bit. I could have tuned this number a bit more to get the optimum “splash”, but I am impatient.
Areas of improvement
I think next time I would create a tube that objects would roll through (probably held by light stand and “magic arm”), and hit the laser and glass 100% of the time. Before I set up the dental floss (halfway through the shoot), I was missing the laser and glass often. I lost a few grape tomatoes this way.
Even with the dental floss, I wasn’t always triggering the laser, and the dental floss was impacting the quality of the “splash”.
Next time I will try to drop from a higher altitude, to get a bigger splash. I will probably try a bigger object too.
Even with the grid on the light, there was quite a bit of light spill. I’ll be more careful, and use a snoot or cinefoil to control the light more.
Some of the photos I took you’ll see hairs in the glass. This is from the tomato or cherry rolling on the floor previously when I missed the glass, and collecting cat hair :/
Conclusion
This experiment was fun, albeit a bit messy. I’ll certainly take some of my lessons learned and do it again, and try to improve on it.
The setup was just how I did it – you don’t need any of the tools I used, except a camera and a flash. The tools make it easier (e.g. the Pluto Trigger, high speed flash) and more consistent, but not necessary.
However if you are looking to spend money on new gadgets, the Pluto trigger does have many creative features that in my opinion are worth the investment. I’ll certainly post some more of the features of the Pluto trigger in future blog posts (e.g. star trails, water droplet, lightning, fireworks, time lapse).
Thanks for checking out my instructional blog post!
Update
Today I tried it with water balloons and a bust. Here are the results…
Macro photography can be fun. It can also be expensive if you are starting out.
This article will try to let you answer the question:
Are macro lenses worth it, or can I get decent macro photos using extension tubes and an inexpensive lens?
If you don’t know what macro photography is (confusingly sometimes also known as micro photography) , what macro lenses are, or extension tubes are, here’s some background first…
My definition of macro photography is to “take close-up pictures of small things and making them look bigger”.
Or according to Wikipedia:
“By the original definition, a macro photograph is one in which the size of the subject on the negative or image sensor is life size or greater “
Lens manufacturers tend to play with this definition, as you may sometimes see macro lenses that are 1:2, which means they are only half as big as real life when projected onto the negative or sensor. We will be using a macro lens that is true 1:1, which means the image size on sensor is same as in real life.
There are several ways to take macro photos. Check the above Wikipedia article for a more thorough list of tools and tricks, but in summary you can achieve macro photography using:
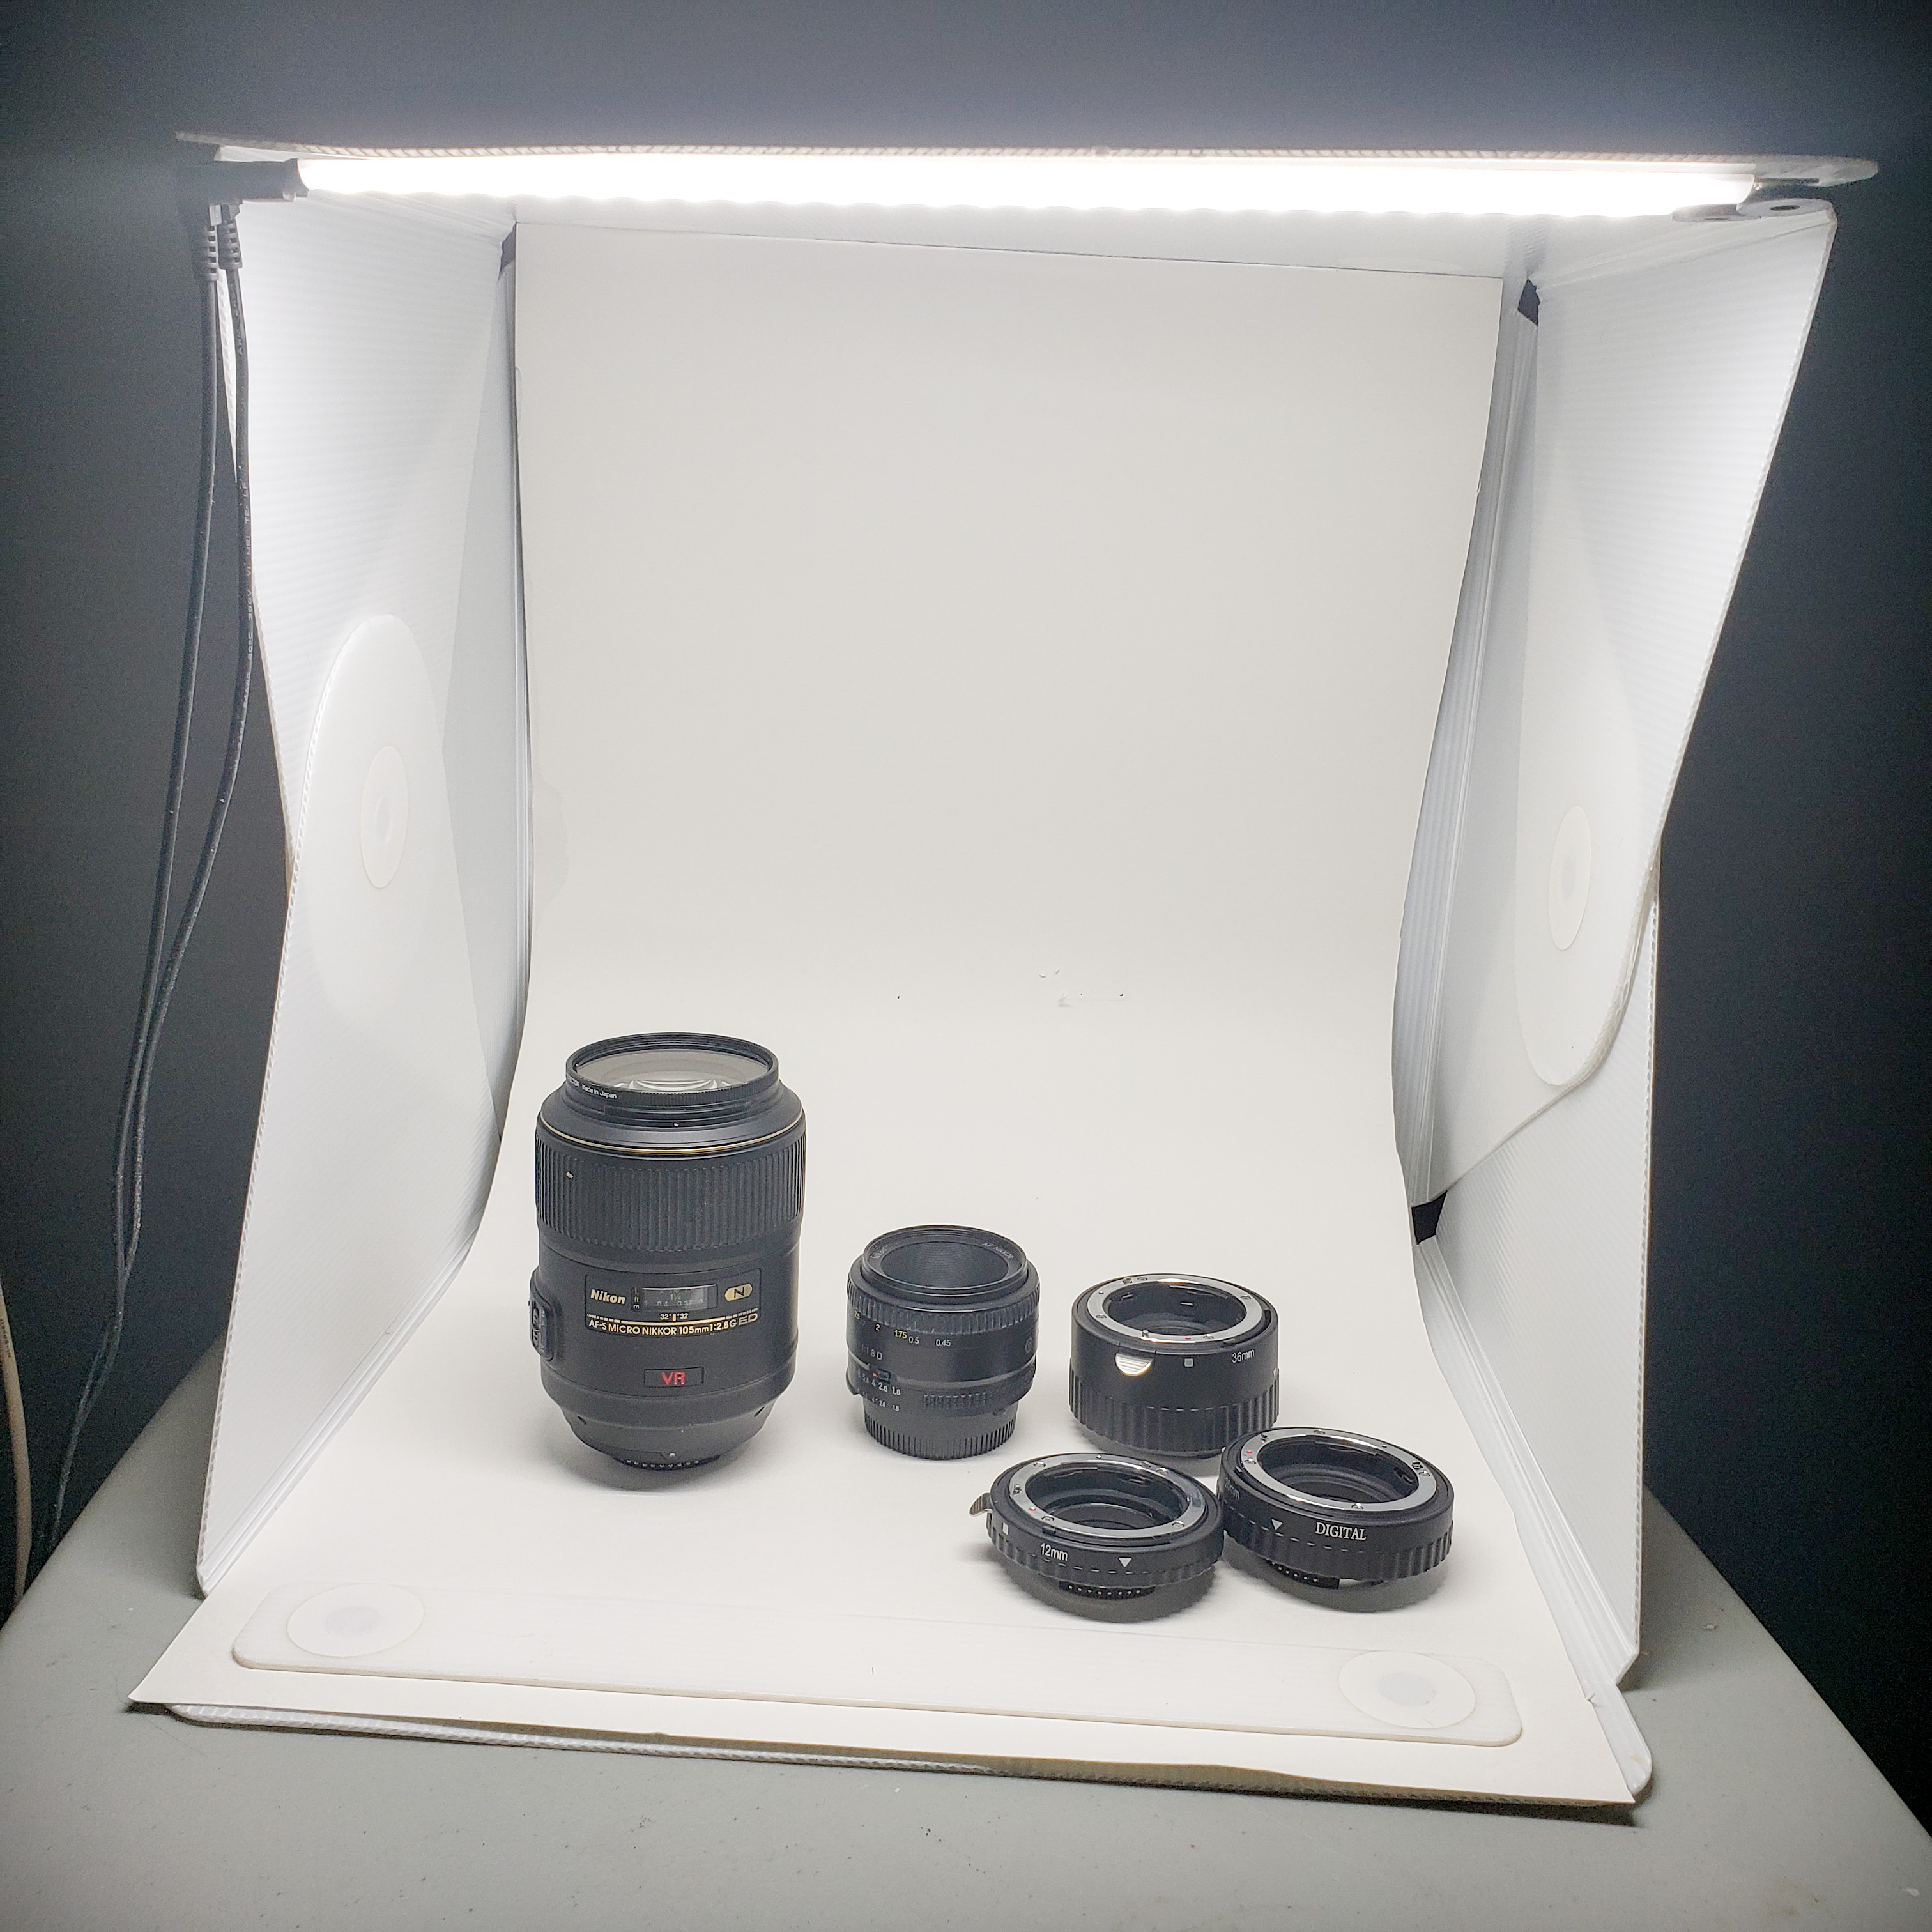
Using macro lenses. This is a common method with great optical quality (using great lenses), but can get expensive. I shoot with Nikon, and the go-to macro lens is the 105mm 2.8 macro lens, which is priced at US$900 – not cheap. There are cheaper Nikon alternatives (with smaller focal length), but I have not tried them. Other manufacturers, such as Canon, have similar macro lenses and prices (equivalent Canon lens is 100mm at US$750). Macro lenses have special construction optically to be able to focus on very close objects. Normal lenses require the object to be some distance from the lens to be able to focus, and thus will appear smaller.
Extension tubes are basically optically neutral tubes that get a normal lens closer to the subject, therefore making it look bigger. The extension tubes get installed between the camera and the lens, thereby moving the lens further away from the camera. There is typically nothing in the tubes (no glass or other optical elements) – just air. To get an idea of how this works, hold a pair of glasses further away from your eyes to see things appear bigger. That’s essentially what you are doing with the lens. The advantage to extension tubes is price. The model I will be testing can be found on eBay for around US$50. In conjunction with a 50mm prime lens, which goes for about US$200, the total for this outfit is around $250, which is considerably cheaper than the $900 macro lens.
Here is a link to the extension tubes I will be testing purchased from Amazon.
(If the link doesn’t work, just search for “Neewer Extension Tubes” and your camera manufacturer).
Extension tubes are often sold with multiple lengths, thereby giving you different options and combinations for your focal length. You can put all three tubes together for the closest zoom. We will be testing multiple combinations of extension lengths.
You can get more expensive extension tubes, such as those manufactured by the camera manufacturer. You can also get cheaper ones than what I tested, but they may not have the electrical contacts to allow auto-focus to work. I chose the slightly more expensive ones so I can use auto-focus, if needed. I will be focusing manually during these tests, however.
Test setup
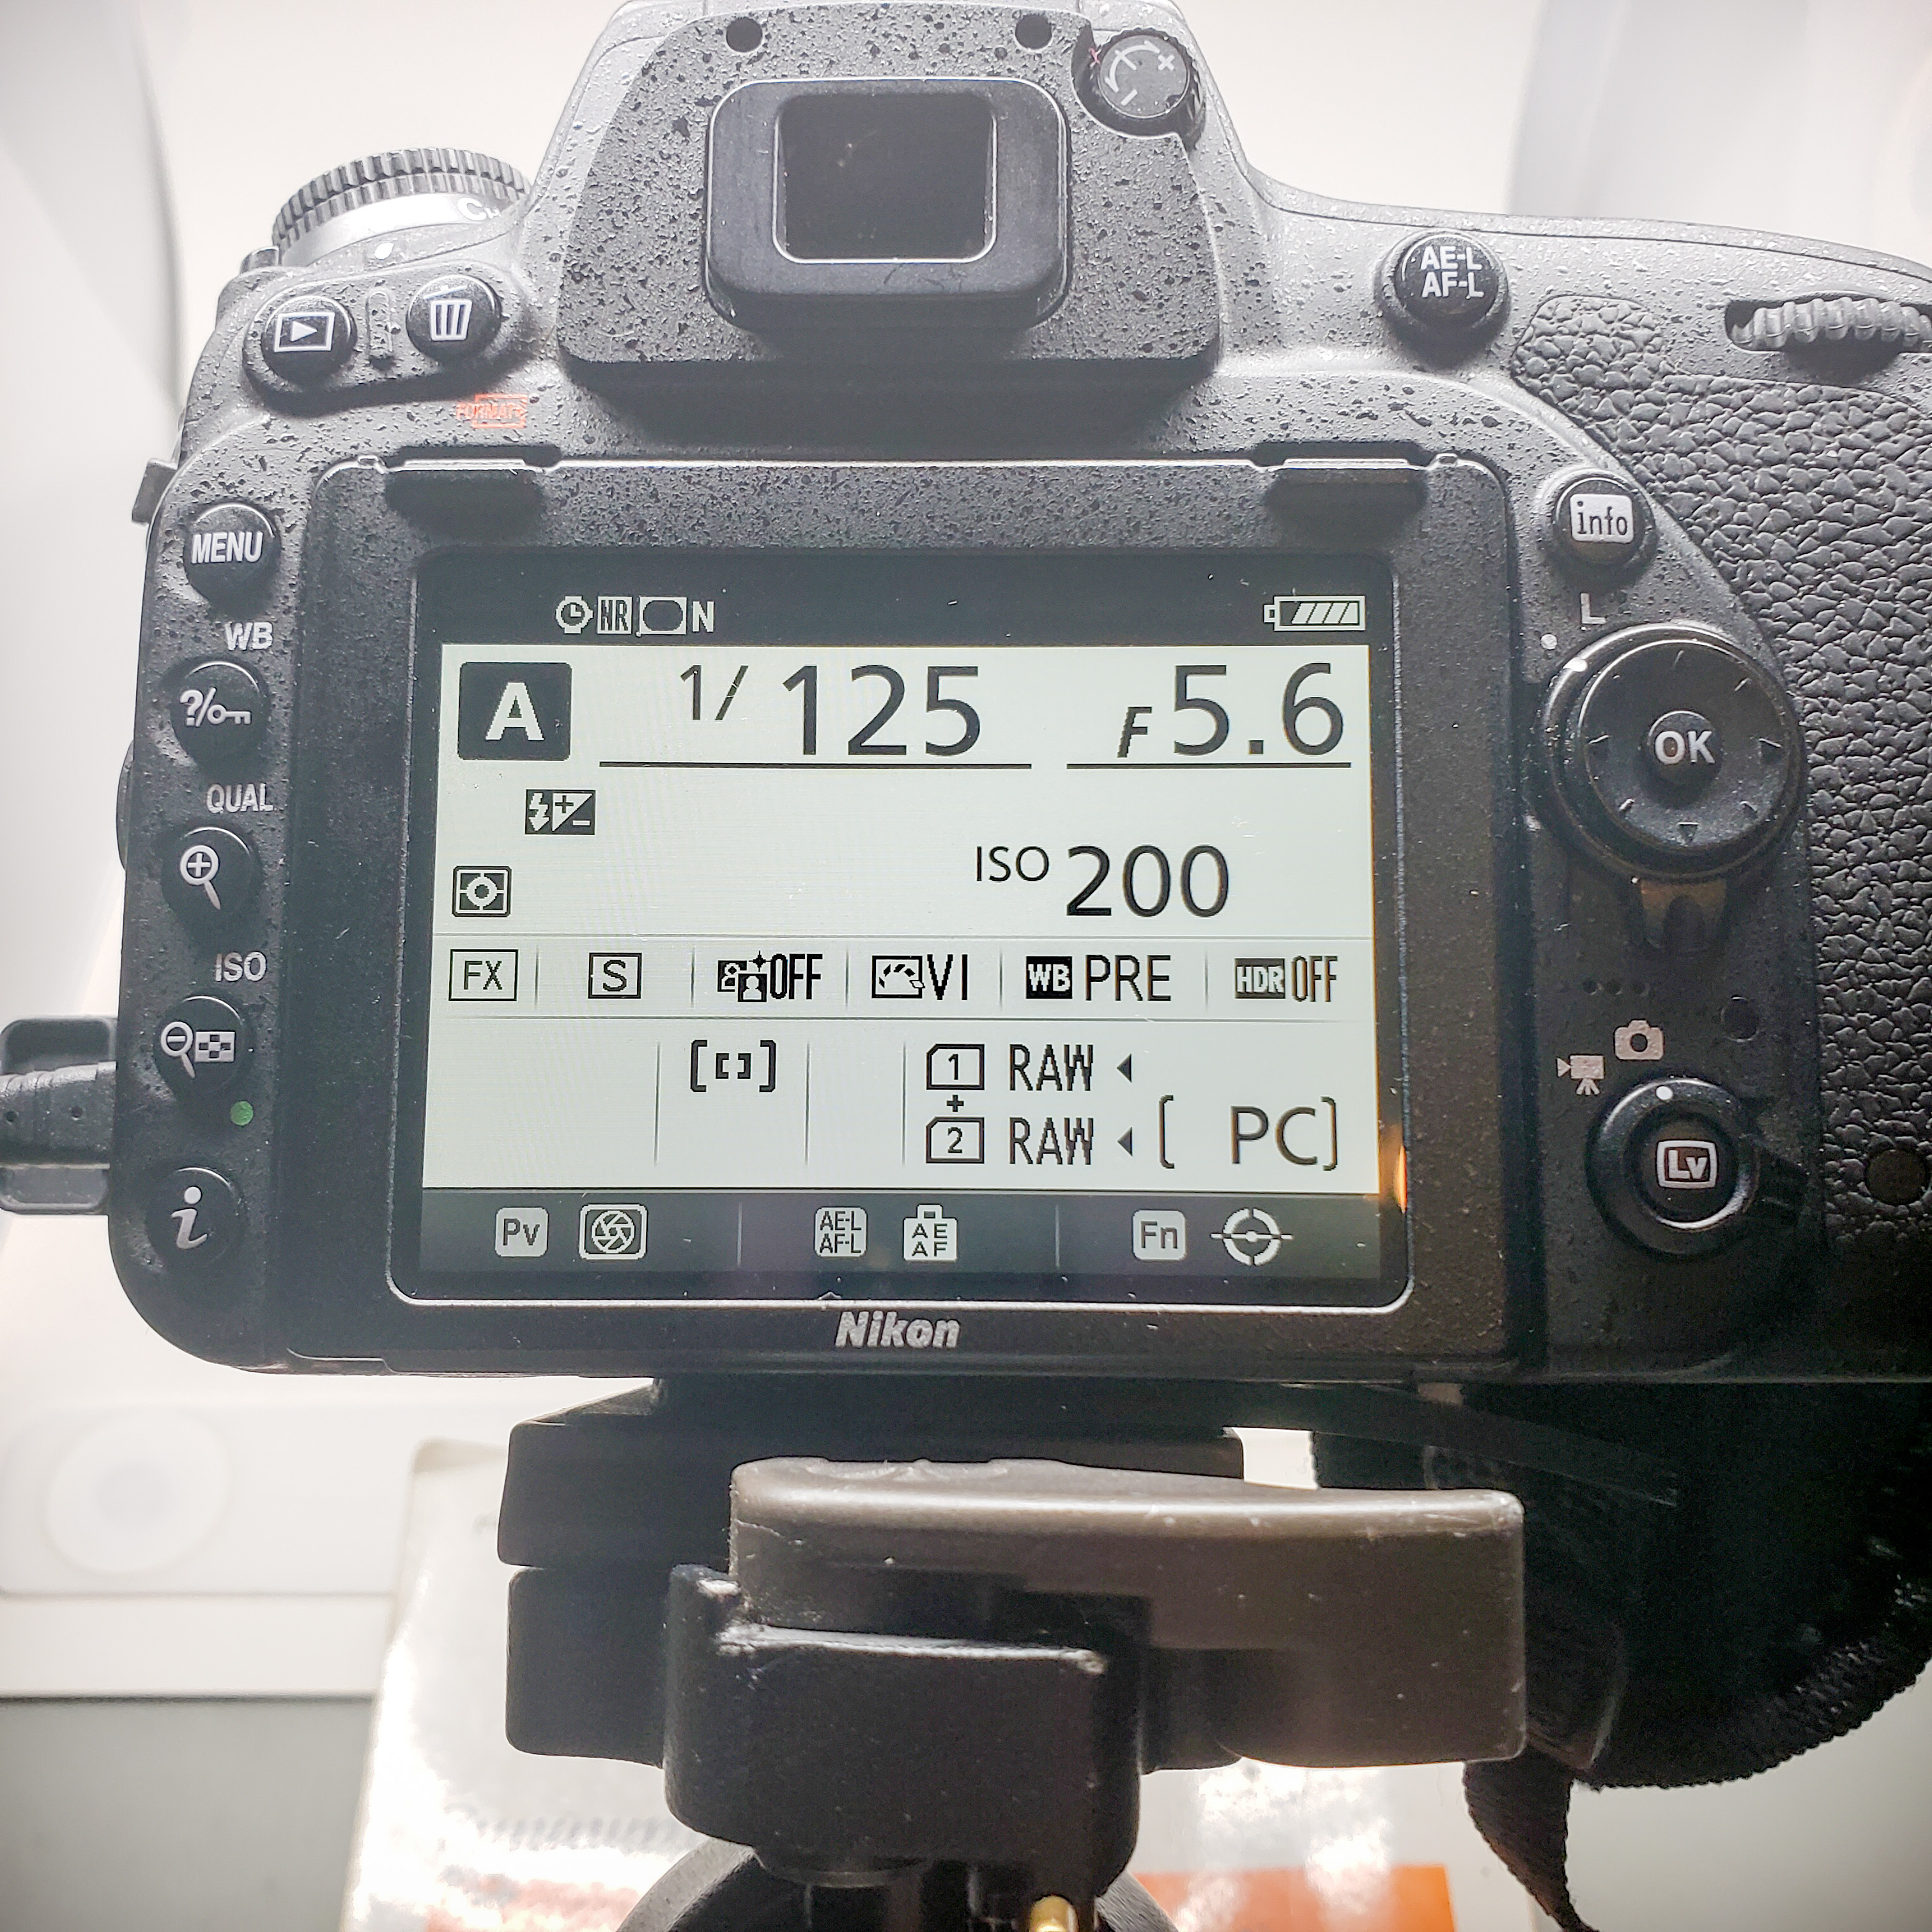
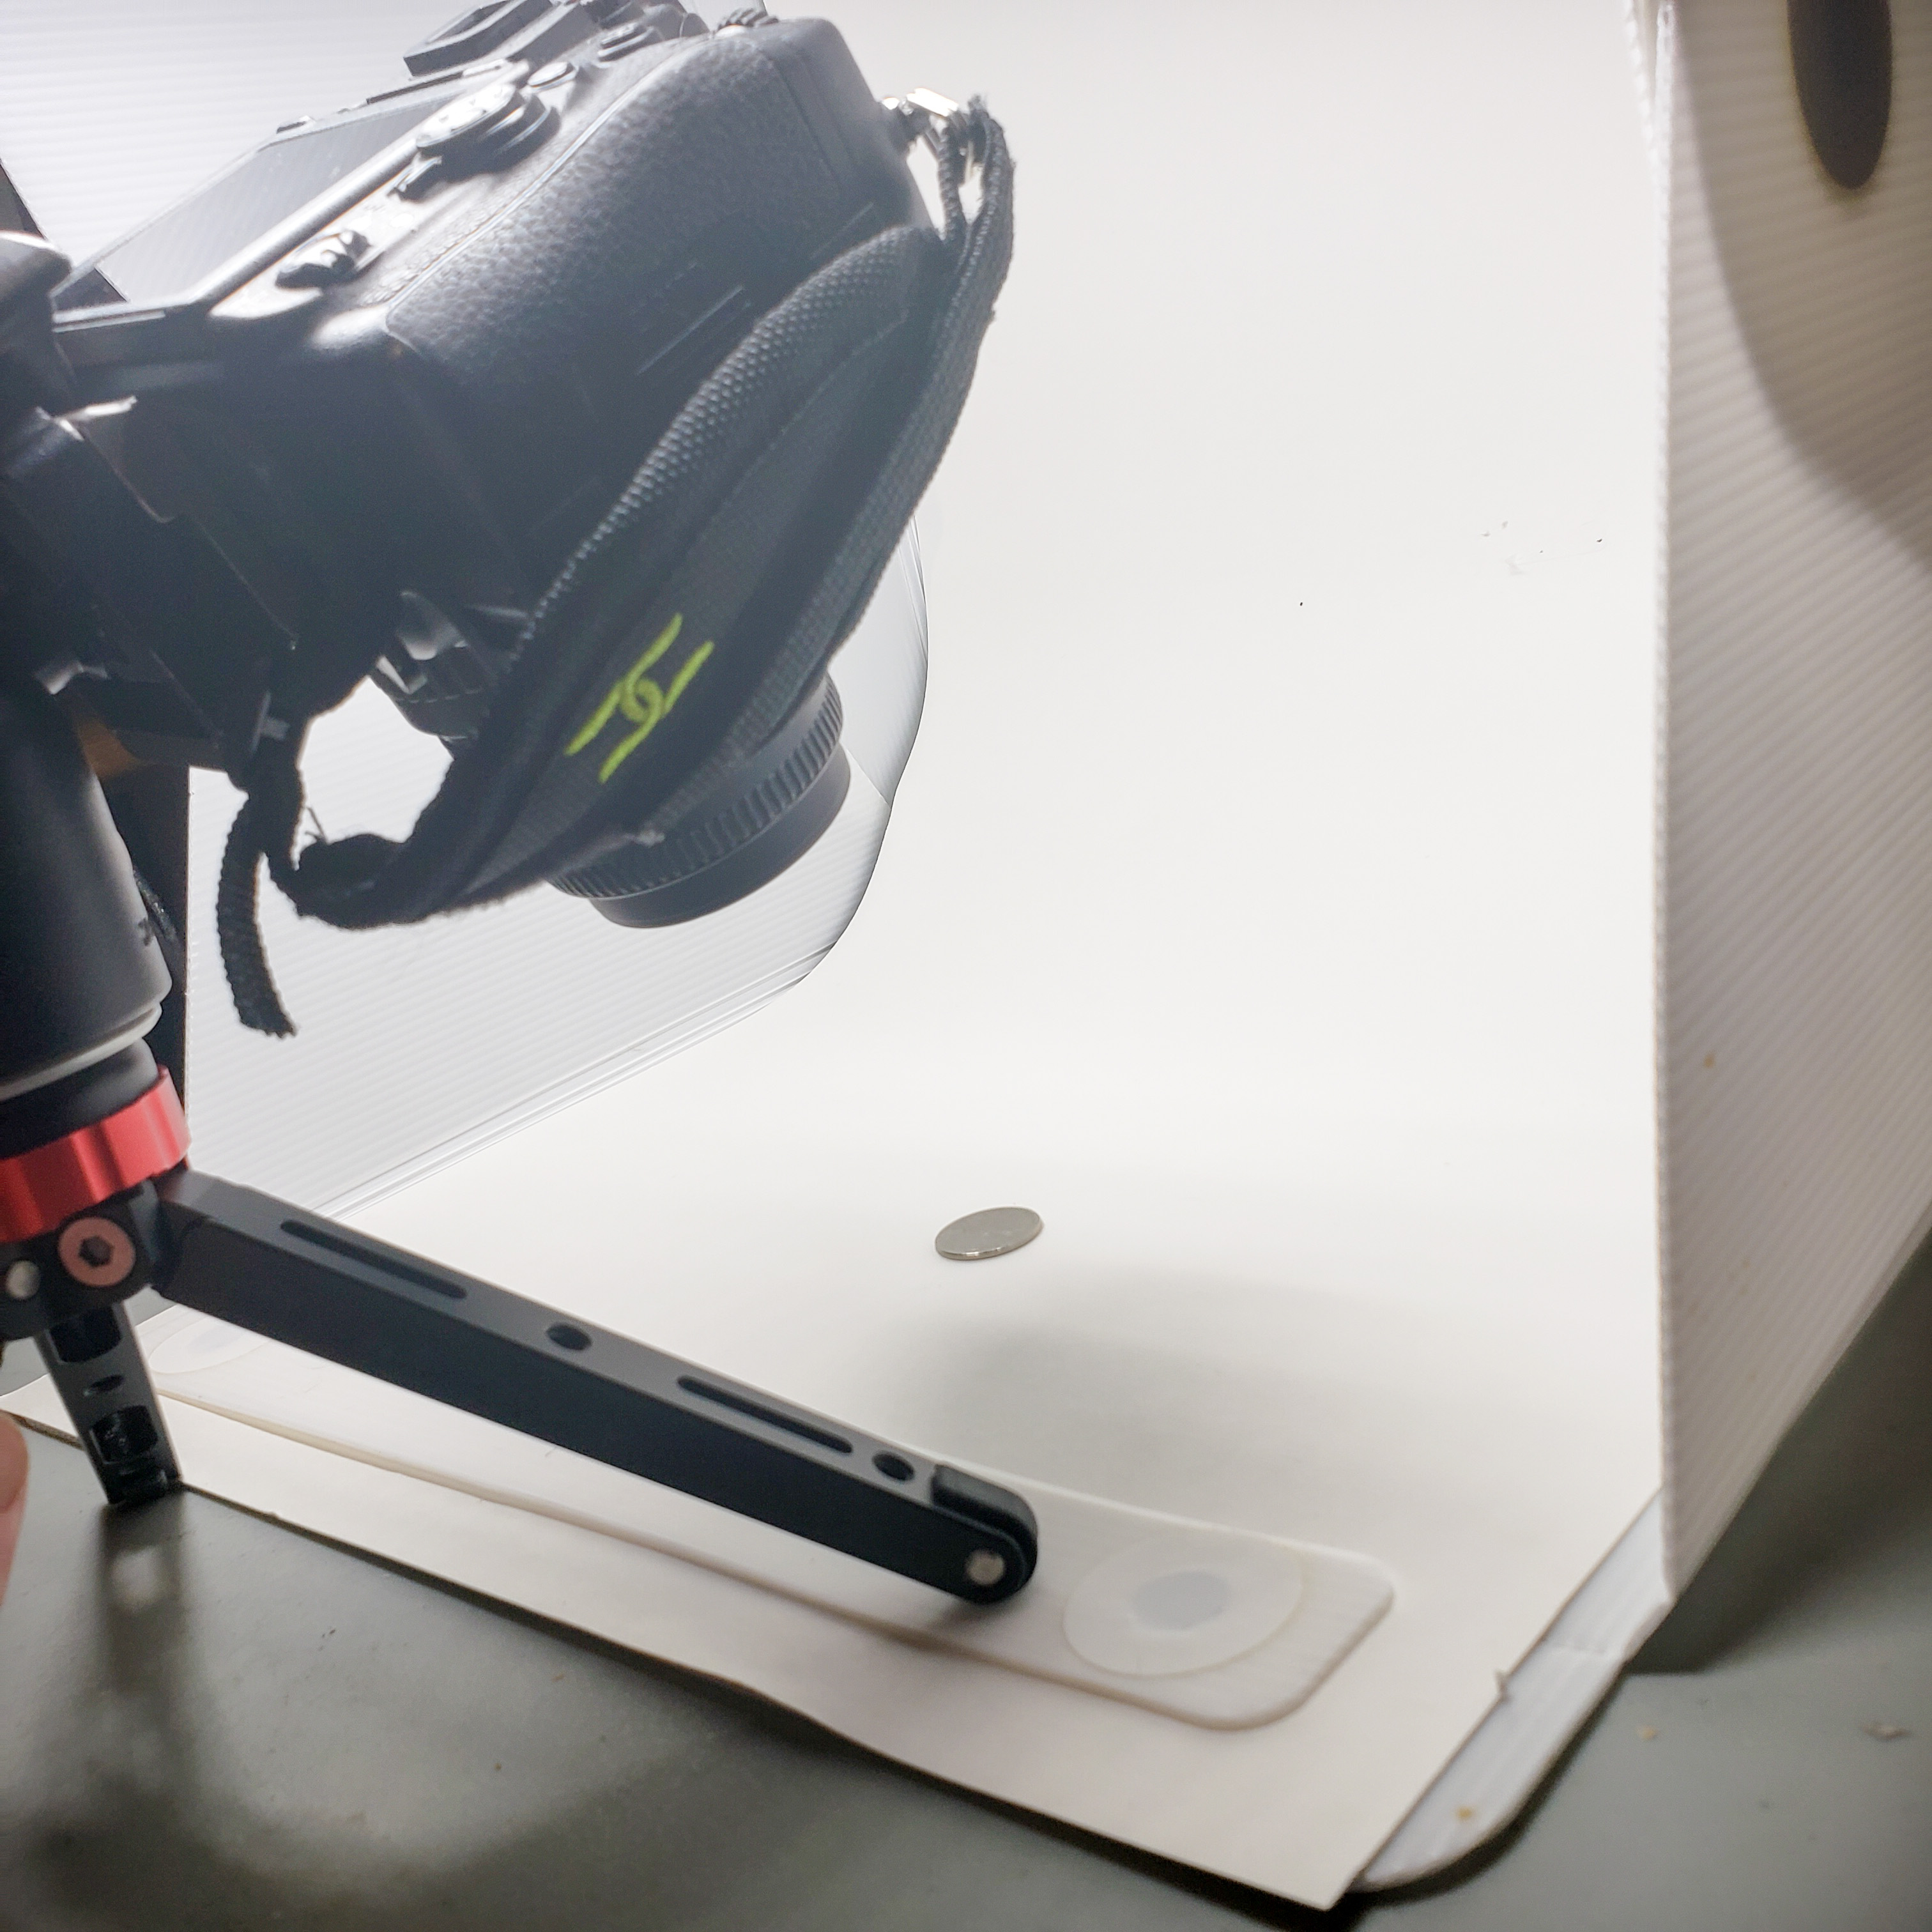
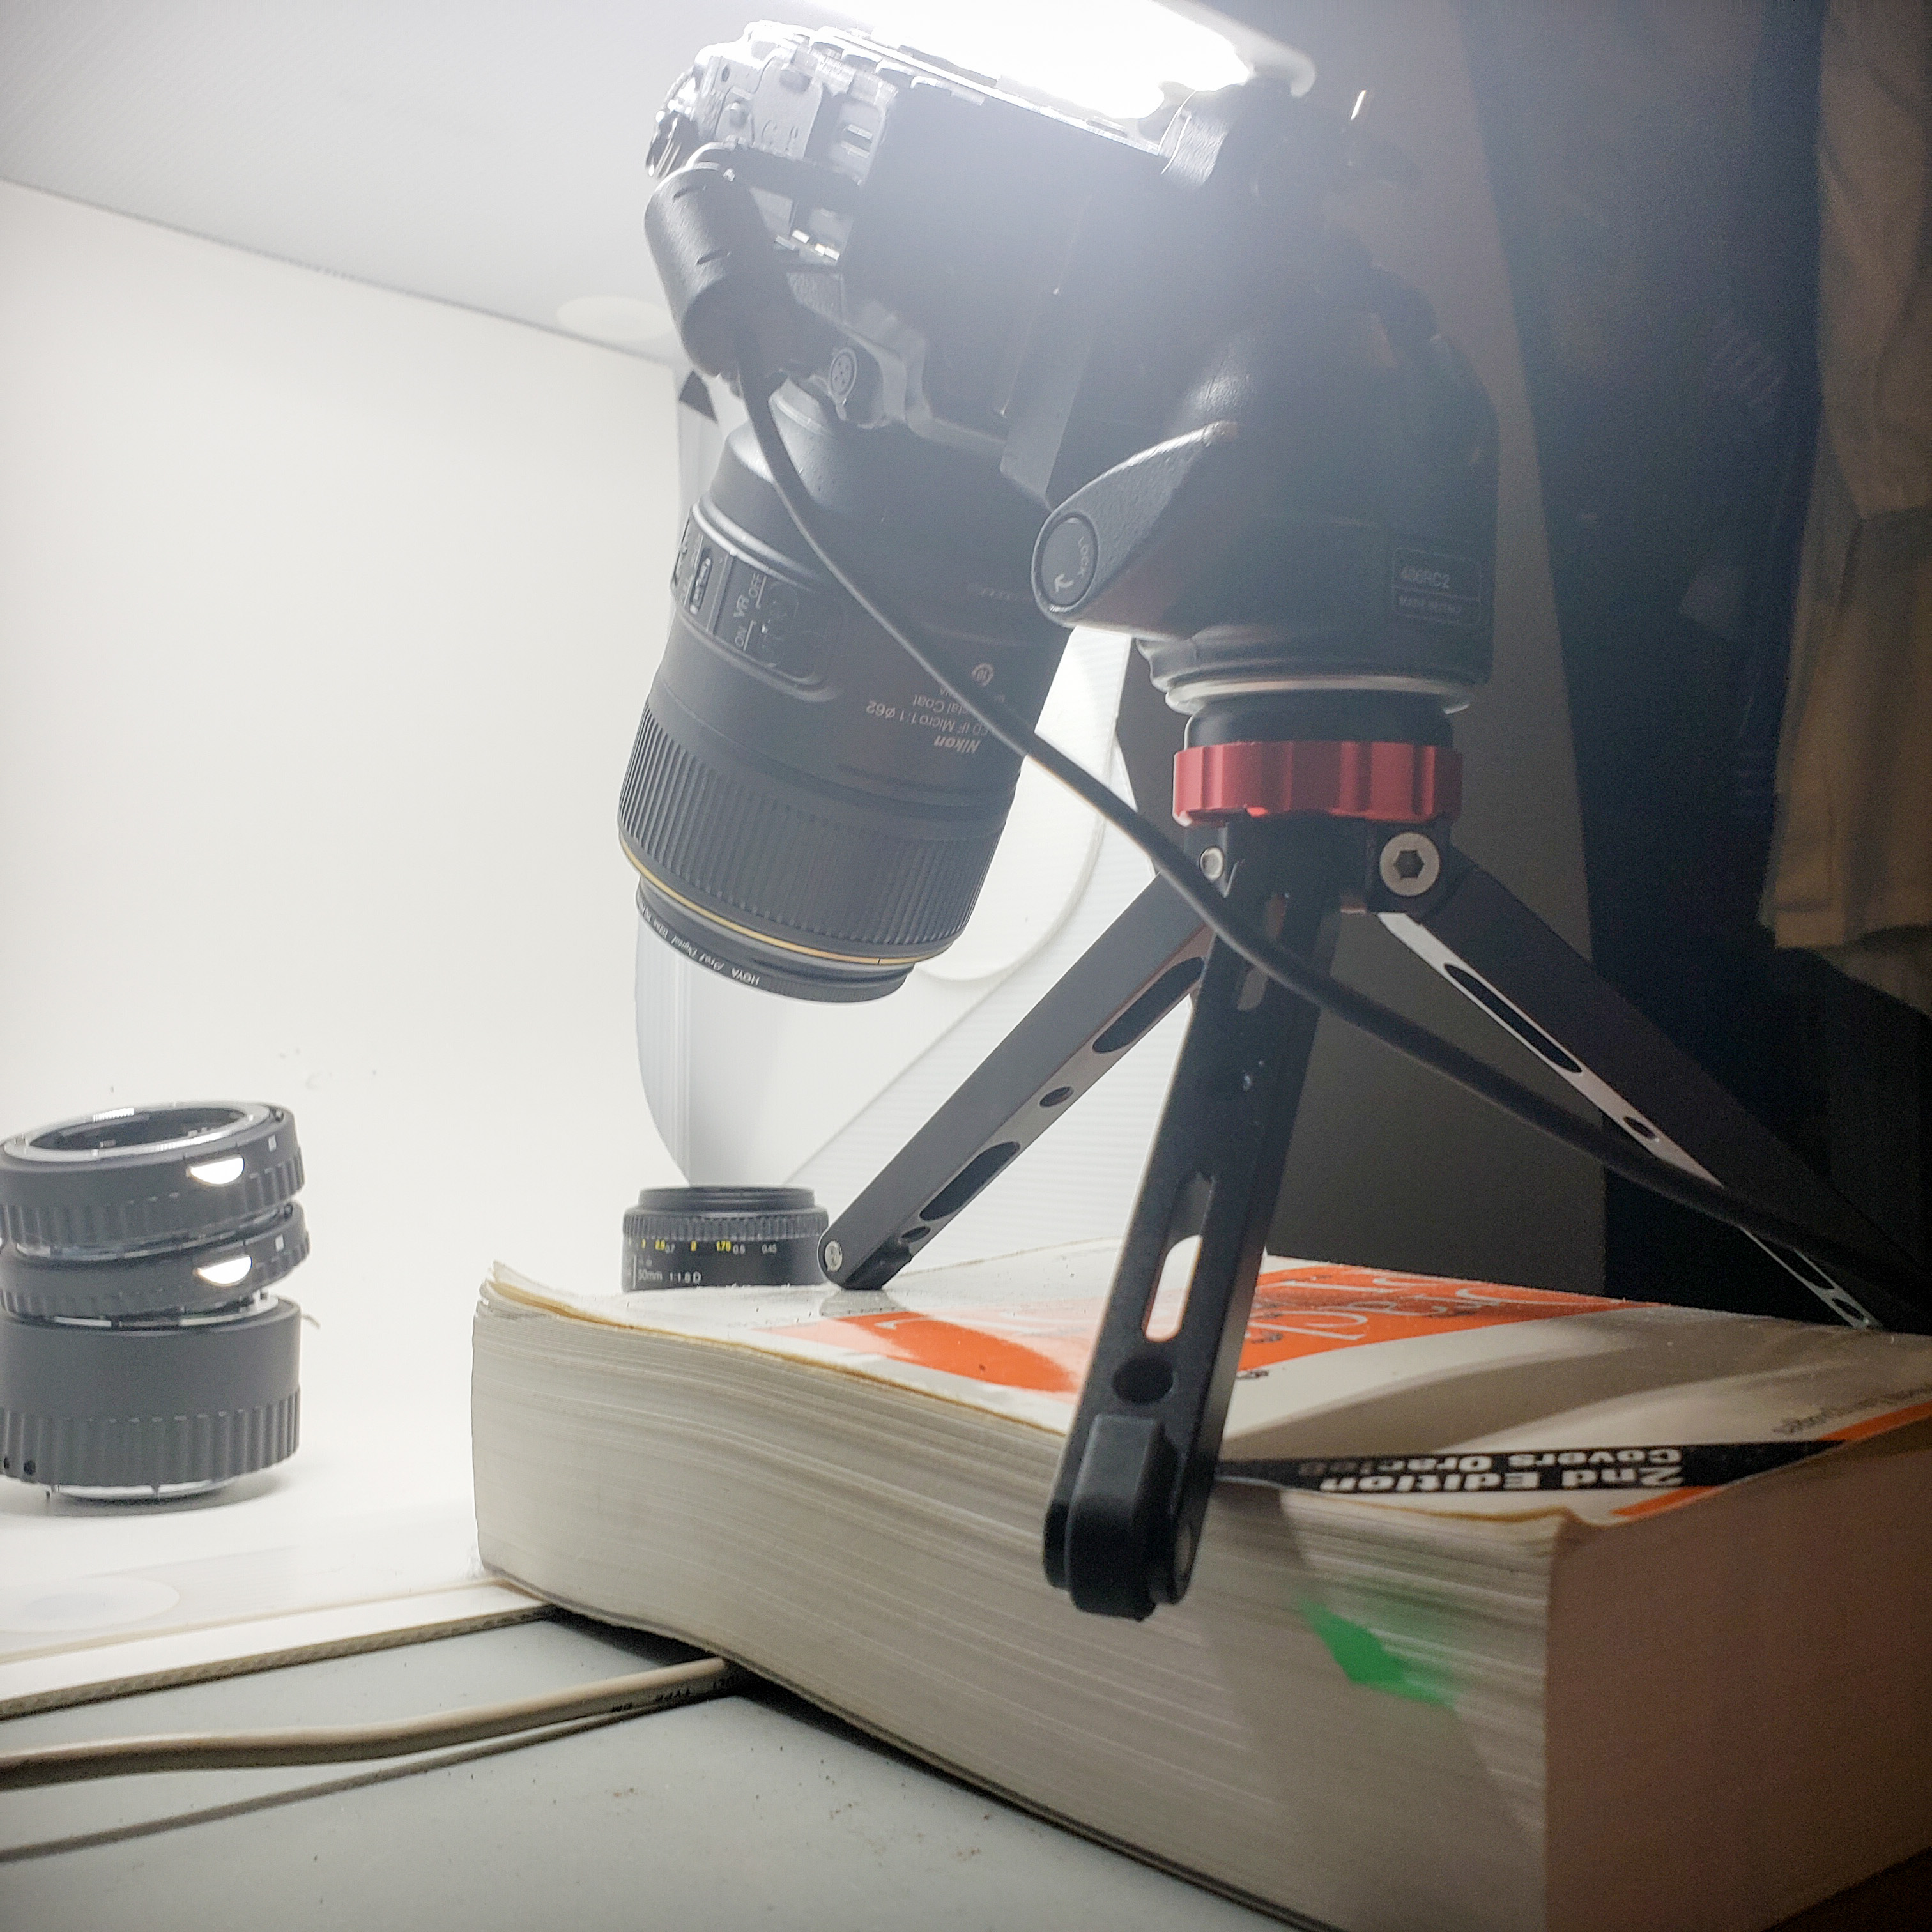
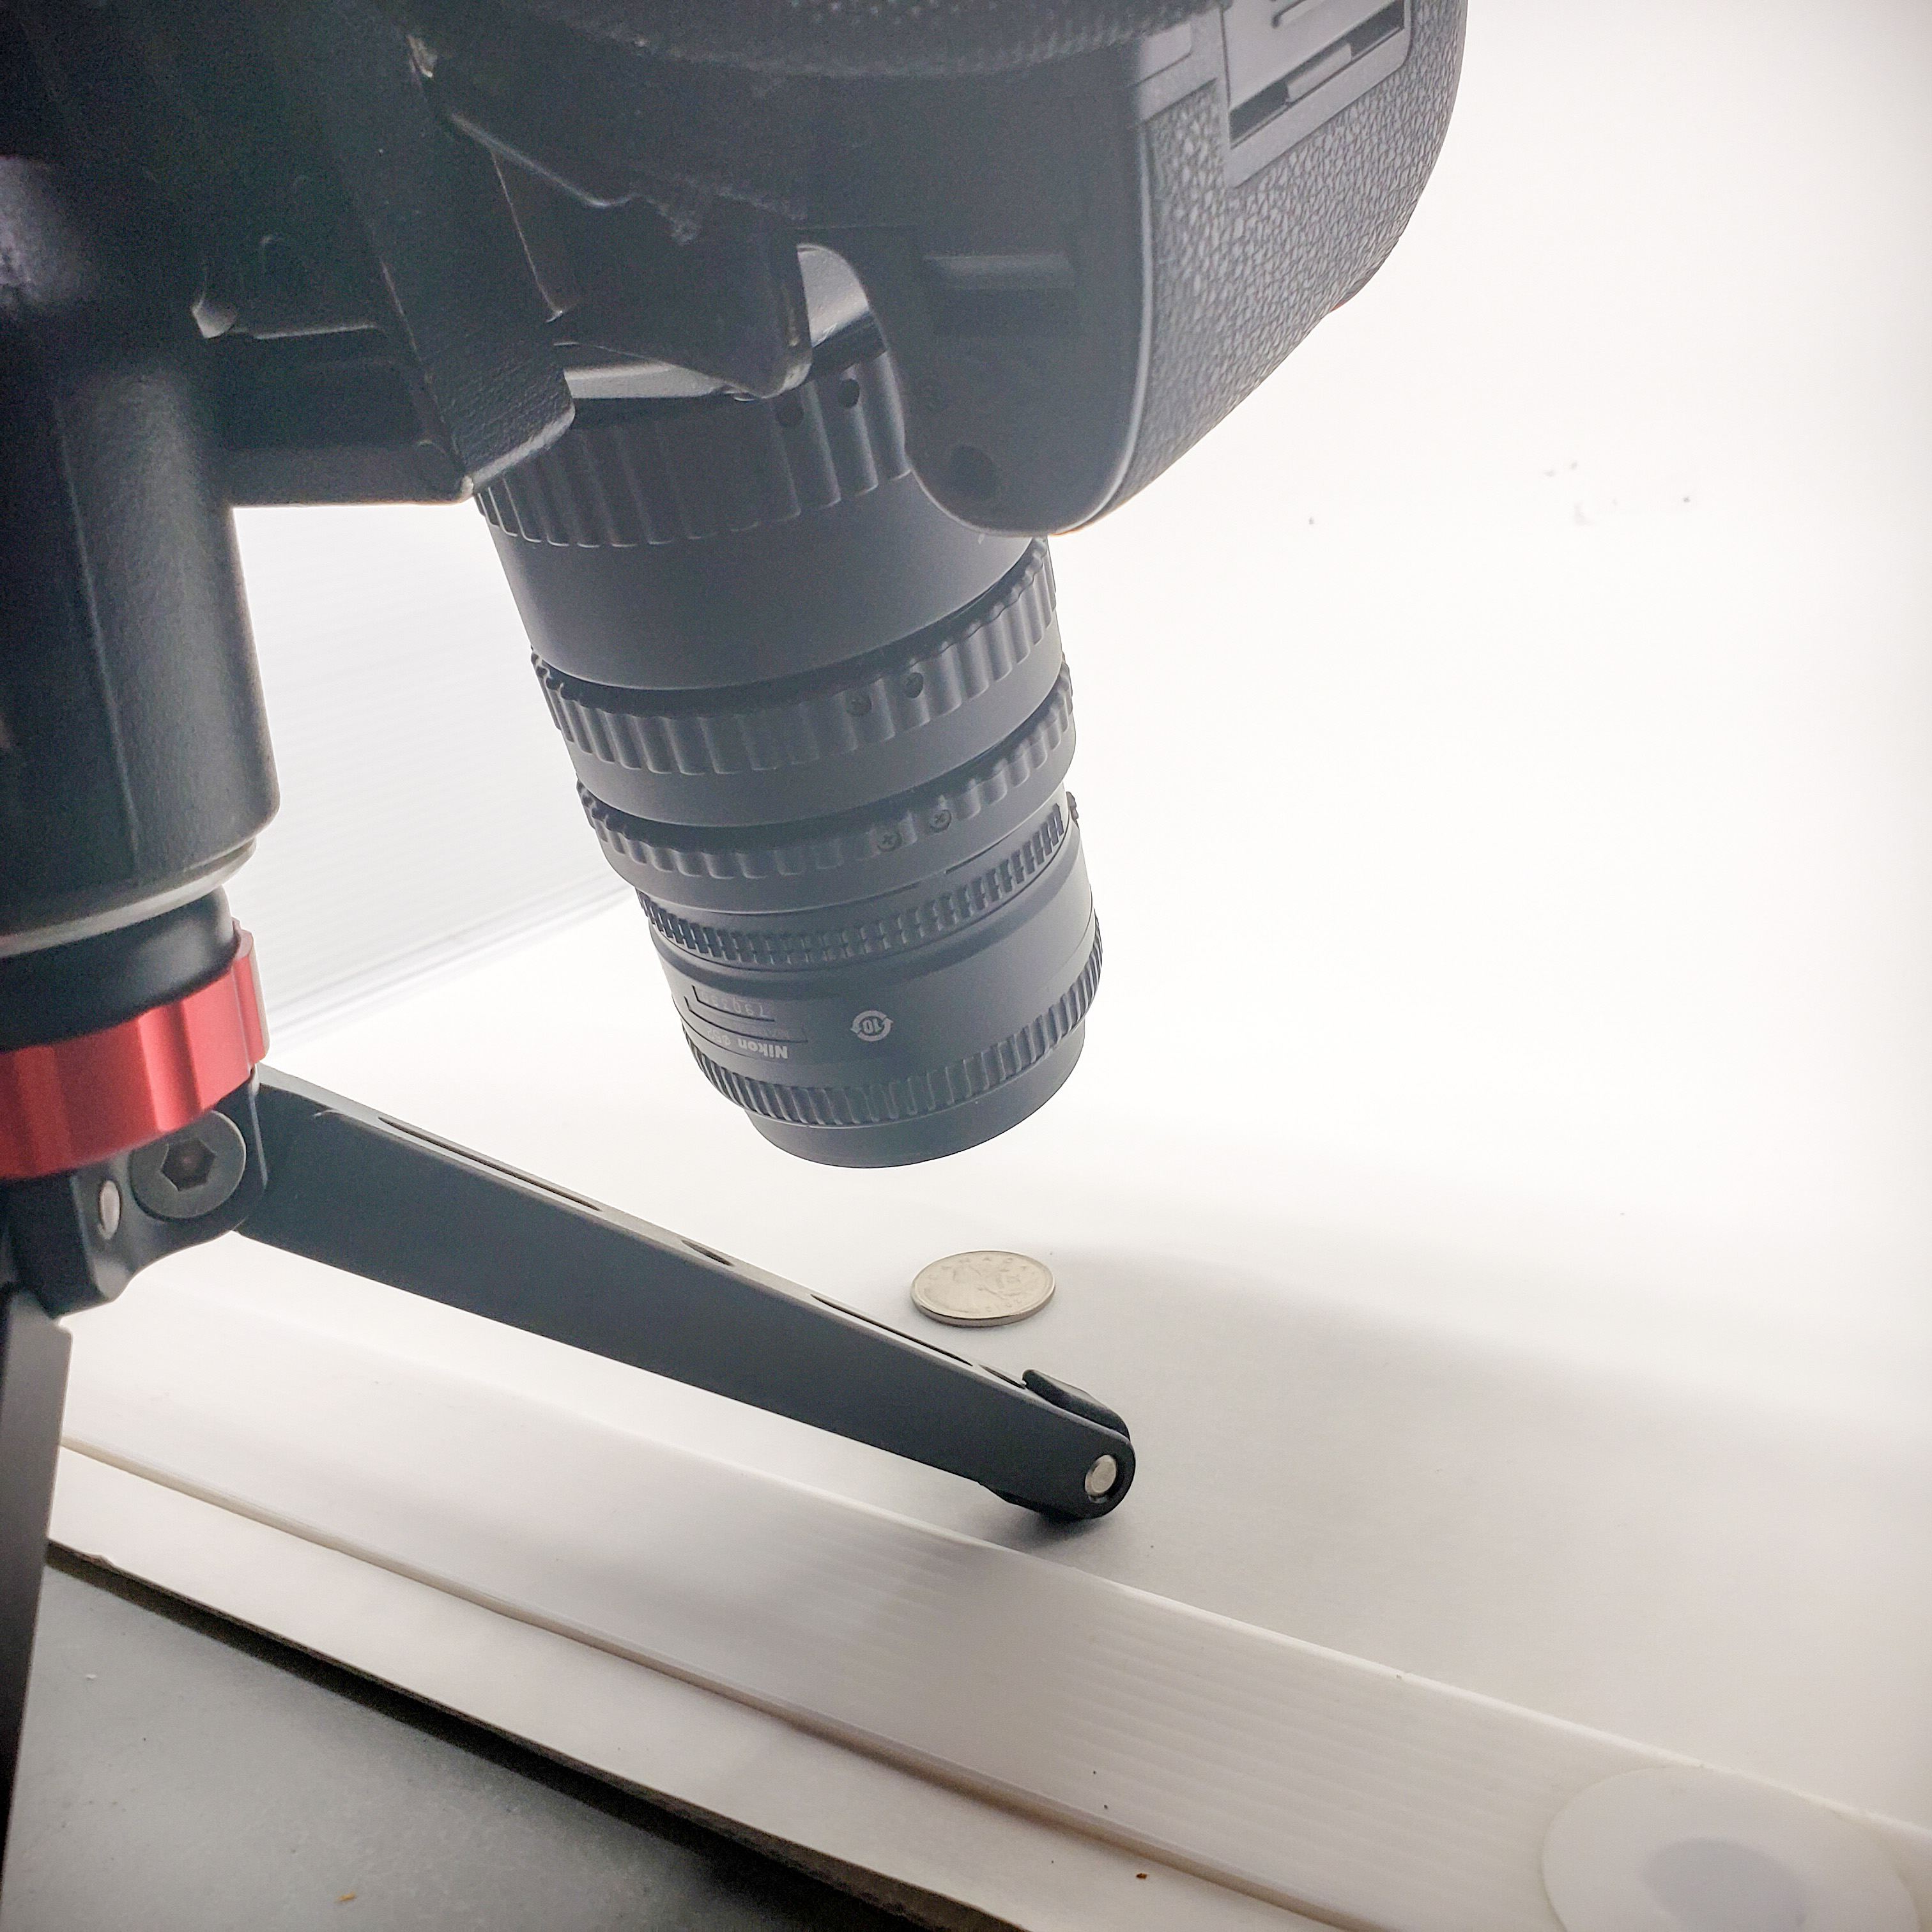
I will be using a Nikon D750 camera, mounted on a mini tripod from Amazon (with Manfrotto ball head), shooting into a Foldio2 light table, and using the closest focus distance for each shot. I will be using a consistent focal length of 5.6 to keep the depth of field reasonably consistent. The camera is set to A (aperture priority), with ISO 200. There may be minor differences in sharpness between the lenses at f5.6, but those should be negligible. I will be using a quarter as the test subject. The distance from subject and angle may change slightly in order to keep the closest focus distance.
From left to right – the Nikon 105mm macro lens, the Nikon 50mm f1.8 lens, and the 3 extension tubes we’ll be testing.
Here were the camera settings as shot. (The shutter speed may change between shots based on the metering of light)
Some more notes before we get to the images:
To show how big and small the images appear on the sensor, there is no cropping, so some images may seem like a lot of “negative space” intentionally.
The photos were mostly taken tethered to my PC (I’ll do another blog post on Tethering). The only processing done was “auto tone” so the lighting and white balance appears somewhat consistent between shots.
I wanted to be able to let you zoom into the photos by clicking on them, but I haven’t figured out how to do that in WordPress. When I do, I’ll update the article so you can look closer, but hopefully images are big enough so you get an idea of sharpness and depth of field.
The lighting may appear different since different angles and camera height was needed for the different lens combinations.
This experiment is not a review or recommendation, just the raw data from an experiment. I will let you zoom into the pics and decide what you think is sharper and more aesthetically pleasing.
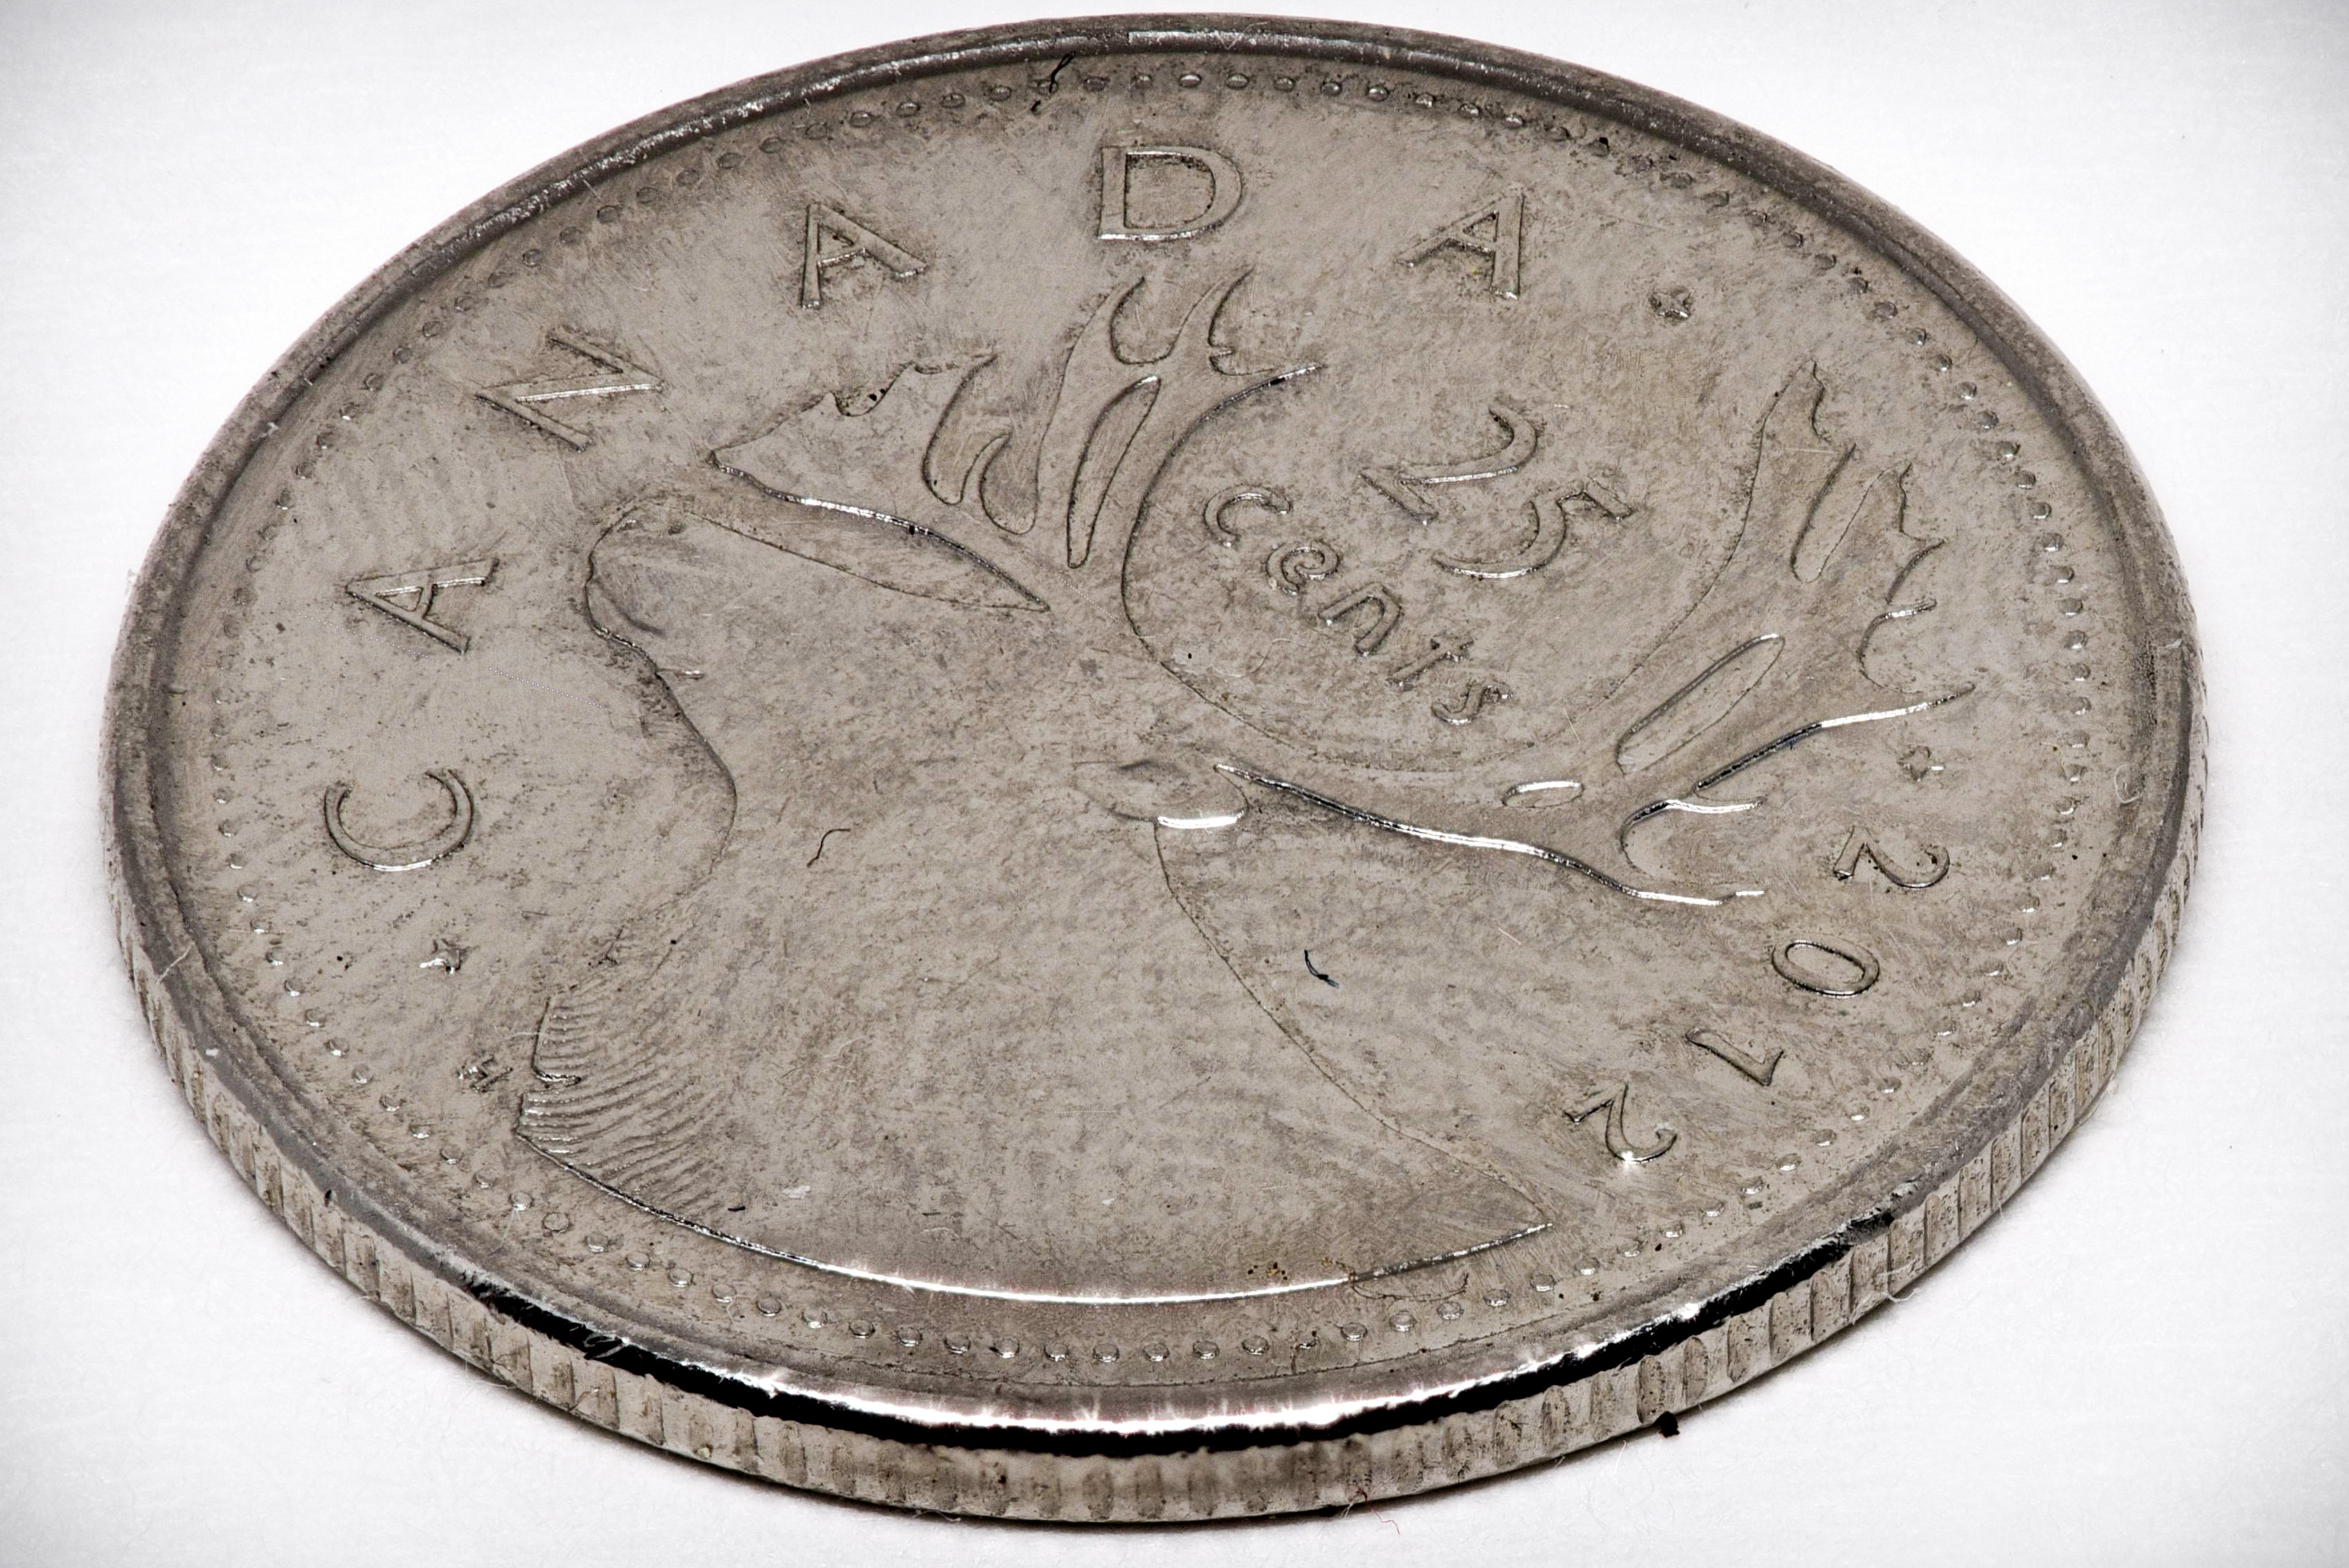
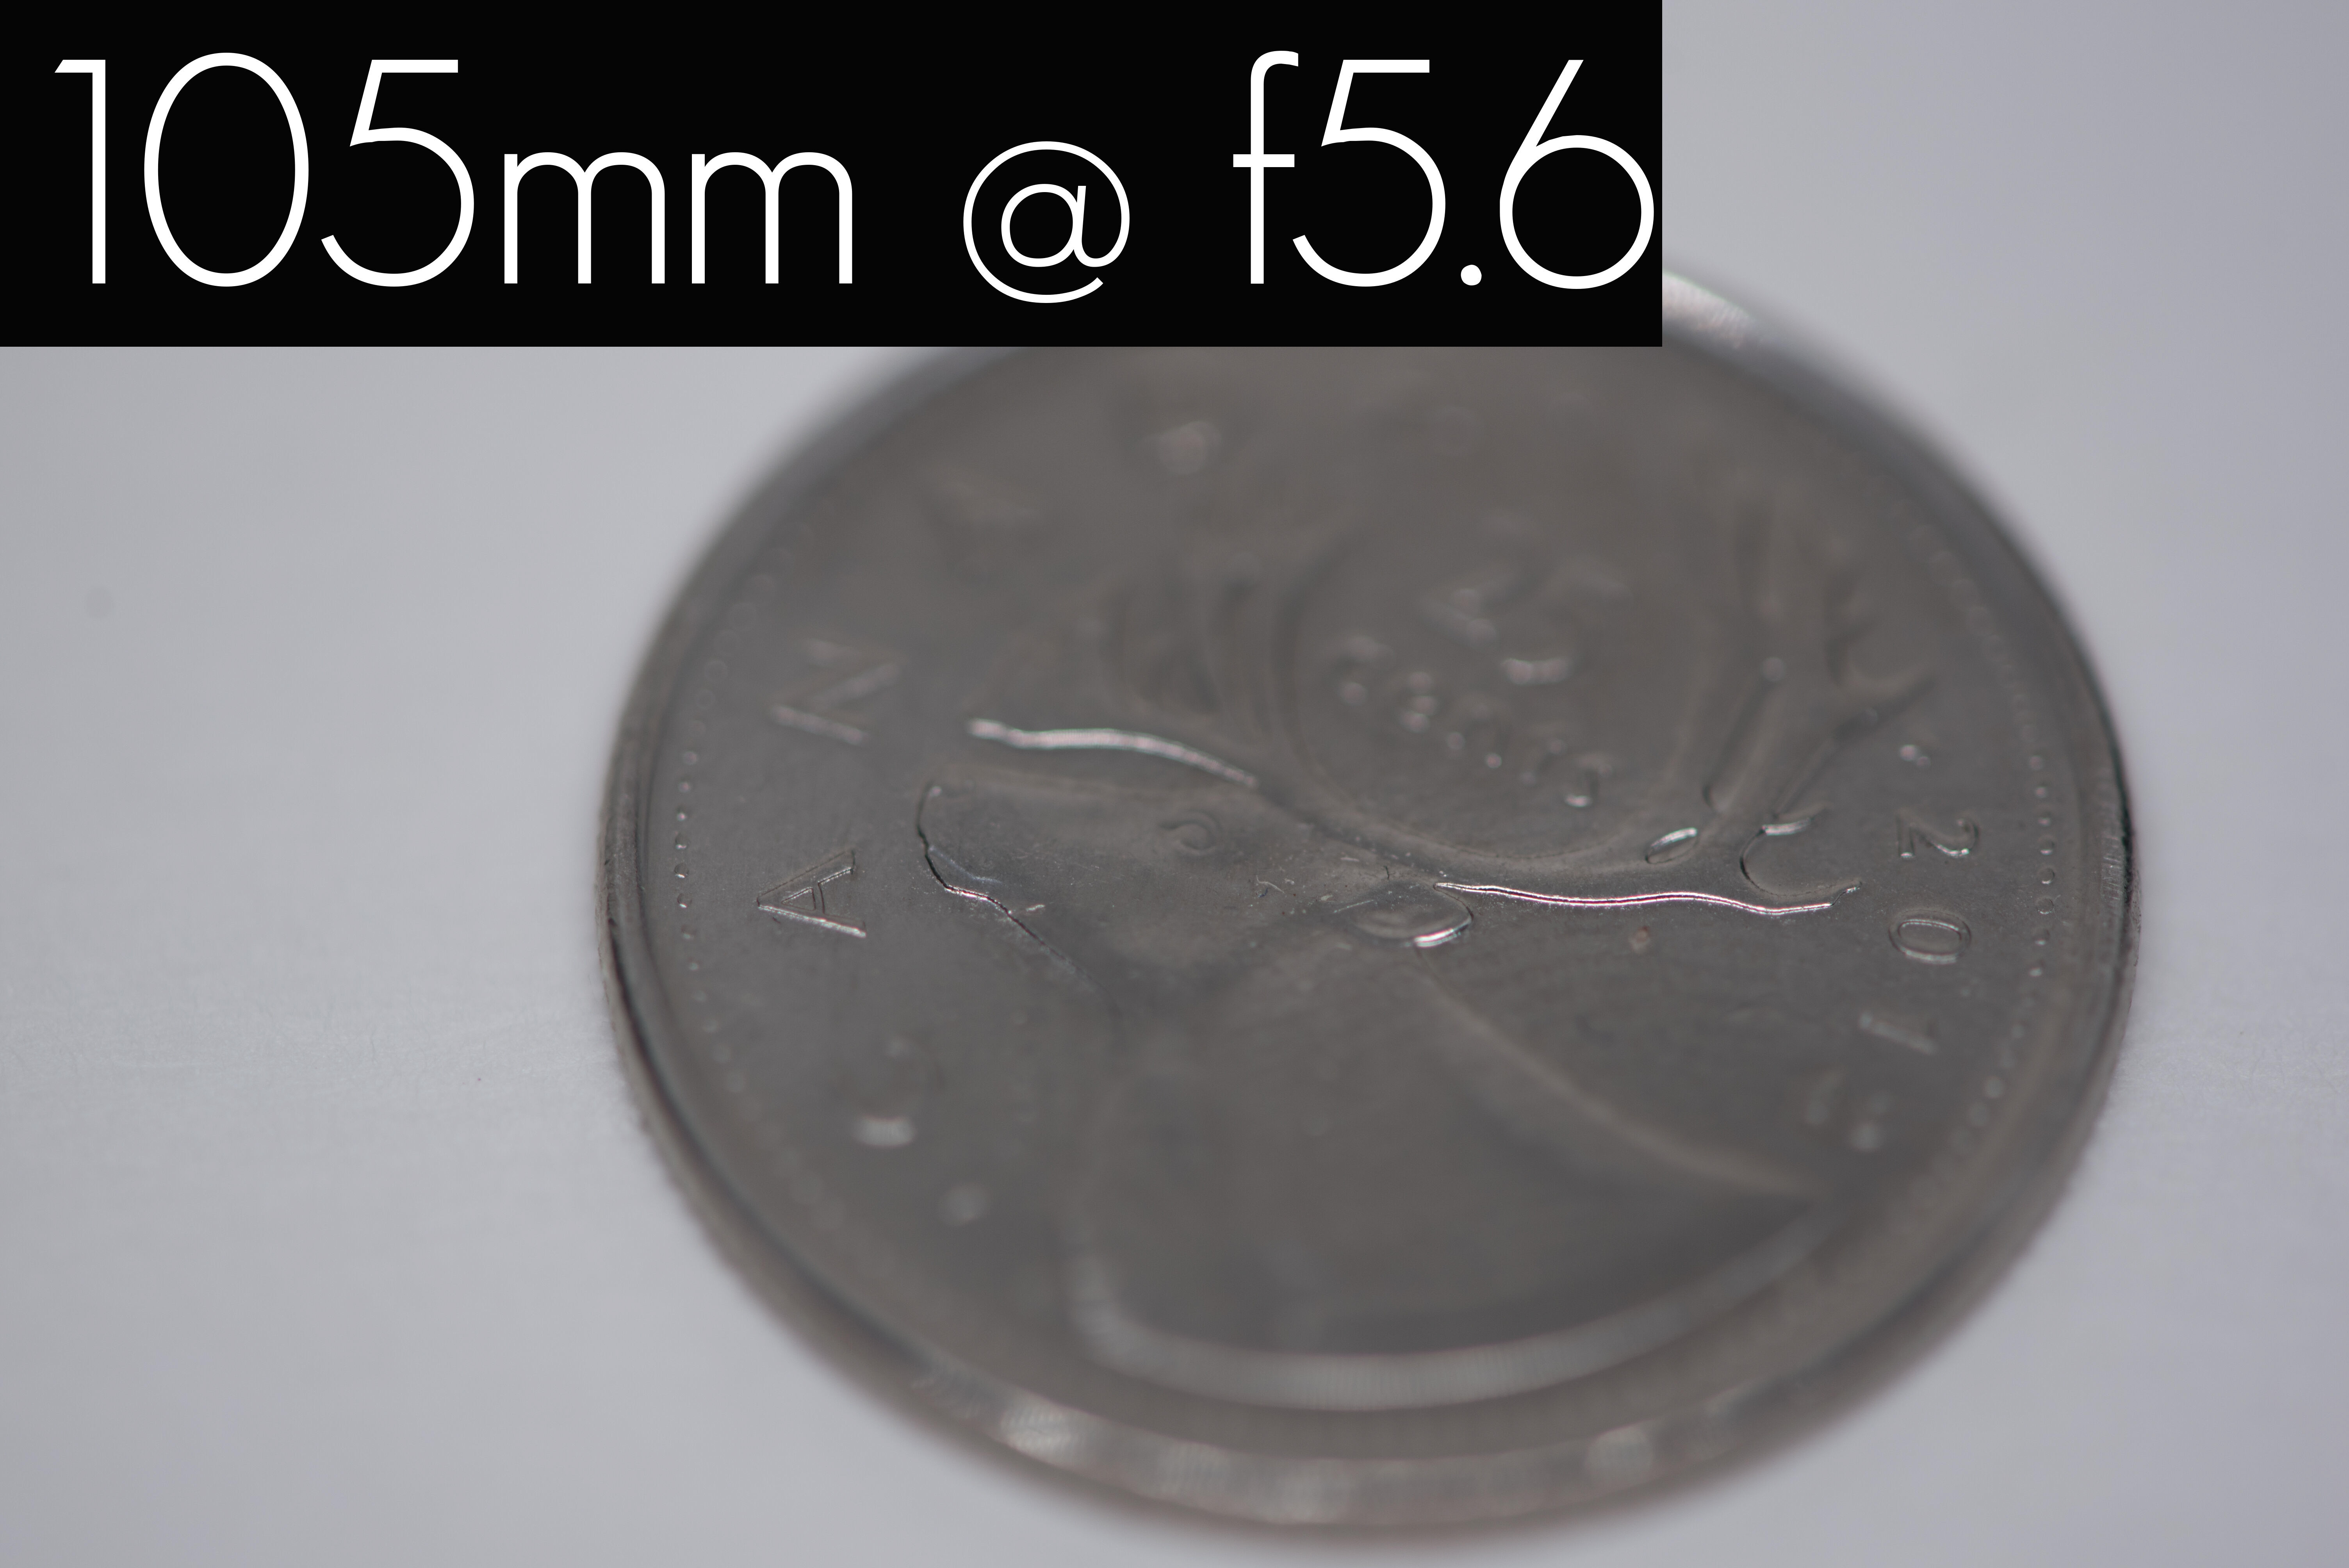
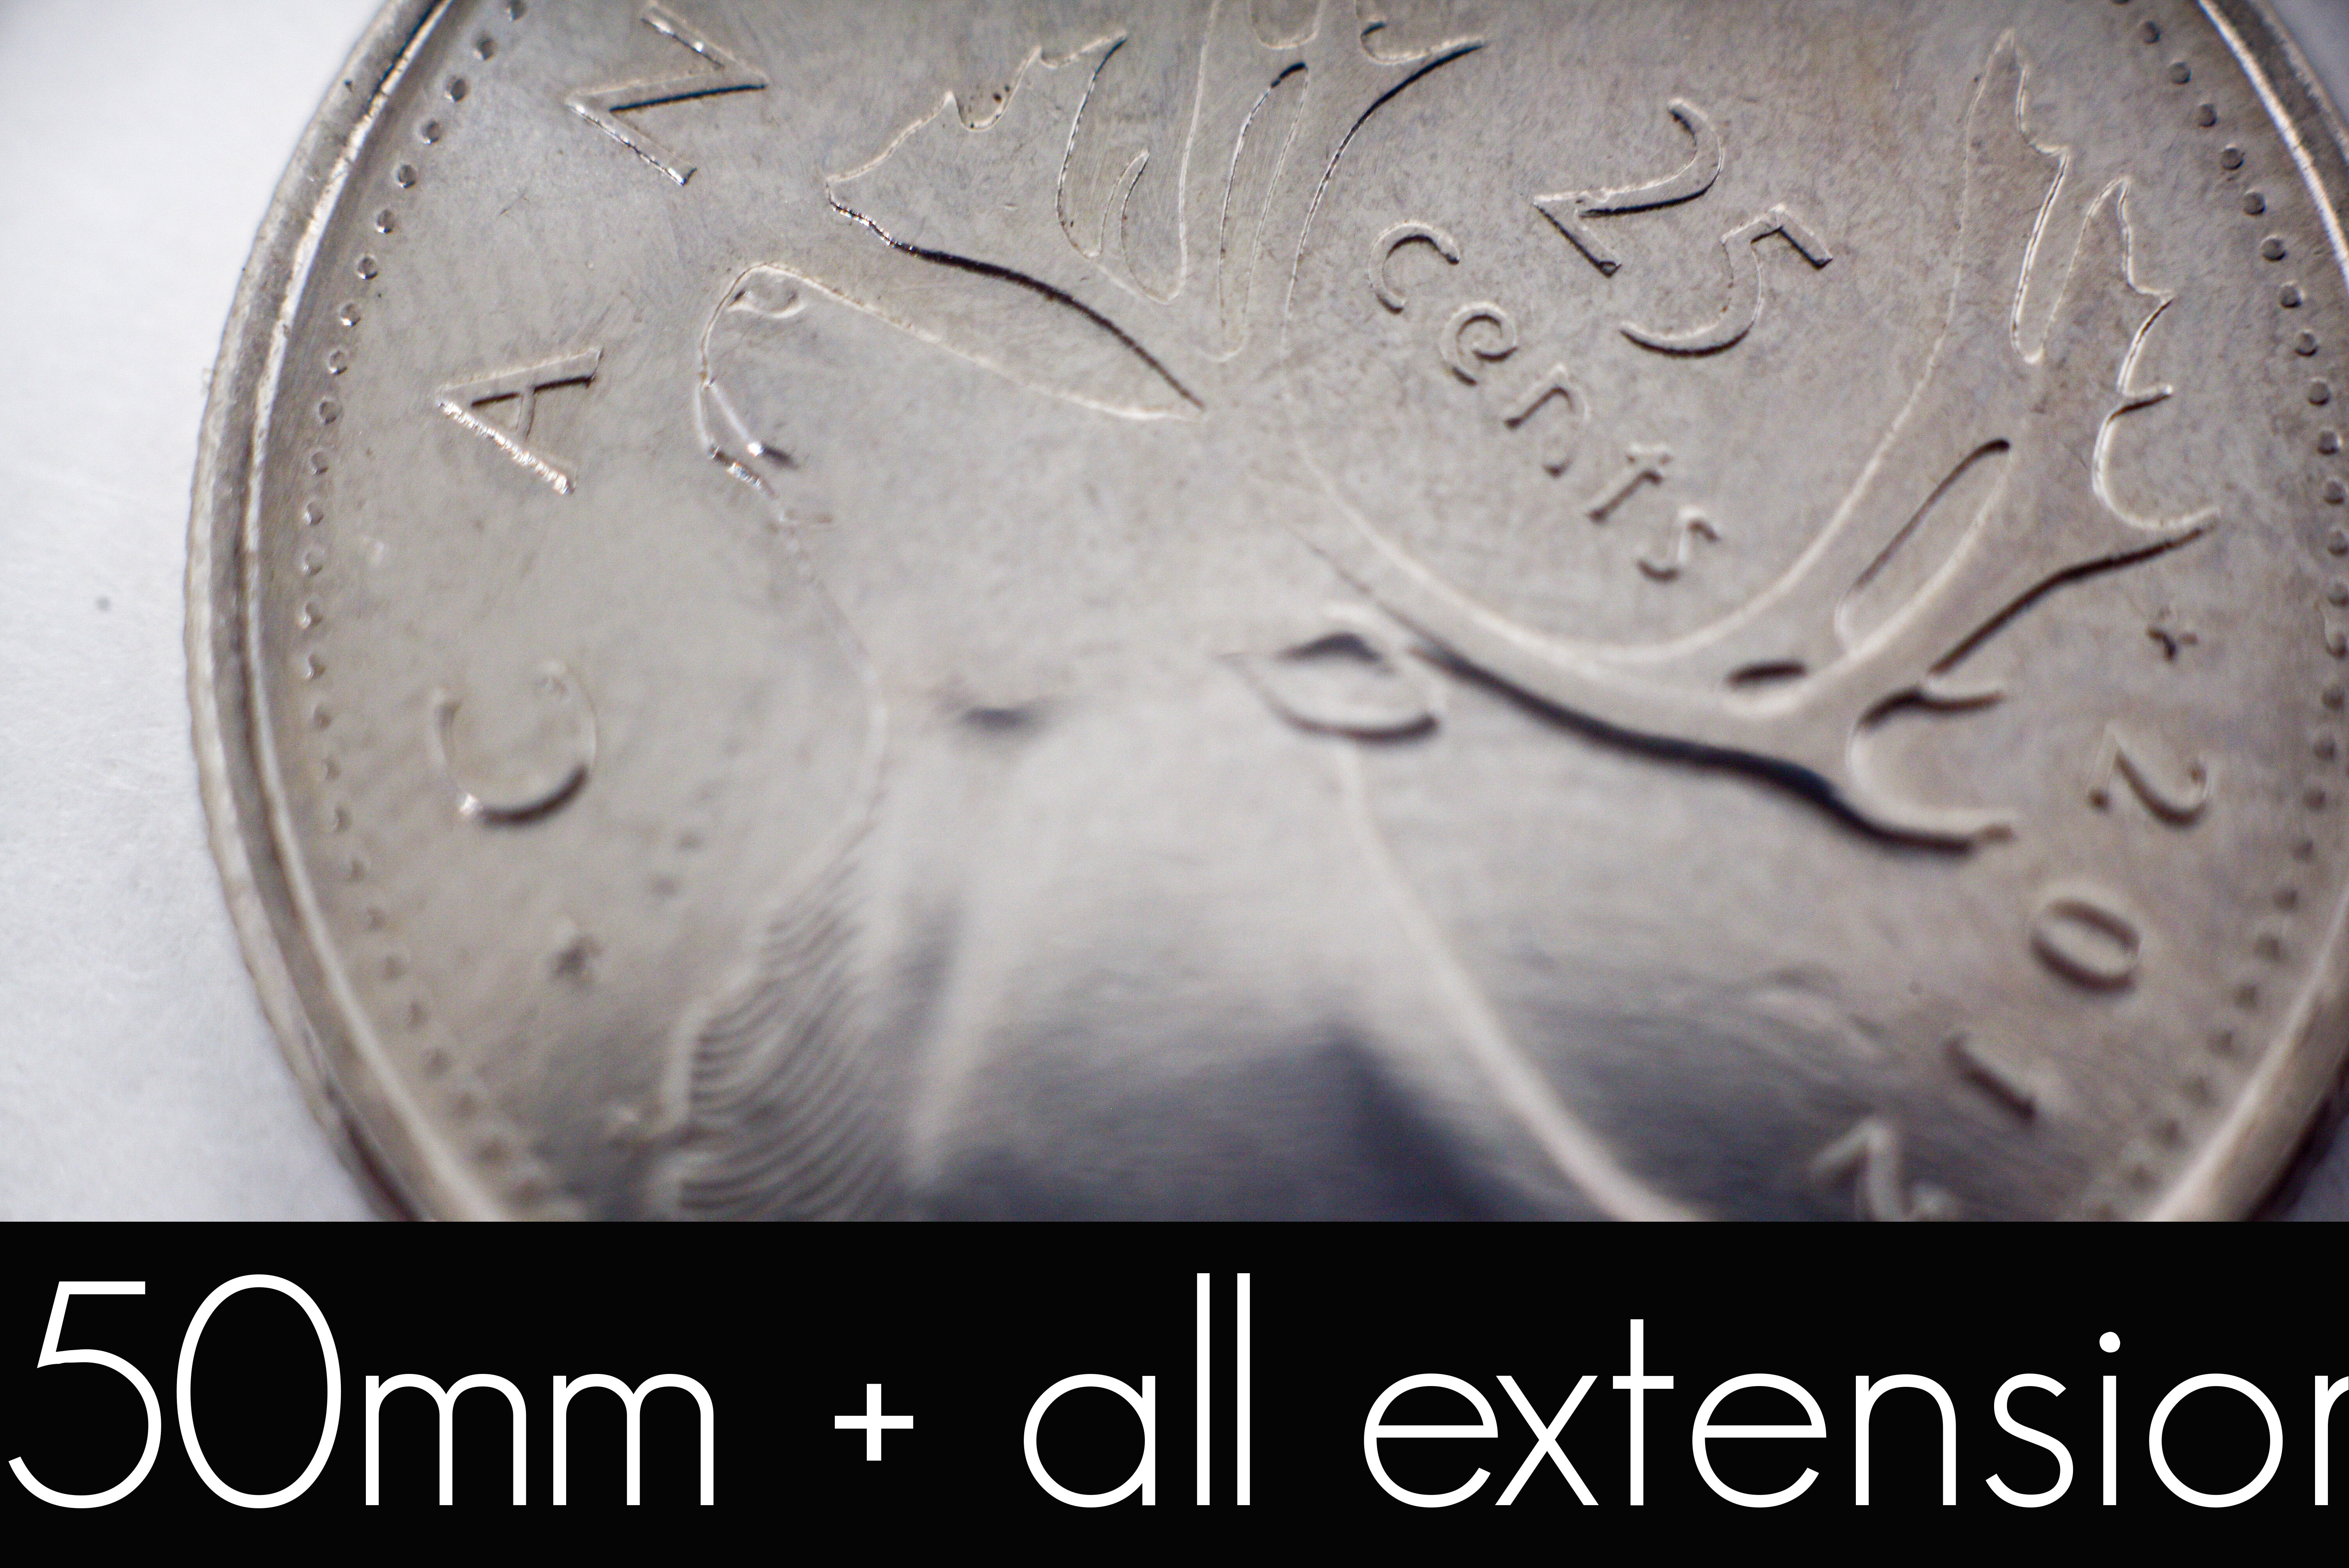
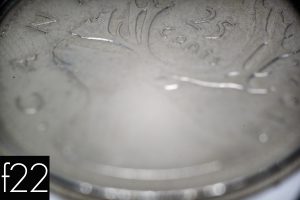
Macro Lens Only (105mm at f5.6)
Our first photo is that using the Nikon 105mm macro at f5.6. Note how large the coin looks in terms of the whole image (no cropping). Even at 5.6, the depth of field is pretty narrow due to the distance from the subject.
Due to the distance needed to the subject, I needed to prop the mini tripod onto a book.
50mm only
Ok this is not a macro shot, but just for baseline and reference, here’s a shot of the quarter with only the 50mm lens shot at f5.6. The image may not be sharp as I had to hand-hold the camera it was so far away (the closest I could with this lens get and have the quarter in focus).
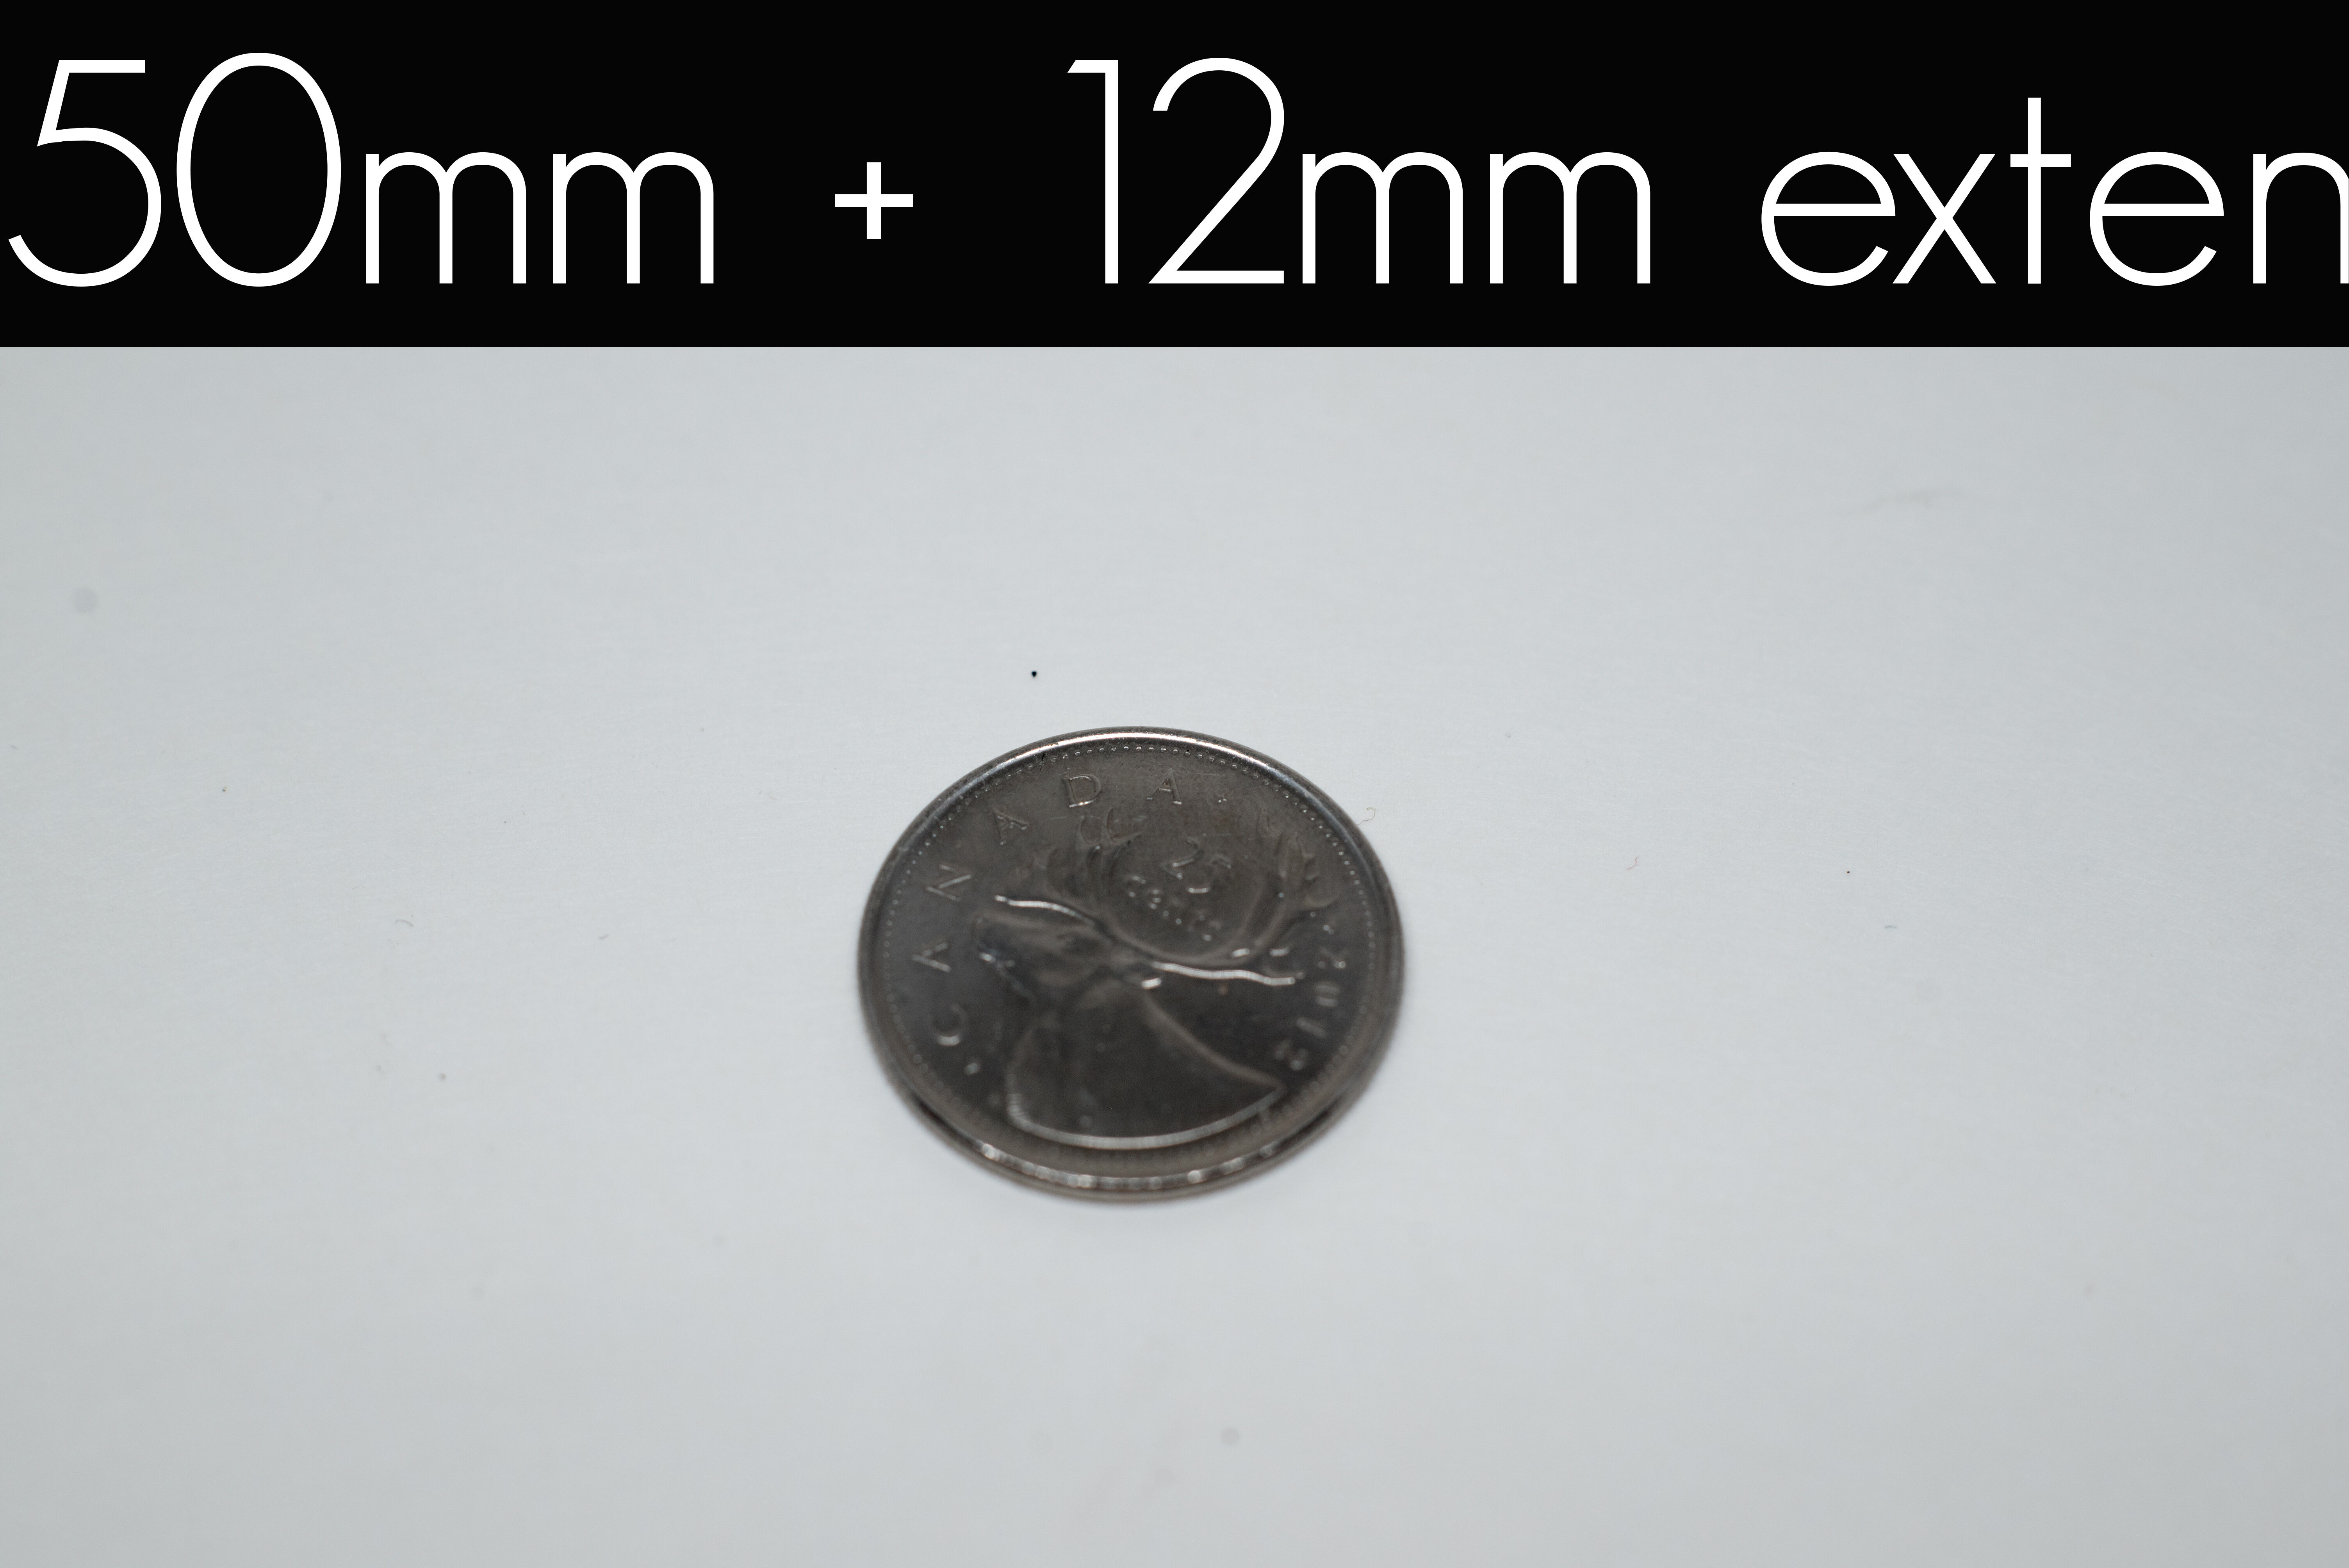
50mm lens with 12mm extension tube
This shot was also taken at f5.6, with the 12mm extension tube between the 50mm lens and the camera. Notice how much close I can get to the quarter than with no extension tube. The lens is about 14cm from the quarter (the closest I can get). The quarter is mostly in focus from top to bottom.
50mm lens with 20mm extension tube
This shot was also taken at f5.6, with the 20mm extension tube between the 50mm lens and the camera. The lens is about 11cm from the quarter (the closest I can get). The quarter is even closer than with the 12mm tube, as expected. The quarter is still pretty sharp and in focus.
” ‘
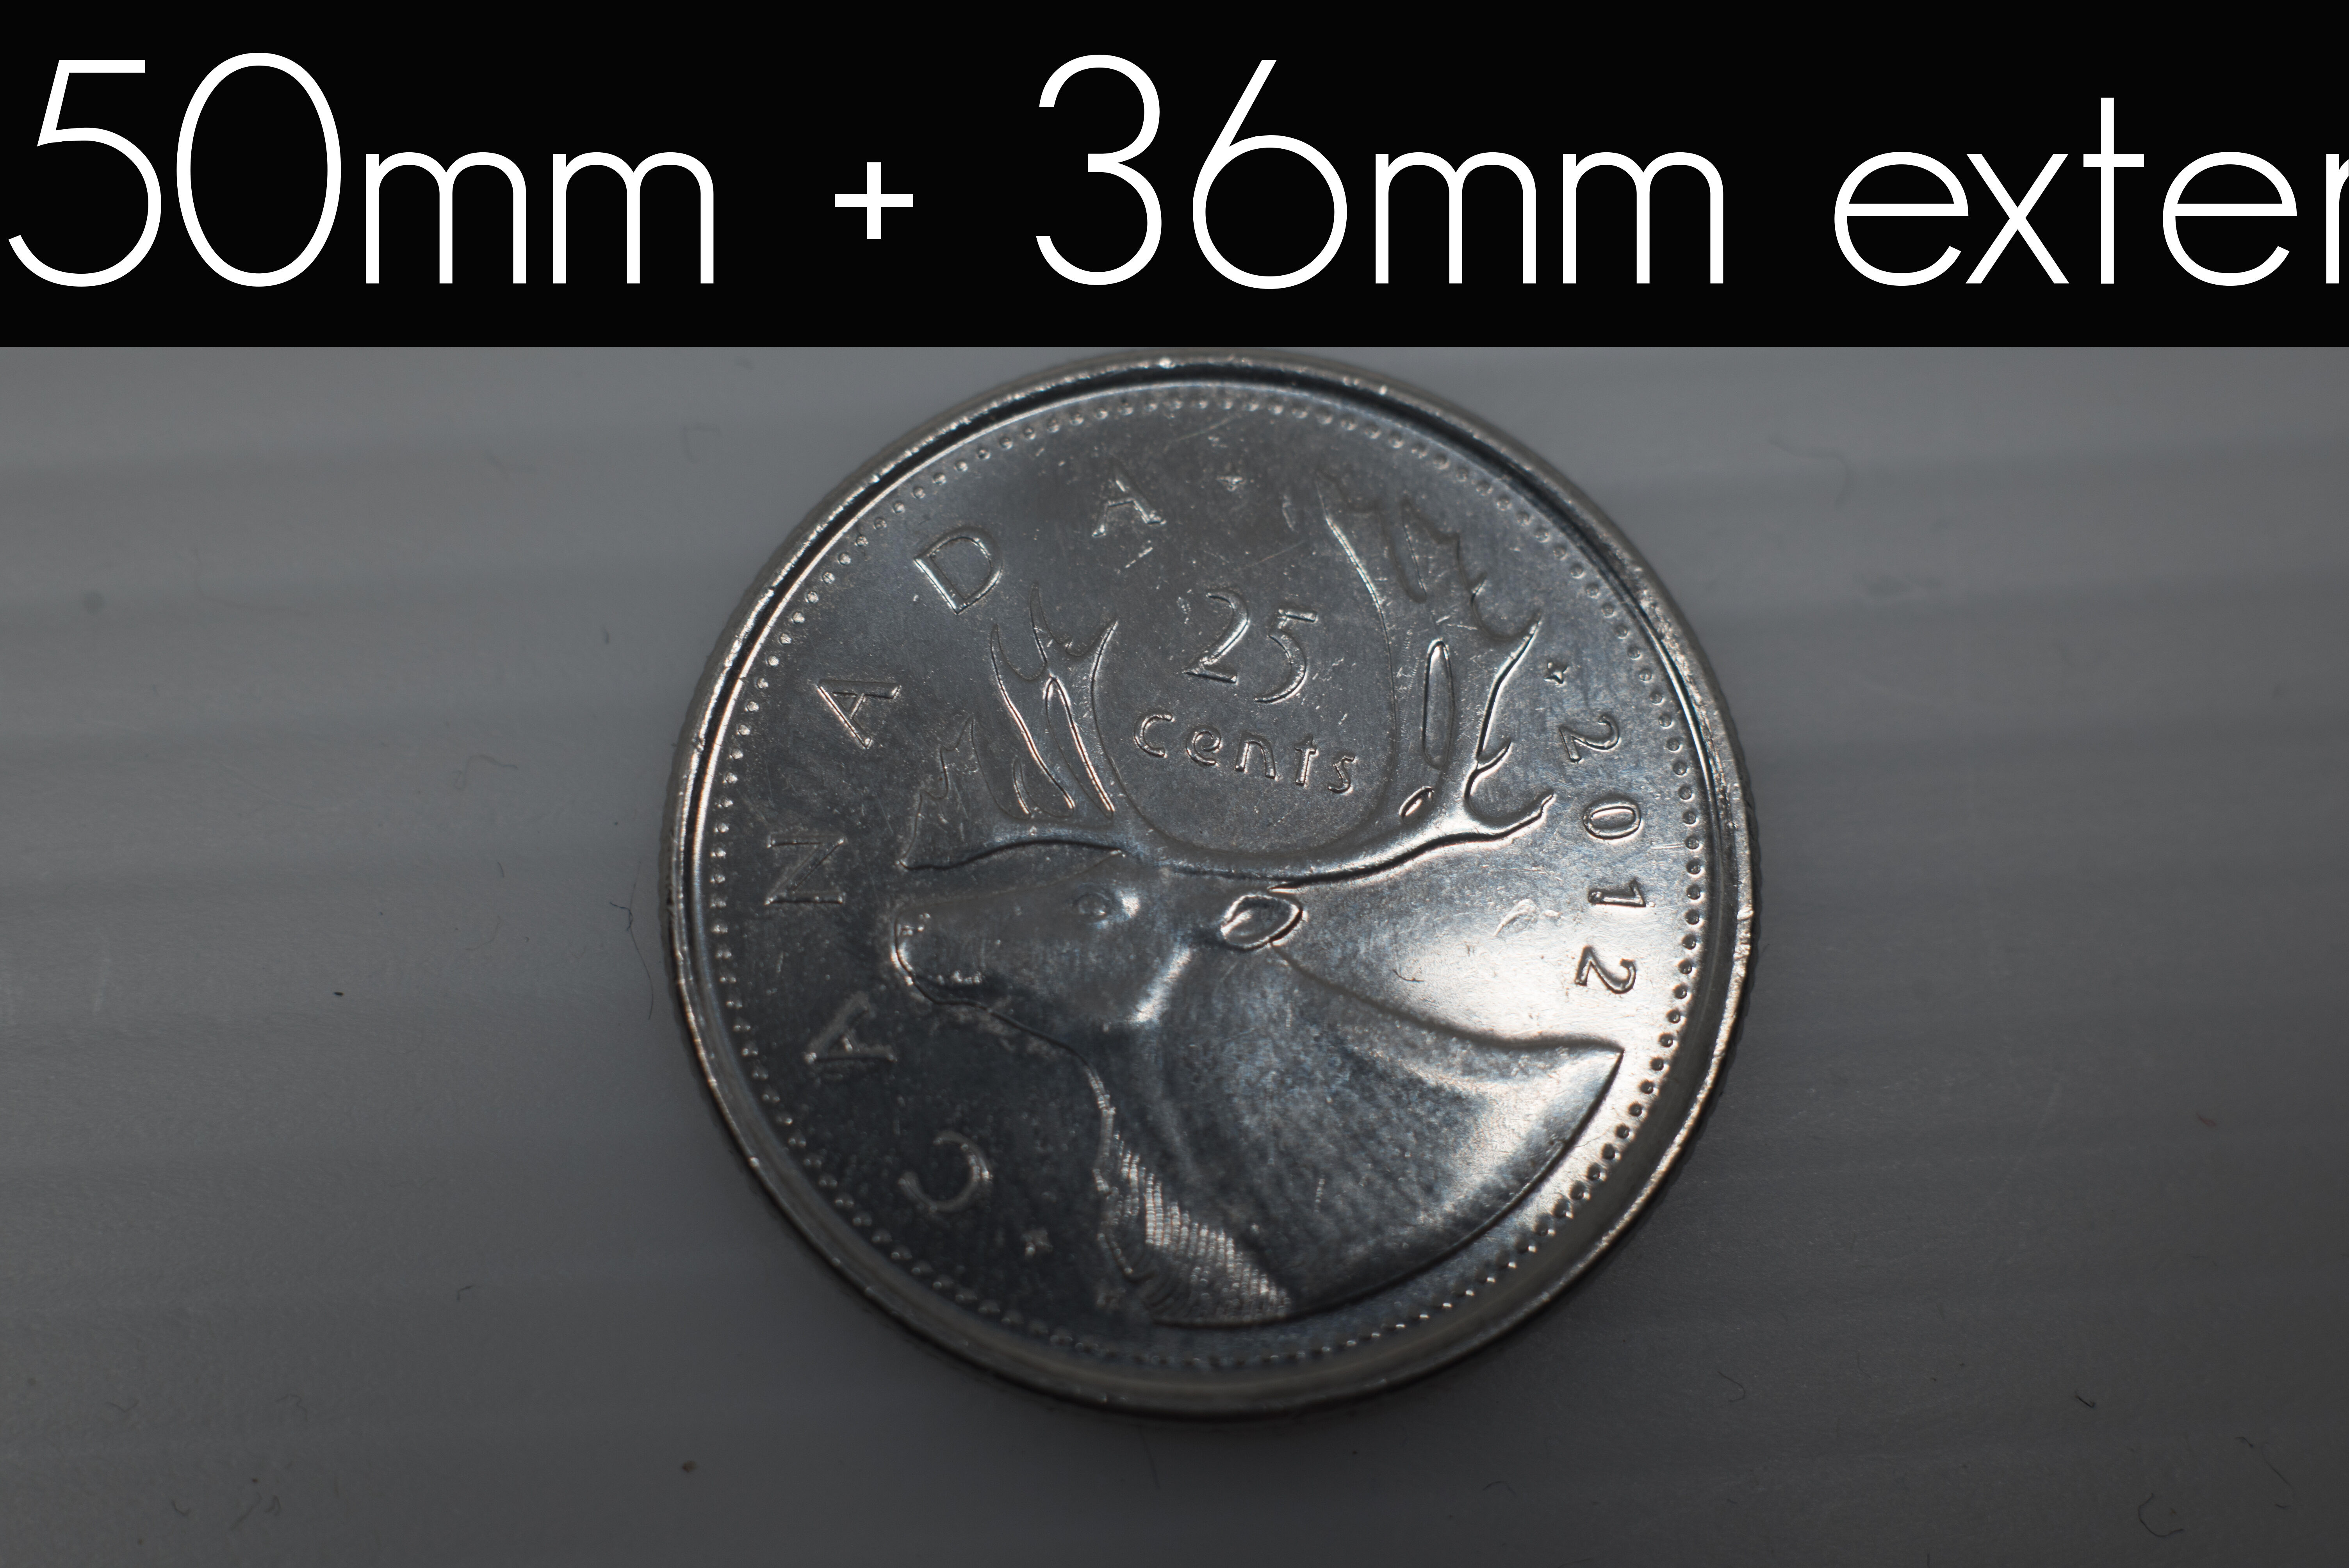
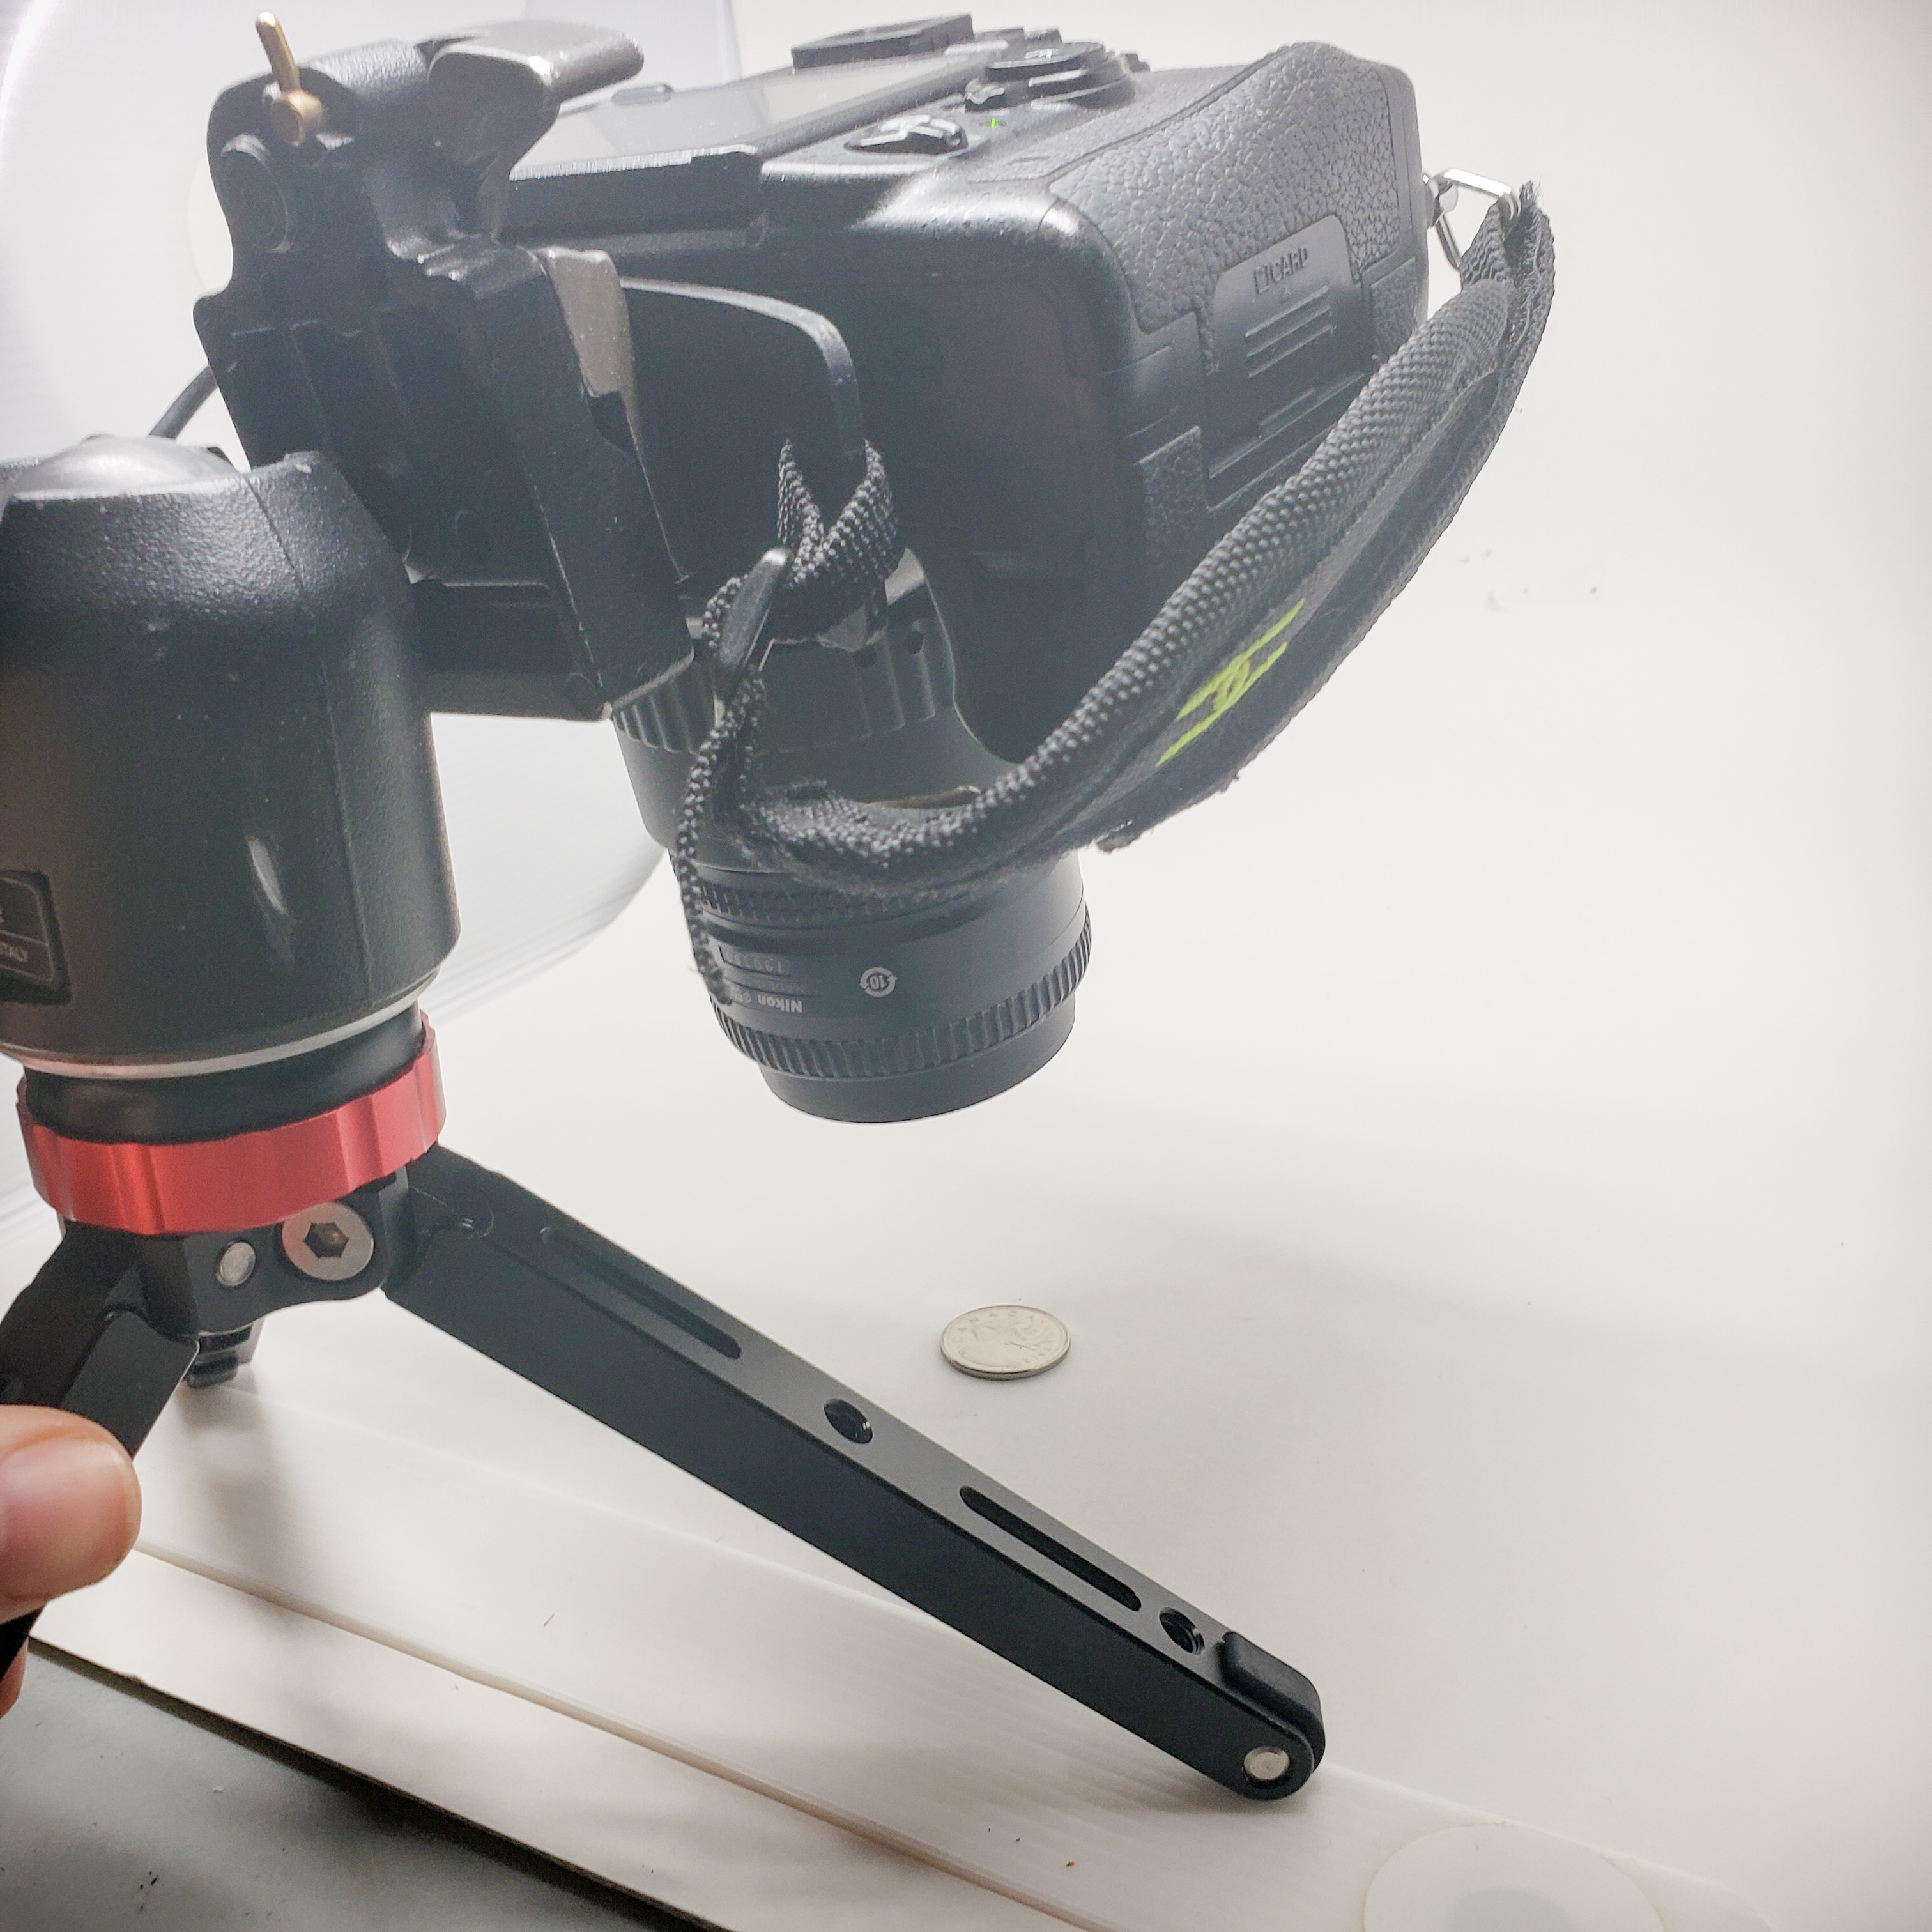
50mm lens with 36mm extension tube
This shot was also taken at f5.6, with the 36mm extension tube between the 50mm lens and the camera. The quarter is even closer than with the previous tubes, as expected. I have to get the lens pretty close to the quarter (approx 9cm). The quarter is still pretty sharp and in focus. The quarter looks much different with the lighting because the camera is almost completely overhead from the quarter, as opposed to at an angle from it.
Here’s what the 50mm looks like with the 36mm extension tube attached (and how close we can get):
50mm lens with all extension tubes
Here we have the 50mm with 12mm+20mm+36mm. If my math is correct, that’s 68mm equivalent extension tube. The quarter appears closer than 1:1, and is fairly quite in focus with a decent depth of field.
Here’s what the 50mm looks like with all tubes connected (and how close we can get):
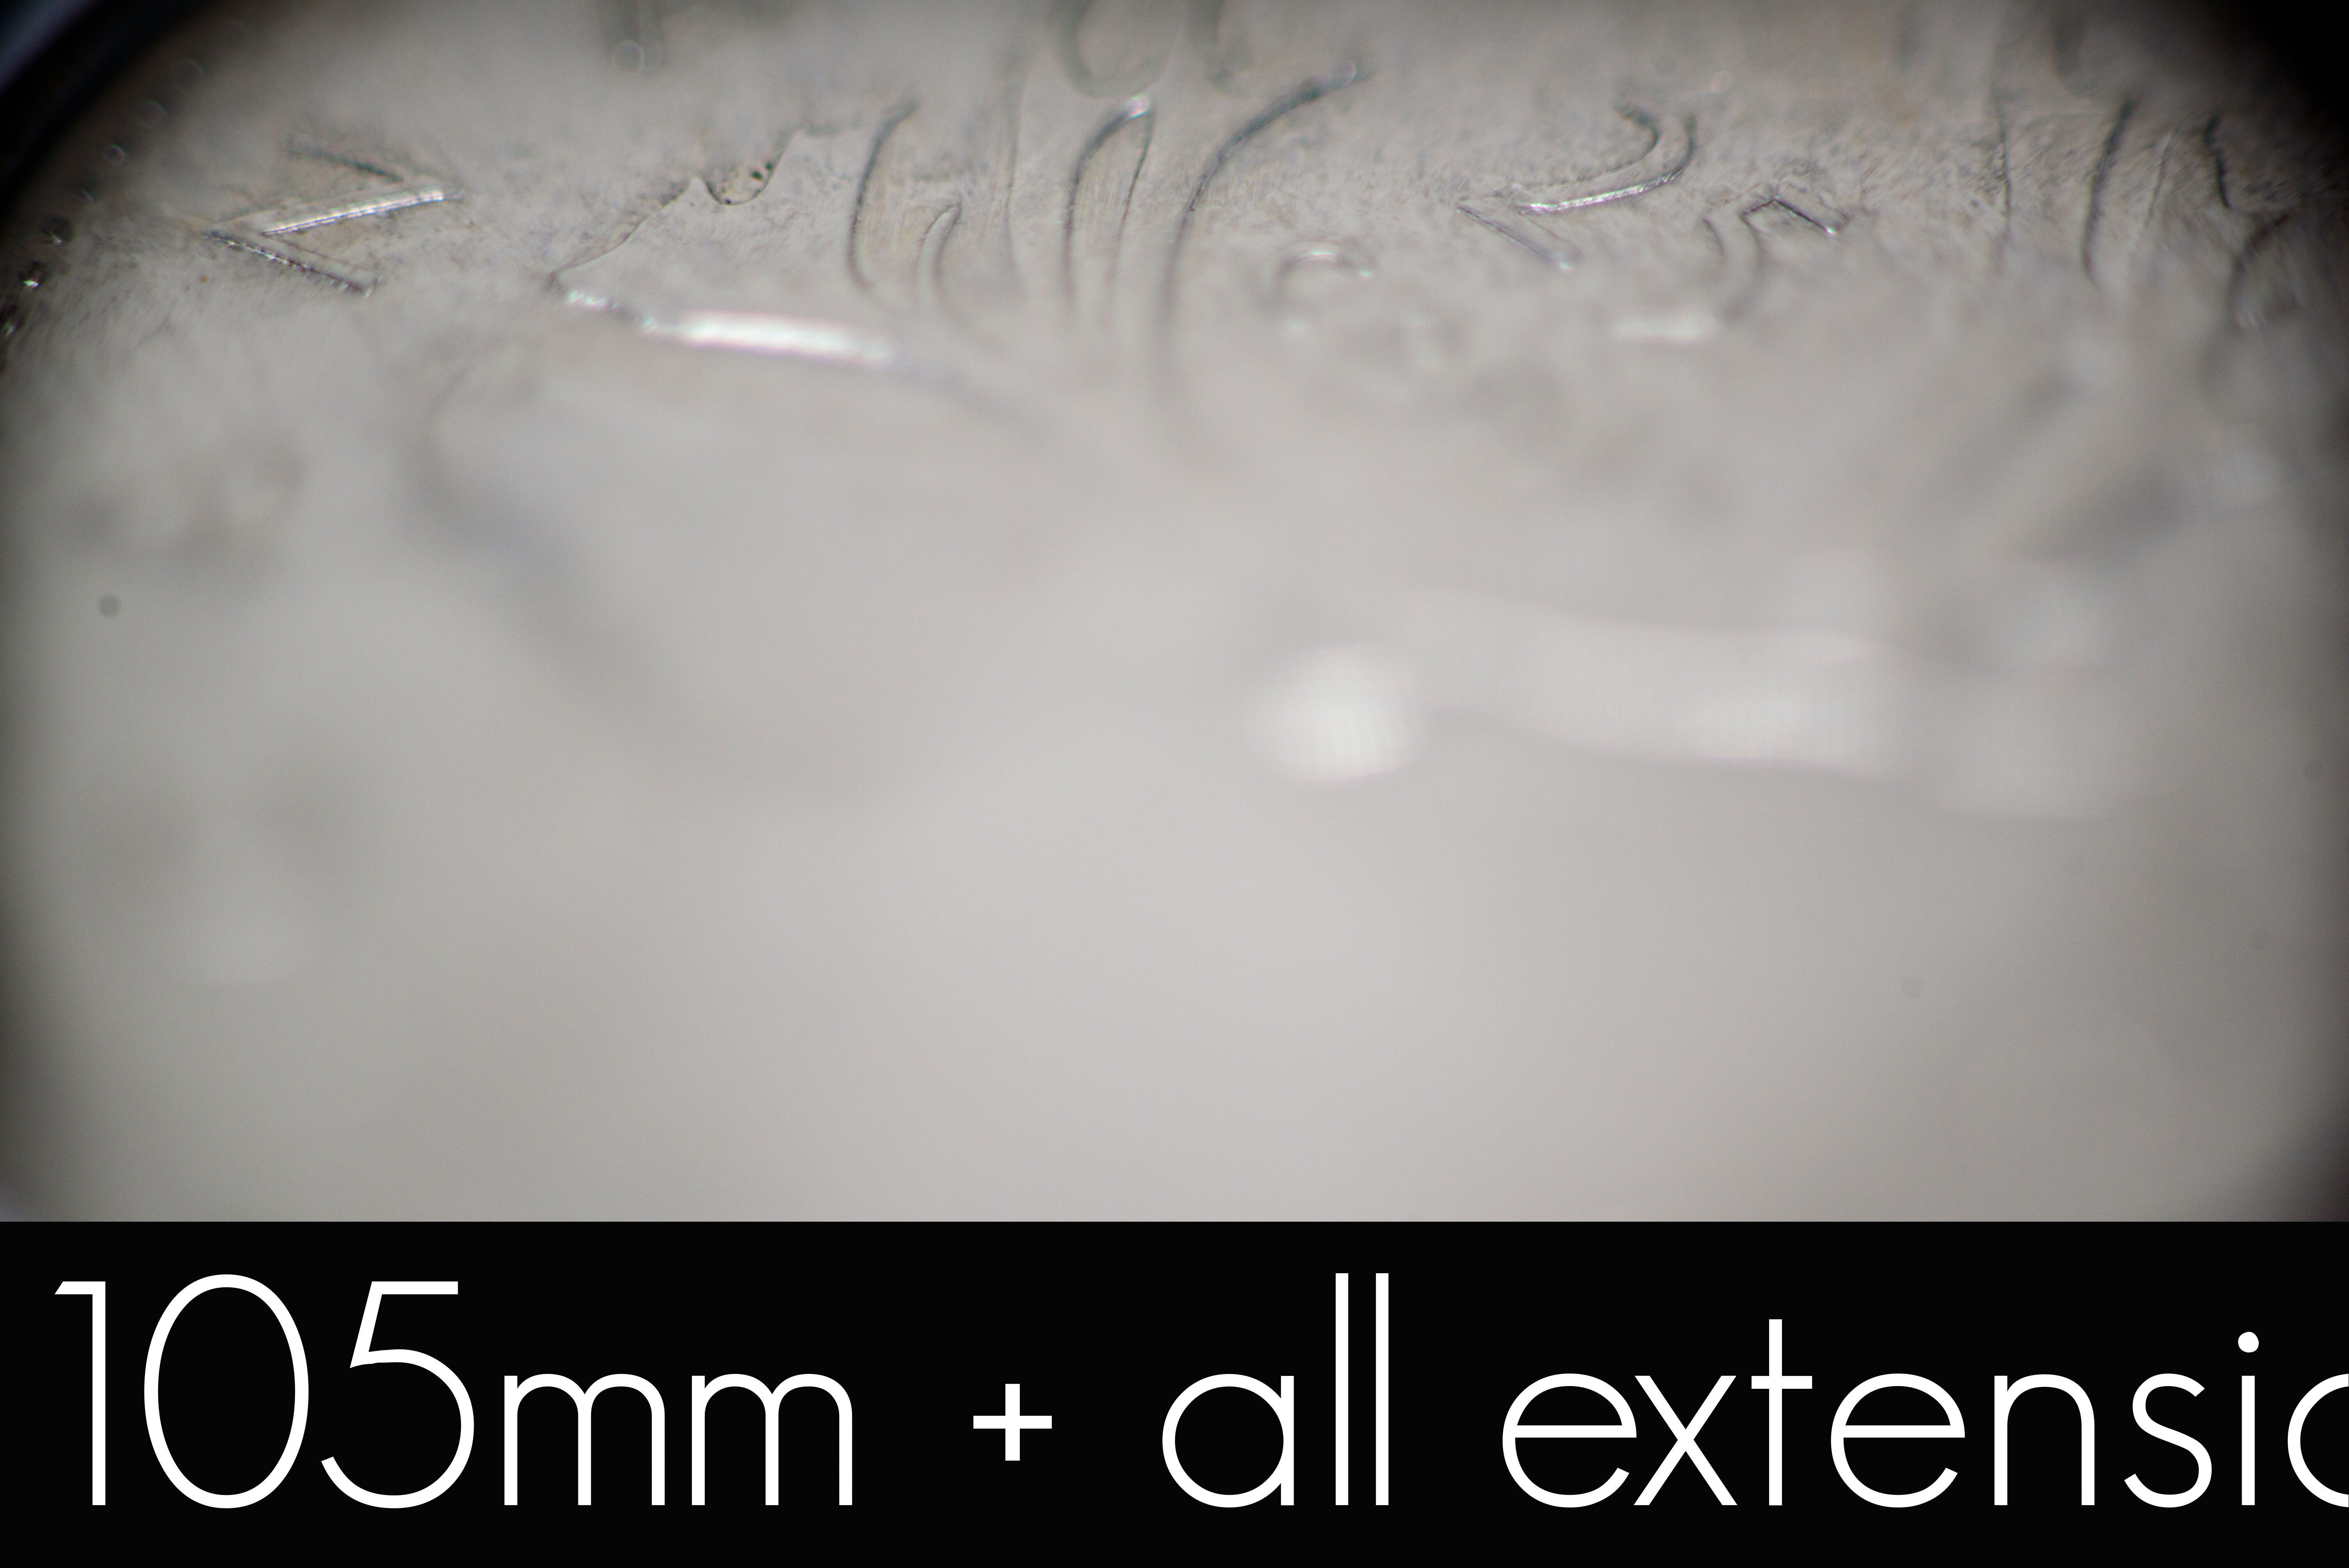
105mm macro with all extension tubes
Now the real reason I bought the extension tubes was to use with the macro lens. (I bought the macro lens much earlier than the tubes). So here’s what that looks like at f5.6. It’s definitely closer than 1:1, but with a very narrow depth of field. Depending on what you are trying to achieve with your photo, this narrow DoF could be good or bad.
Bonus shots
Now that we covered what we set out to do, let’s look at some photos outside the parameters we have set out for this experiment.
Since the 105mm with all extensions is super narrow depth of field, I wanted to try with different aperture settings. The 105mm macro is able to stop down to a whopping f57 (many lenses only stop down to about f22, for example).
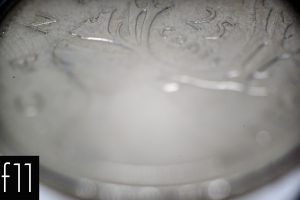
Here are some of the various other aperture settings. The aperture setting is captioned in the photo.
At f11 the depth of field is quite a bit larger than at f5.6, as more of the quarter is now in focus.
At f22, even more of the quarter is in focus (wider depth of field), and the image is still pretty sharp. But even at f22, only about half the quarter is in focus.
At f57, the smallest aperture the macro lens will go to, the quarter is mostly in focus, and still reasonably sharp. Even at this setting, you’ll see the bottom of the quarter is out of focus. And at this aperture setting, you will definitely see any dirt on your sensor or lens!
Conclusion
I know I said this wasn’t a review, but here are some thoughts. Using macro lenses or using normal lenses with extension tubes are both means to get decent macro photographs. The Nikon macro 105mm lens is relatively expensive, but a phenomenal lens not only for macro photography, but also great for things like portrait photography, with it’s sharp and fast f2.8, with VR (vibration reduction). I have no experience with other macro lenses, but the Canon macro lens also seems to be a great lens. (See comparison at DXOMARK)
Non-macro prime lenses, in particular the Nikon 50mm f1.8 (or Canon’s f1.8), are quite inexpensive, are very sharp, and good alternative for macro shooting when using extension tubes (and even with combined cost, will cost you less than a top end macro lens). You can also use other lenses, such as your camera’s kit lens, but the results probably won’t be as sharp. The f1.4 (or Canon f1.2) are even sharper, but they are at least double the price of the f1.8, so I would not recommend those if price is a concern.
If you just want to play with macro photography without a huge commitment – I would recommend you start with extension tubes. It’s fun, and the results can be quite good.
If you are looking to do macro photography more professionally, looking to get wider control of depth of field, or you are looking to also get a good portrait lens, I would recommend investing in the 105mm macro lens (or 100 if you are shooting Canon). Or even invest in both macro and extension tubes – the additional cost is negligible at that point!
Note, I have not tested the other macro lenses available for Nikon, since I don’t own them. My decision to buy the 105mm was as stated above – it is well reviewed and a great portrait lens. The reviews for the other macro lenses, such as the 40mm and 60mm, note that they aren’t true 1:1, so they don’t get the same level of close-up as the 105mm. For a good overview of the various macro lenses, visit Ken Rockwell’s article here.
And somewhat related thoughts…
Related discussion topics that we haven’t discussed yet are tethering (hooking up your camera to a computer or tablet) and focus stacking. I started doing these tests tethering my camera to my computer using Adobe Lightroom 6, but it was having difficulty finding my camera between lens configurations, so I tried out another app called “ControlMyNikon”. It’s my first time using it (trying the trial), but so far I love it. Unlike Lightroom, you can do live preview, which helps you focus better, and allows you to do other advanced things like focus stacking (I’ll do a future blog post on this), HDR photos, etc.
All that to say, look for future blog posts on tethering and on focus stacking.
I took an Elinchrom D-Lite 4 with a big beauty dish and gold reflector, put it on a boom arm on a C-stand, and had it camera right. It was quite a distance from the model, so I cranked it to full power (400w/s).
I put a Nikon SB900, put it on a light stand with Honl grid, and zoomed it to 200mm. It was quite close, so I powered it on manual to low power (1/64 or 1/128). The SB900 was set to SU-4 mode, so it would fire when it saw the Elinchrom fire.
The camera was set to ISO 100, 1/200sec, f11. I think the Elinchrom metered at f8, but if I had listened to my light meter I would have overexposed the background and the punchiness of the light I think is just right.
There was minimal editing of the photo, just a horizontal crop and a slight change to the white balance.
I just installed Lightrrom 4, and figured I’d give it a quick test. I found a photo that I took last year that was quite underexposed, to see what I can do with it. Right off the bat, when I made the process update to the LR4 “2012 process”, the photo was instantly much better. The ability to use the adjustment brush to selectively add noise reduction (to her skin tones only), and highlight and shadow adjustments (to the brick), in my opinion, make the photo much more pleasing. There aren’t many functional differences between LR3 and LR4, but my first impressions is that the technical aspects (the “algorithms”) used by LR4 is going to make my photos better and improve my workflow.
You’ve probably heard the term “depth of field” before, but like many photographers, it may be a concept hard to visualize. I find the best way to understand things is by example, so here it goes.
Before we get to the example, let’s talk theory. Some of this I’ve already discussed, so please forgive the repetition. When the aperture (that’s the opening) of your lens is very wide, it lets in a lot of light. A wide aperture confusingly is given a small “f-stop” number, such as f1.4 or f2.8. When the aperture is very narrow, it lets in less light. This is given a larger f-stop number, such as f22 or f30. And there’s a whole slew of f-stop ranges in between ranging from wide open to almost completely closed.
A wider open aperture lets in more light, and therefore the shutter doesn’t need to be open as long as when you have a narrow aperture. This means to take the same exposure of the same photo, you will need to have a very slow shutter speed for a narrower aperture. Faster is better because you can hand hold the camera to take photos, and capture high speed action, right? Well that’s technically true, but there’s another factor in play here : depth of field.
A wider open aperture (e.g. f1.4) has a narrower depth of field. A narrow depth of field means things that you aren’t focusing on are blurry.
A narrower aperture (e.g. f22) has a much wider depth of field, meaning more of your composition will be in focus.
These facts are neither good nor bad – they just are.
Sometimes you want a wide depth of field, such as when you are doing landscape photography and you want the foreground and the background all in focus. Since you want a very narrow aperture, exposure time will be longer, so you’ll probably be using a tripod.
Why wouldn’t you always want as much as you can in focus, and use this wide depth of field? Many point and shoots try to give you as much depth of field as possible. In my opinion, this is not usually desirable.
When taking portraiture, a narrow depth of field helps isolate the subject, the person, from the background. If the background is tack sharp, that could distract from the subject that you are trying to focus on. Many beginner photographers try to get as much information in the scene, but this in the end makes for a boring scene. Simplicity and focus on the subject usually wins out. If you don’t believe me, take a look at the best photojournalism photos (e.g. http://www.boston.com/bigpicture/)
More expensive lenses are expensive because they are faster, which is another way of saying they have a wider aperture (or smaller f-stop number – this is confusing at first, I know).
One more thing – depth of field is not only controlled by the size of your aperture, but by your distance from the subject. The closer you are, the narrow the depth of field.
You can even use your eyes to prove this one out. Focus on something very close to you, and everything else (including things relatively close) is blurry. Focus on something farther away, and more objects are in focus.
Okay – as promised, here are some examples to illustrate how the aperture controls the depth of field. I’m focusing on something fairly close to the lens, and note how the narrower the aperture, the more in focus the background building becomes. You can hopefully see how this can be used for creative control – neither the in focus nor the out of focus photos are better or worse than each other, they just produce a different outcome.
I am eventually going to post some pictures to depict what depth of field means and how to use it creatively, but I stumbled upon this great link that illustrates the point as well as I can explain it. Enjoy!
For real estate, commercial, and architectural photography, you want to start with a high quality wide angle lens. You may also need a camera that is capable of doing high ISO, and you may need to supplement the environment with additional lighting.
Although you can certainly take and present decent straight-out-of-the-camera photographs for a client, but you will most likely get a better product by using professional post-processing techniques via Photoshop and various plug-in filters.
Here’s a recent photograph taken for a client. Here’s the “before” picture. Click on the image to see it close-up.
Before Processing
Although it’s a perfectly fine image, you’ll see after we touch up the lens flare, add some sharpness and detail to the image, and colour correct the photo, I think you’ll agree that the photograph stands out more. Click on the image to see it close-up.
After Processing
Here’s a summary of what was done in this example:
Cleaned up lens flare in Photoshop
Reduced noise in Lightroom
Added detail and sharpness in Photoshop
Corrected white balance in Lightroom
Removed television images (95% removal) in Photoshop
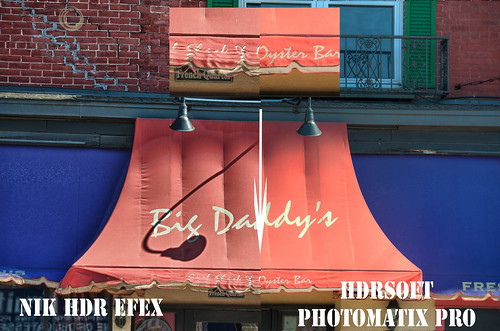
In my previous comparison of HDR Efex versus Photomatix, I indicated that I preferred the HDR Efex as it has a simpler and more effective workflow.
One area where Photomatix is clearly better is when there is movement in the image, which could cause “ghosting” in the HDR image.
These sample images were taking using the same 5 bracketed exposures. The HDR Efex had the adaptive ghosting setting enabled, whereas the Photomatix had the semi-manual ghosting setting used.
As you can see, aside from different appearances based on settings used (which has no effect on the appearance of ghosting), the HDR efex version has some serious ghosting at the bottom of the verandah. (Not sure if that’s the technical term).
Although normally I prefer using HDR Efex for its simple workflow, there are situations such as when there is motion where Photomatix Pro excels.
Call me a cheap b%st%rd, but I don’t want to invest $200+ to get the Nikon GPS unit, which to me is just a luxury.
I did some research (read: Google), and found a way to inject GPS data from my iPhone.
The work flow to accomplish this is the following:
– Start up an application on the iPhone called RunKeeper
– Take pictures
– Stop application
– Upload photos to Lightroom on PC
– Download GPS information from RunKeeper.com
– Use jFriedl’s GPS application to tie in the GPS coordinates with the photos
RunKeeper is a free iPhone app.
jFriedl’s GPS app has a free trial, and continues to work for free with some limitations. (It’s donationware, so it is inexpensive if you decide to use the full functionality.)
The great thing is that as long as your phone and camera’s clocks are in sync, you can keep the application running on your phone and it will keep track of where you were and at what time you took your photos.
This is my first attempt, so I am not sure how much of an impact running the GPS on the iPhone is on the iPhone battery.
First you need to log into the Runkeeper.com website (free to use), and download your GPS history – a .GPX file
The jFriedl plugin is activated by selecting all photos taken while you ran the Runkeeper application.
Browse for the GPX file that you downloaded to your computer.
I had to use GMT time as the time zone, as it seems that Runkeeper stored the history in GMT timezone (configurable?)
Click on the commit button, and the GPS coordinates get synced into the photo’s metadata, and gets updated with Flickr.
I tested the accuracy of the GPS coordinates, and it was bang on.
Obviously this workflow is pretty handy for photowalks, but I’ll have to see how long my iPhone lasts for. It’s a pretty involved workflow if you are intending to only GPS tag one photo – it would probably be easier to use Google Maps or the Flickr location tool
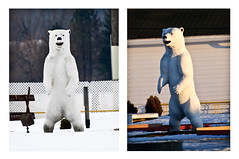
It’s been a while since I blogged, and this entry will be short, but important.
The quality and direction of light has a huge impact on the final product.
These photographs of the same polar bear look quite different.
The first photograph was taken with diffused lighting (cloudy conditions) late morning.
Note the image looks quite two-dimensional, almost like a cardboard cutout.
The second photograph was taken in less cloudy conditions, at the end of the day with very directional light.
The light in the second photograph has a warmer colour to it, and the directional harsh nature of the light creates shadows that gives the second photograph a sense of dimension and shape.
We are three dimensional creatures – we experience the world around us in three dimensions, however photographs are two dimensional. Adding shadows to our subject allows the viewer to identify the dimension and texture of the subject.
Light and shadow isn’t always a good thing; harsh shadows aren’t always flattering for human subjects, and usually a cloudy day, such as in the first photograph, would be more aesthetically pleasing on a person.
We can’t control natural light, but we can be aware of weather conditions and the type of light we can expect at different periods of the day.


")
")